
Are you in need of changing the ADF cover on your Brother printer? Don’t worry; we’ve got you covered! In this guide, we will walk you through the steps on how to open ADF cover brother printer.
Opening the Automatic Document Feeder (ADF) cover on a Brother printer is essential for troubleshooting paper jams or clearing debris that could affect print quality. The ADF is designed to hold multiple pages and feed them into the printer for efficient scanning and copying. However, like any mechanical device, it may require periodic maintenance.
This guide will walk you through the straightforward steps to safely open the ADF cover, ensuring you’re prepared to address any issues that may arise during your printing tasks.
What Will You Need?
- Your Brother printer model number
- A clean lint-free cloth or cotton swab
- Isopropyl alcohol (optional)
- Tweezers (optional)
Once you have gathered all the necessary components, let’s open your Brother printer ADF cover.
10 Easy Steps on How to Open ADF Cover Brother Printer
Step 1: Turn off Your Printer
Before you begin opening the ADF cover, it is crucial to turn off your Brother printer. Powering down the device helps prevent any accidental movement of the printer components, which could potentially lead to injury or further mechanical issues. Unplug the power cord from the electrical outlet to ensure a complete shutdown.
Wait for a few seconds to allow any residual power to dissipate before proceeding to the next step. This precaution protects you while working on the printer and ensures that the internal electronics are safe from any unintended short circuits during maintenance.
Step 2: Locate the ADF Cover
The next step involves identifying the ADF cover, which is typically on top of your Brother printer. Most Brother printers feature a distinctive ADF design, making them easier to spot. Look for a rectangular lid with a slight lip or indentation, indicating that it can be lifted or opened. Depending on the model, the ADF cover may be clearly labeled, or you might see an icon signifying its function, such as an image of stacked documents.
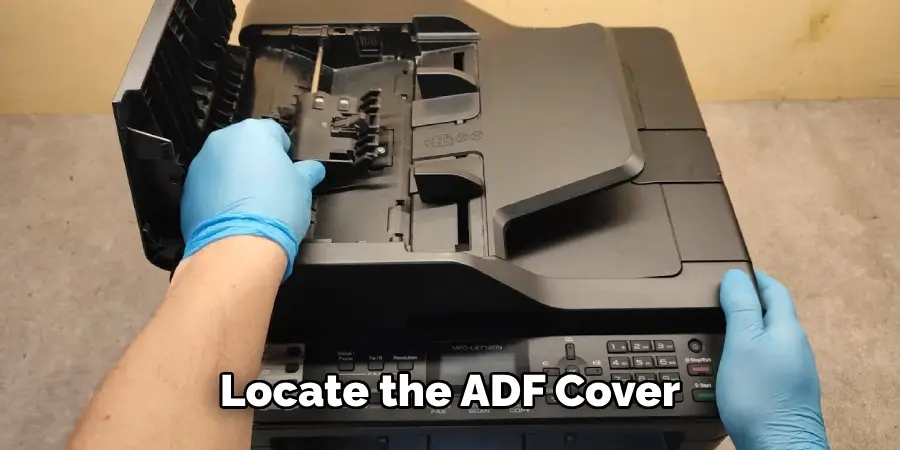
If you’re having trouble locating it, refer to your printer’s user manual for specific diagrams or descriptions. Understanding your printer’s layout will ensure a smoother experience as you proceed with the maintenance task, allowing you to efficiently access the feed rollers and scanning areas when you open the ADF cover.
Step 3: Open the ADF Cover
Now that the printer is turned off and you’ve located the ADF cover, it’s time to open it. Gently lift the ADF cover by grasping the lip or indentation you identified in the previous step. Be cautious and apply even pressure to avoid damaging the hinges or the cover itself.
Depending on your model, tabs or latches may need to be released before the cover can be fully opened. If you encounter any resistance, double-check for any locking mechanisms that may be in place. Once the cover is open, you’ll have access to the ADF feed rollers and the interior components, allowing you to inspect for any obstructions or debris that need to be addressed.
Step 4: Inspect for Paper Jams or Debris
With the ADF cover open, take a moment to carefully inspect the feed rollers and the interior area for any signs of paper jams or debris. Look for crumpled paper, torn pieces, or any foreign objects obstructing the feeding mechanism. If you find any stuck paper, gently pull it out toward the paper path to avoid damaging the rollers.
For any debris, you can use a clean lint-free cloth or cotton swab dampened with isopropyl alcohol to wipe the rollers and other accessible parts. It’s essential to keep these components clean as dirt, dust, or paper residue can lead to future jams or scanning issues.
Step 5: Clean the ADF Feed Rollers
After inspecting for any jams or debris, cleaning the ADF feed rollers is essential to ensure optimal performance. Using the lint-free cloth or cotton swab that you prepared earlier, gently wipe the surface of the rollers to remove any dust or residue.
If you’ve chosen to use isopropyl alcohol, ensure that the cloth or swab is only slightly damp to prevent excess liquid from dripping. Rotate the rollers manually to access all surfaces, and be sure to clean both the top and bottom rollers if applicable.
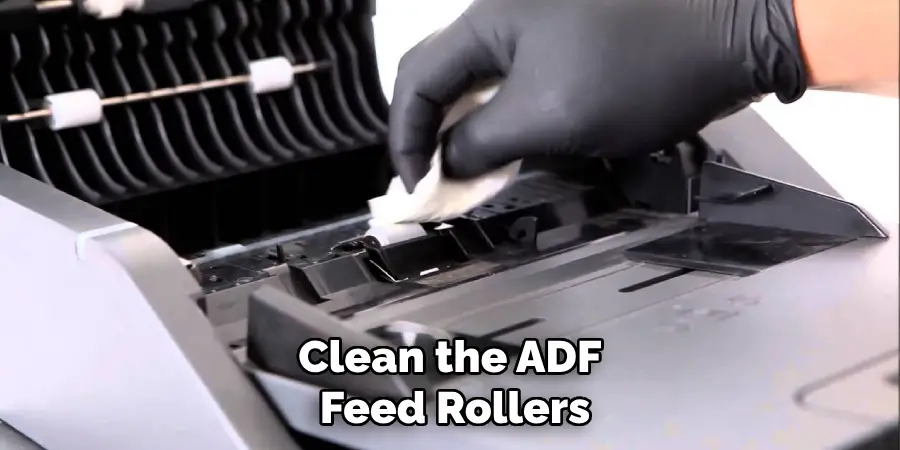
Properly maintaining these components will enhance the printer’s ability to feed paper smoothly and reduce the risk of jams in future printing tasks.
Step 6: Check for Damage
Once you have cleaned the ADF feed rollers, it’s essential to check for any signs of damage to the components inside the ADF. Examine the rollers and the surrounding area for wear, cracks, or other issues that may impede functionality. If you notice any damage, it may be necessary to replace the affected parts.
Consult your printer’s user manual for information on obtaining replacement parts and follow the manufacturer’s guidelines to ensure proper installation. Addressing any damage promptly will help maintain the printer’s performance and extend its lifespan.
Step 7: Close the ADF Cover
After ensuring that the ADF feed rollers are clean and undamaged, it’s time to close the ADF cover securely. Gently lower the cover back into position, ensuring it aligns properly with the printer body. If your model has any tabs or latches, ensure they snap back into place to lock the cover, as this will help prevent it from opening unintentionally during use.
Take a moment to check that there are no gaps or misalignments after closing the cover, as a secure fit is crucial for the ADF to function correctly during scanning and printing tasks.
Step 8: Power On Your Printer
Now that the ADF cover is securely closed, it’s time to power on your Brother printer. Reconnect the power cord to the electrical outlet and press the power button to turn the printer back on. Wait for the printer to complete its startup sequence, which may take a few moments as it initializes.
Once the printer is on, watch the display panel for any error messages or alerts indicating that the ADF cover may not be adequately secured, which can affect functionality. If everything appears normal, you are ready to test the ADF to ensure it is operating correctly.
Step 9: Test the ADF Functionality
To ensure that the Automatic Document Feeder (ADF) is functioning correctly after maintenance, it’s essential to perform a test run. Place a small stack of documents in the ADF tray, ensuring they are aligned correctly and within the specified capacity limits. Select a simple copy or scan job from your printer’s menu and observe how the ADF handles the documents.
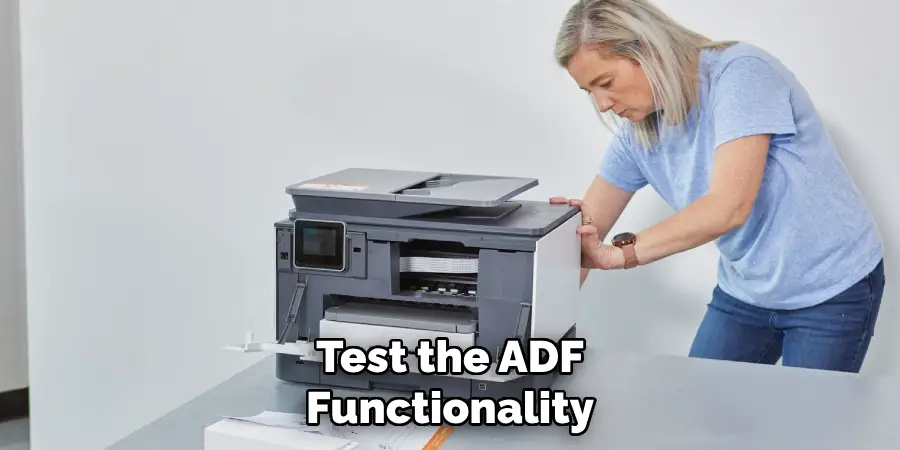
Pay attention to whether the pages feed smoothly without any jams, and listen for unusual sounds that may indicate an issue. If the papers are scanned or copied without problems, you can be confident that your maintenance tasks have succeeded. If you are still experiencing issues, consider revisiting the previous steps or consulting your user manual for further troubleshooting tips.
Step 10: Maintain Regular ADF Care
To ensure the longevity and reliable performance of your Automatic Document Feeder (ADF), it’s essential to establish a routine maintenance schedule. Aim to clean the ADF feed rollers and inspect for debris at least once every few months or more frequently if you notice any performance issues.
Additionally, keep the area around your printer free of dust and clutter, which can contribute to component wear and tear. Regular maintenance enhances functionality and can prevent potential problems down the line, ensuring that your printer remains in optimal working condition for all your document-handling needs.
By following these simple steps and incorporating regular maintenance into your printer care routine, you can keep your Brother printer’s ADF functioning smoothly and efficiently.
5 Things You Should Avoid
- Forcing the ADF Cover Open: Avoid using excessive force to open the ADF cover, as this can lead to damage of the hinges or internal components. If the cover does not open easily, double-check for any locks or tabs that must be released first.
- Neglecting to Power Off the Printer: Never open the ADF cover while the printer is powered on. This can interfere with the internal mechanisms and increase the risk of electrical shock or damage to the printer.
- Ignoring Safety Precautions: Always ensure your hands are clean and dry before touching the ADF cover and its internal components. Oils or debris from your hands can impact the rollers’ and other parts’ function and longevity.
- Attempting to Open with Obstructed Access: Avoid opening the ADF cover if the printer is in a cramped or cluttered space. Ensure ample room to access the cover easily, as tight conditions can complicate the process and cause unintended damage.
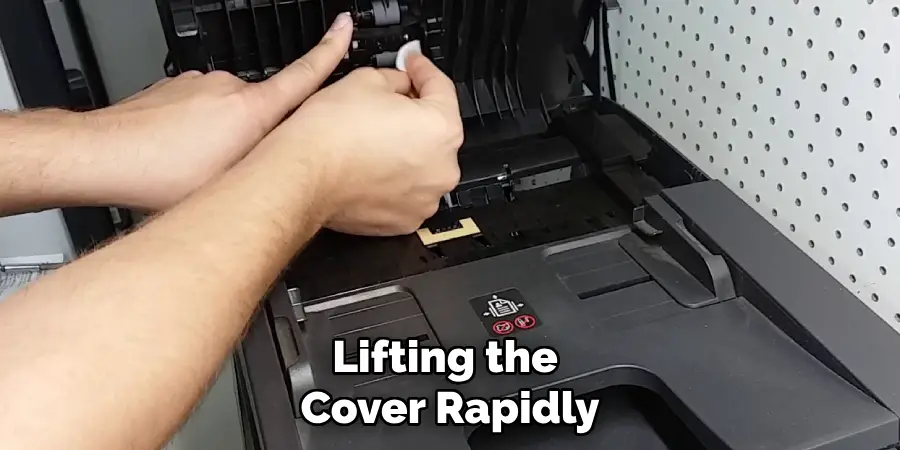
- Lifting the Cover Rapidly: Don’t lift the ADF cover abruptly or without caution. A sudden movement can lead to misalignment or damage to the hinges, so opening it smoothly and carefully is essential.
By being mindful of these cautions, you can help prolong the life of your Brother printer and its Automatic Document Feeder functionality.
Conclusion
In conclusion, opening the ADF cover on your Brother printer is a straightforward process that requires careful attention to detail and proper maintenance.
By following the outlined steps on how to open ADF cover brother printer—checking for locks, ensuring the printer is powered off, and handling the components gently—you’ll not only gain easy access to the ADF but also help maintain its performance and longevity. Regular inspections and cleaning and avoiding common pitfalls will keep your printer functioning optimally.
With these guidelines, you can confidently manage your document-handling tasks and extend the lifespan of your Brother printer’s Automatic Document Feeder.