Refinishing a cherry wood desk is an effective way to restore its natural beauty and ensure its longevity. Over time, desks can show signs of wear and tear, including scratches, faded finishes, or stains. By taking the time to refinish the desk, you can renew its appearance and even customize it to better match your style or decor.

This guide explores the key aspects of how to refinish cherry wood desk. This process requires proper tools, patience, and attention to detail to achieve the best results.
Common Signs That Your Cherry Wood Desk Needs Refinishing
Over time, even the most well-maintained cherry wood desks can exhibit signs of aging and wear. Here are some common indications that your desk may benefit from refinishing:
- Scratches and Dents – Everyday use can lead to surface scratches, minor dents, or gouges in the wood, detracting from its smooth finish.
- Faded or Worn Finish – Exposure to sunlight, moisture, or general wear can cause the finish to fade, dull, or peel, leaving the surface looking uneven and tired.
- Stains or Discoloration – Spills and other mishaps can result in unsightly stains or discoloration that are difficult to remove with regular cleaning.
- Visible Water Damage – White rings, warped areas, or darkened spots from water exposure are clear signs that refinishing is necessary to restore the desk’s appearance.
- Rough or Dry Surface – If the wood feels rough to the touch or has become dry due to a lack of protective finish, it’s time to rejuvenate the desk with a new layer of stain or varnish.
Addressing these signs promptly will help preserve the natural beauty of your cherry wood desk and prevent further damage.
10 Methods How to Refinish Cherry Wood Desk
1. Assess the Desk’s Condition
Before starting the refinishing process, it’s important to assess the condition of the cherry wood desk. Check for any visible scratches, dents, or stains, and determine whether the existing finish is peeling or faded. If the desk has a heavy build-up of dirt or grime, cleaning it thoroughly before starting the refinishing process is crucial.

This will give you a clear understanding of the necessary repairs and refinishing steps. Also, inspect the wood for any cracks or loose joints that may need attention during the restoration process. Understanding the desk’s condition will help you plan the refinishing procedure and determine which methods to use.
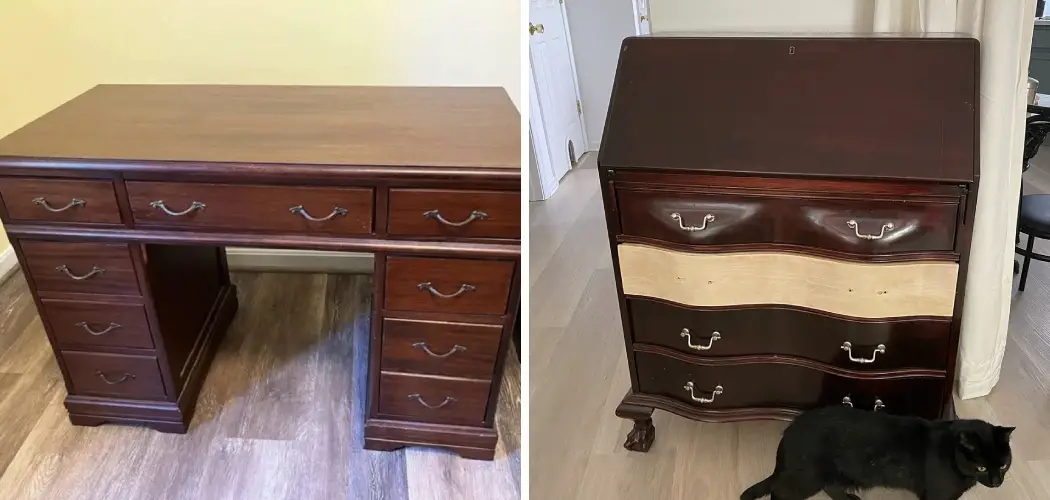
2. Remove Old Finish with Sandpaper
To begin refinishing, you will first need to remove the existing finish from the desk. This can be done by sanding the entire surface with medium-grit sandpaper (around 120-grit), followed by finer-grit sandpaper (220-grit). Start with the top surface, where most of the wear will be evident, and work your way around the edges, legs, and drawers.
The goal is to remove any existing stain, lacquer, or varnish to expose the raw wood. Sanding will also smooth out any imperfections, such as scratches or dents, giving you a clean surface to work with. Be sure to sand in the direction of the wood grain to avoid damaging the cherry’s natural texture.
3. Clean the Wood Thoroughly
Once the old finish is removed, it’s important to thoroughly clean the desk before moving forward. Use a tack cloth or a lint-free rag to wipe away the dust created by sanding. It’s also recommended to use a wood cleaner or mineral spirits to ensure the surface is free from any leftover residue or oils that could affect the new finish.
If necessary, clean the desk’s intricate parts, such as the drawer mechanisms or carved details, with a soft brush or toothbrush. This step ensures the wood is free of debris, creating a smooth surface for the new stain or finish to adhere to.
4. Repair Any Damage
Before applying a new finish, inspect the cherry wood desk for any cracks, gouges, or holes. If you find any damage, such as deep scratches or small dents, fill them with wood filler. For cracks, apply wood glue and clamp the parts together to secure them while the glue dries. Once the filler or glue is dry, sand the repaired areas smooth with fine-grit sandpaper to blend them seamlessly into the surrounding wood.

If necessary, use a wood touch-up marker or stain to match the repaired areas to the natural color of the cherry wood. This step ensures that the desk will have an even and flawless finish when you’re done.
5. Stain the Cherry Wood for a Richer Hue
After sanding and cleaning, you can apply a cherry wood stain to enhance the natural color and grain. Cherry wood is prized for its ability to darken and develop a rich patina over time, so choose a stain that complements this characteristic. Apply the stain using a clean cloth or a brush, following the grain of the wood for a smooth, even application.
Wipe off any excess stain with a rag after a few minutes, depending on how dark you want the finish to be. You can also apply additional layers of stain for a deeper color, allowing each layer to dry before adding the next. Staining the wood will accentuate its natural beauty and bring out the depth of the grain.
6. Apply a Wood Conditioner
To ensure an even stain application, particularly on cherry wood, consider using a wood conditioner before staining. Wood conditioners help prevent uneven absorption of the stain, which can lead to blotches or streaks on the wood surface. Apply the conditioner according to the manufacturer’s instructions, and allow it to dry completely before proceeding with the staining process.
This step is particularly important when working with softwoods like cherry, as it helps to achieve a more uniform finish.
7. Choose the Right Finish: Varnish, Lacquer, or Polyurethane
After staining the desk, it’s time to choose a protective finish to seal and protect the wood. There are several finish options to consider, including varnish, lacquer, and polyurethane. Each has its advantages: varnish provides a durable, satin finish with a slightly amber hue, while lacquer gives a high-gloss, smooth surface.
Polyurethane is a popular choice due to its strength and resistance to scratches and water, providing a long-lasting finish. Choose the finish based on the look you want to achieve and the level of durability needed for your desk’s intended use. Apply the finish using a brush, and make sure to follow the wood grain during application to avoid streaks.

8. Apply Multiple Coats of Finish
For a smooth, durable surface, it’s important to apply multiple coats of finish. Allow the first coat to dry completely, then sand the surface lightly with fine-grit sandpaper (around 320-grit) to remove any dust or imperfections. After sanding, wipe the surface with a tack cloth to remove any residue before applying the second coat.
Repeat the process for each additional coat, making sure the finish is smooth and even. For a high-gloss finish, you may want to apply up to three or four coats of lacquer or polyurethane, allowing each coat to dry thoroughly before adding the next.
9. Polish the Desk for a Glossy Appearance
Once the final coat of finish has dried, you can polish the desk to enhance its gloss and give it a sophisticated look. Use a soft cloth and a wood polish or furniture wax to buff the surface, working in circular motions. Polishing helps to bring out the depth of the cherry wood’s color and adds a luxurious shine to the surface.
Be careful not to apply too much polish, as it can leave a greasy residue. A light, even layer is all that is needed to restore the desk’s natural luster and make it look freshly refinished.
10. Reassemble and Touch Up Any Final Details
After the refinishing process is complete and the desk is fully dry, reassemble any components that were removed during the restoration, such as drawer hardware, handles, or decorative elements. If the desk has intricate carvings or detailed moldings, carefully touch up those areas with a fine brush or a wood stain marker to enhance their beauty.
Inspect the desk for any areas that may need additional attention, such as missed spots of finish or uneven areas. Once everything is in place, your cherry wood desk will be ready for use again, looking as good as new or even better than before.

Conclusion
Refinishing a cherry wood desk is a rewarding process that restores the natural beauty and functionality of the furniture. By carefully following each step—from preparation and cleaning to staining and finishing—you can achieve stunning results that highlight the unique grain and rich hue of cherry wood. This meticulous approach ensures not only an aesthetically pleasing outcome but also prolongs the lifespan of the desk.
Follow these simple instructions outlined in this blog post about how to refinish cherry wood desk, and you’ll be able to get the job done with ease.