
Sanding cabinet doors with grooves can be a meticulous task, requiring patience and attention to detail to achieve a smooth, professional finish.
This process is essential for preparing the wood surface for painting or staining, ensuring the coating adheres properly and evenly. Due to the intricacies of the grooves, more than traditional sanding methods might be required, and specialized techniques or tools may be necessary to reach into the carved areas. Understanding the correct approach, materials, and strategies can significantly impact the outcome, whether refurbishing an old cabinet or finishing a new one.
In this guide, we’ll explore the step-by-step process of how to sand cabinet doors with grooves, providing tips and recommendations to simplify the task and improve your results.
What Will You Need?
Before you start sanding, gather all the necessary materials and tools to ensure a smooth and efficient process. Here’s a list of essential items that you’ll need for this project:
- Sandpaper: Depending on the condition of your cabinet doors, you may need both coarse and fine-grit sandpaper (60 to 100 grit for initial sanding and 150 to 220 grit for final finishing). Alternatively, you can use a combination of sandpaper sheets or rolls with an orbital sander.
- Applicators: To reach into the grooves effectively, you’ll need multiple types of applicators. These may include foam pads, sponges, small brushes, or even toothbrushes for tight corners.
- Sanding block: A sanding block provides stability and control while sanding, ensuring that you apply consistent pressure to the surface.
- Vacuum or dustpan: Sanding creates a lot of dust, so it’s essential to have a vacuum or dustpan nearby to keep the area clean and dust-free.
- Protective gear: Wear safety glasses and a mask to protect your eyes and lungs from dust particles while sanding.
- Chemical stripper or degreaser: If your cabinet doors have old paint or varnish that needs to be removed, you may need to use a chemical stripper or degreaser before sanding.
Once you have all the necessary materials and tools, you can start sanding your cabinet doors with grooves.
10 Easy Steps on How to Sand Cabinet Doors With Grooves
Step 1. Remove the Cabinet Doors
Begin by carefully taking off the cabinet doors from their hinges. This step is crucial as it allows for more maneuverability and ensures that you can access all areas of the door without obstruction. Use a screwdriver to remove the screws, keeping them in a labeled container to prevent loss and ensure easy reassembly.

Working on a flat, stable surface is advisable to maintain control and avoid any damage. Lay down a protective cloth or old sheet on your workspace to protect against scratches or dirt. Taking the doors off also allows you to check for any damages, such as cracks or loose joinery, that might need attention before beginning the sanding process.
Step 2. Clean the Surface
Before you start sanding, ensure the cabinet doors are free from dust, grease, and residue. Use a damp cloth or sponge to wipe down the surfaces, focusing mainly on the grooves where grime accumulates. Use a gentle degreaser or mild detergent to break down stubborn buildup, but rinse thoroughly with clean water afterward.
Allow the doors to dry completely to prevent clogging your sandpaper or applicators. This cleaning process not only prepares the surface for sanding but also helps reveal any hidden imperfections or areas needing special attention. Taking the time to clean thoroughly will enhance the effectiveness of your sanding and ultimately contribute to a smoother, more polished finish.
Step 3. Apply Chemical Stripper (If Necessary)
If your cabinet doors have old paint or varnish that needs removal, apply a chemical stripper before starting the sanding process. Carefully follow the product instructions for the best results, applying the stripper evenly over the surface with a brush or applicator, focusing mainly in the grooved areas. Leave the stripper on for the recommended amount of time to allow it to break down the existing finish.

Once the finish begins to loosen, use a scraper or putty knife to remove it gently. Be cautious not to damage the wood, especially within the grooves. After removal, clean the surface with a clean rag or cloth to remove any residual stripper.
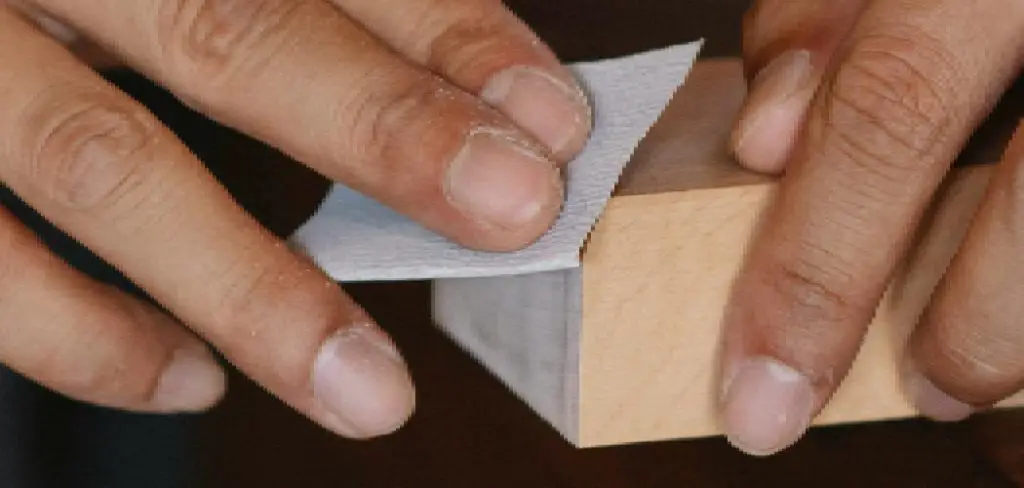
Step 4. Start Sanding with Coarse Grit Sandpaper
Begin the sanding process by using coarse-grit sandpaper (60 to 100 grit) to tackle the larger flat surfaces of the cabinet doors. Attach the sandpaper to a sanding block or orbital sander for consistent pressure and control. Focus on removing any remaining old finish or surface imperfections across the general area of the doors.
When sanding the grooves, switch to a flexible applicator such as foam pads or small brushes to get into the crevices. Work systematically, starting from one edge and moving carefully across the door to ensure full coverage. Remember to sand along the wood grain to avoid scratches and achieve a more uniform surface. This initial sanding stage is crucial for preparing the cabinet doors for further refinement, breaking down the surface to a level that allows the finer grit sandpaper to smooth out any imperfections.
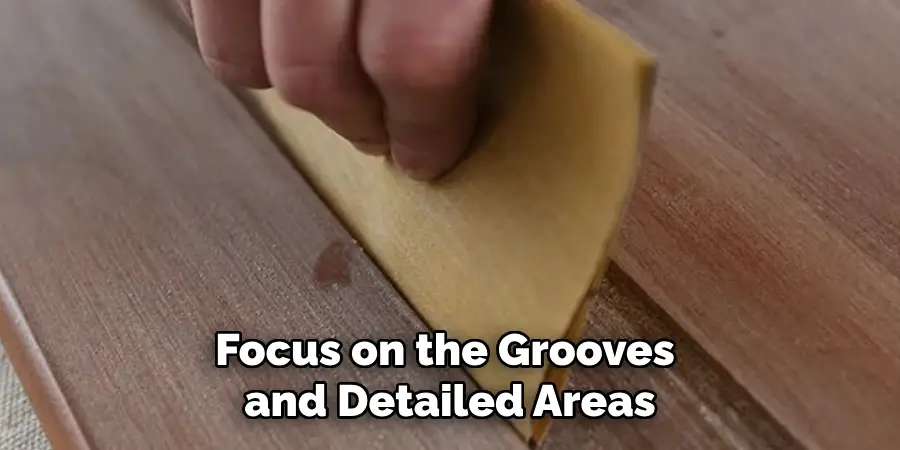
Step 5. Sand the Grooves With Fine Grit Sandpaper
After the initial pass with coarse grit sandpaper, move on to fine grit sandpaper (150 to 220 grit) to focus on the grooves and detailed areas of the cabinet doors. Fine-grit sandpaper will help smooth out any roughness left from the coarse sanding while ensuring a polished finish. Select an appropriate applicator like a small brush or foam pad to delicately sand within the grooves, maintaining smoothness without altering the wood’s shape. If needed, fold the sandpaper to fit tighter spaces and wrap it around a small tool, like a dowel or pencil, to provide precision.
Step 6. Vacuum and Wipe Down the Surface
Once you have completed sanding the grooves and other areas of the cabinet doors, it’s essential to clean off any dust or debris created during the process. Use a vacuum with a brush attachment to remove dust from flat surfaces and intricate grooves, ensuring a clear and debris-free surface. After vacuuming, take a tack or slightly damp microfiber cloth and wipe down the surfaces to capture any remaining fine particles.
This cleaning step is vital to prevent dust from interfering with the adhesion of paint or stain and helps achieve a smooth, professional finish. Ensure the surfaces are dehydrated before moving on to the next stage, whether painting, staining, or applying a protective finish.
Step 7. Apply Primer
With your cabinet doors now perfectly sanded and cleaned, it’s time to apply a primer to ensure a smooth base for painting. Choose a high-quality primer for wood surfaces and apply an even coat using a brush or roller. To create a uniform base, focus on covering all areas, including the grooves and edges.
A primer helps to seal the wood, preventing any stains or tannins from bleeding through the paint and enhancing the adhesion of the topcoat. Allow the primer to dry thoroughly per the manufacturer’s instructions before proceeding. Once dry, inspect the surface for any imperfections or spots that may require a second coat of primer.
Step 8. Paint or Stain the Cabinet Doors
You can apply your chosen paint or stain to the cabinet doors with the primer dried and prepared. For painting, select a high-quality paint designed for wood surfaces. Begin with a light and even first coat using a brush or a roller. Make sure to cover all areas, including the grooves and edges, to maintain a consistent finish.
If staining, apply a stain that highlights the natural wood grain using a brush or cloth, wiping away any excess to prevent scars. Following the drying times recommended by the manufacturer between coats is essential. Multiple thin coats often yield better results compared to a single thick layer, as they reduce the risk of drips and unevenness. After applying your final coat, allow the cabinet doors to dry completely before handling or reattaching them, ensuring a flawless and professional finish.
Step 9. Seal the Finish
After thoroughly drying the paint or stain, the final step involves sealing the finish to protect your work and extend its longevity. Choose a clear topcoat like polyurethane, polycrylic, or lacquer, depending on the desired level of sheen and durability needed for the cabinets’ use.
Apply the sealer evenly with a high-quality brush, foam roller, or sprayer, ensuring you reach all surfaces including edges and grooves. Pay attention to the manufacturer’s instructions regarding application techniques and drying times. Depending on your preference for durability and glossiness, you may need to apply multiple coats, with light sanding between each to ensure optimal adhesion and smoothness.

Step 10. Reattach Hardware and Reinstall Cabinet Doors
With the finish sealed and dried, it’s time to reattach the hardware and reinstall the cabinet doors. First, gather all hardware components, such as hinges, handles, and knobs, and ensure they are clean and free of residue from the refinishing process.
Using a screwdriver, carefully align and reattach each piece of hardware to its respective position on the cabinet doors. Once the hardware is secure, lift the doors into place and re-secure them to the cabinet frames. Make sure each door aligns properly and opens and closes without obstruction. This final step completes refinishing, leaving you with refreshed, beautifully finished cabinet doors.
By following these steps and preparing and refinishing your cabinet doors properly, you can transform the look of your kitchen without a complete renovation.
Conclusion
How to sand cabinet doors with grooves requires patience and attention to detail, ensuring each surface is adequately prepared for the finishing steps.
You can achieve a flawless surface even in the most intricate areas by selecting suitable materials and tools, from coarse to fine grit sandpaper and appropriate applicators. Proper sanding enhances the cabinet doors’ visual appeal and prepares them for a lasting finish that can withstand daily use.
Following the outlined steps ensures that your effort is rewarded with beautifully refinished cabinet doors, revitalizing your kitchen space with a professional-grade look.