When I initially set out to renovate my 1930s craftsman-style kitchen, I had grand visions of an open shelving system along the bottom of the cabinets to show off my colorful dishware and serveware.

However, as the project progressed, it became clear that an open shelving system just wasn’t practical – it would need to provide more storage space, and the bottom shelves would collect dust. That’s when I came across the solution of using false drawer fronts.
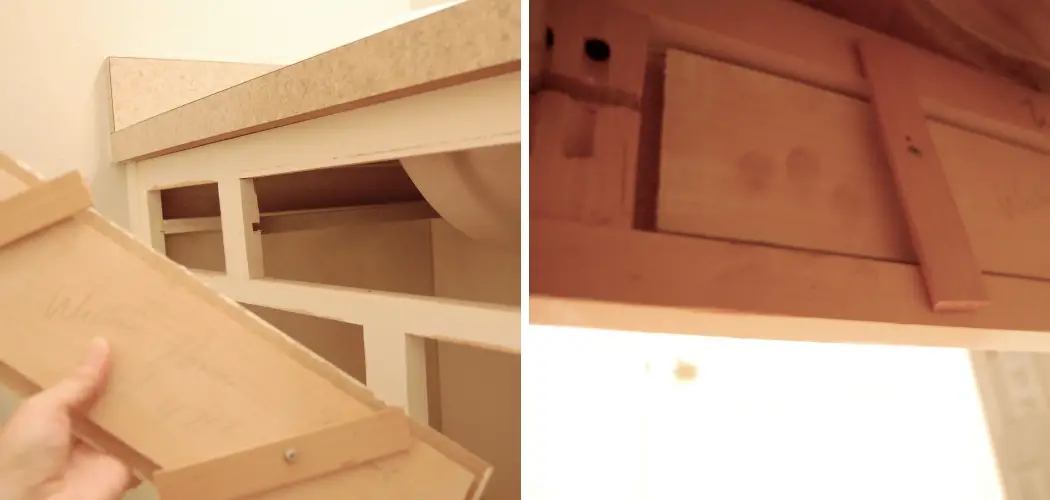
Attaching beautiful drawer fronts that didn’t open to storage was the perfect compromise. They added visual interest while still allowing me to utilize the full depth of the cabinet for storage.
In this blog post, I’ll walk you through the simple process of how to attach a false drawer front, from measurement and template making to installation. This easy DIY project transforms your cabinets from drab to dashing with just a few essential tools and materials.
Necessary Items
Before you get started, you’ll need a few items to complete this project:
- False drawer front(s) in the desired style and size (e.g., solid wood, MDF)
- Tape measure
- Pencil
- Straight edge ruler or level
- Drill with the appropriate drill bit for your cabinet material (wood or metal)
- Screws
- Masking tape or painter’s tape
- Template material (e.g., cardboard, heavy paper)
- Utility knife
10 Steps on How to Attach a False Drawer Front
Step 1: Measure and Mark Placement
The first step is to measure the height and width of your cabinet opening where you want to attach the false drawer front. Be sure to take accurate measurements, as this will determine how well the drawer front fits into the space. Mark these measurements on the front of your false drawer using a pencil.

Step 2: Make a Template
Using your measurements, create a template out of cardboard or heavy paper. This will serve as a guide for drilling holes in the correct location on the false drawer front. Use a utility knife to cut out the template following the marked measurements.
Step 3: Mark Drilling Points
Place the template onto the back of your false drawer front, ensuring it is centered and level. Use a pencil to mark where you will need to drill holes for the screws. It’s also a good idea to mark the top and bottom edges of the template on your false drawer front for easy alignment later.
Step 4: Prepare the False Drawer Front
You are using a drill with an appropriate size drill bit pre-drill holes at each marked point on the false drawer front. This will prevent the wood from splitting when you insert the screws. You can also use a countersink bit to create a slight indentation for the screw heads to sit flush with the surface of the false drawer front.
Step 5: Prepare the Cabinet Opening
Remove any existing hardware or tracks from the cabinet opening. If there are any protruding screws or nails, remove them and fill in the holes with wood filler. Sand down any rough or uneven spots to create a smooth surface for the false drawer front to sit against.
Step 6: Align and Secure
Place your false drawer front in the cabinet opening, ensuring it is centered and level. Use a masking tape or painter’s tape to temporarily hold the false drawer front in place while you fasten it with screws.
Step 7: Fasten Screws
Using a drill, insert screws through the pre-drilled holes on the false drawer front and into the cabinet opening. Be sure to tighten them securely but not too tight, as this can cause damage or cracking to the wood.
Step 8: Remove Tape
Once all of your screws are fastened, remove the tape holding the false drawer front in place. You should now have a securely attached false drawer front.
Step 9: Add Hardware
You can add hardware to your false drawer front if desired for a more finished look. This could be as simple as adding knobs or pulls, or you could get creative with decorative handles or hinges.
Step 10: Finishing Touches
Lastly, step back and admire your newly attached false drawer front. You can now use the space behind it for storage or leave it empty for a decorative touch. If needed, you can also touch up any visible screws or imperfections with paint or wood filler.
Attaching a false drawer front is a simple DIY project that can significantly impact the look and functionality of your cabinets. Following these ten steps, you can quickly transform any sideboard into a stylish and functional storage space. So try it, and see the difference it makes in your kitchen or bathroom!
8 Things to Avoid When Attaching a False Drawer Front
1. Not Taking Accurate Measurements
As mentioned, taking accurate measurements is crucial for a seamless fit. Double-check your measurements and use a template to ensure everything lines up correctly.
2. Skipping the Pre-Drilling Step
Pre-drilling holes in both the false drawer front and cabinet opening are essential for preventing damage or splitting of the wood when inserting screws.
3. Using the Wrong Type of Drill Bit
Using the wrong drill bit can also cause damage to your materials. Ensure you have an appropriate size and type for your cabinet’s material.
4. Forgetting to Sand Down Rough Spots
Sand down any rough or uneven spots on the cabinet opening before attaching the false drawer front. This will create a smooth surface for proper attachment.
5. Over-tightening Screws
Be careful not to over-tighten screws, as this can cause damage or cracking to the wood. Tighten them securely but not too tight.

6. Choosing Incompatible Hardware
If you plan on adding hardware to your false drawer front, make sure it is compatible with the style and size of your false show.
7. Neglecting to Fill in Holes
If there are any holes in the cabinet opening, fill them with wood filler before attaching the false drawer front. This will create a smooth and even surface for attachment.
8. Rushing Through Steps
It may be tempting to rush through the steps, but taking your time and being precise is vital for a professional-looking result. Follow each step carefully and double-check your work before moving on to the next step. Attaching a false drawer front requires attention to detail and proper technique, so avoid these common mistakes for a successful DIY project.
Conclusion
In conclusion, attaching a false drawer front may seem daunting, but with the right tools and techniques on how to attach a false drawer front, it can be easily accomplished. Remember to carefully measure and mark your placement before drilling any holes. Use support blocks to ensure a secure attachment, and always check for alignment before moving on to the next step.
The key is to take your time and follow each step carefully. Now that you have mastered this skill, you can confidently tackle other DIY projects around your house. Remember to share your success and spread the word to others struggling with this task. Let’s empower each other to create beautiful and functional home spaces!