
Security camera lights serve a dual function of illuminating the camera’s field of view and deterring potential intruders by making their presence overtly known. These lights can significantly enhance the quality of footage captured at night or in poorly lit areas, ensuring that details are discernible even in low-light conditions.

However, there are scenarios where the constant glow of these lights may be undesirable, prompting users to explore how to turn light off on security camera. These lights could be turned off through various methods, including physical switches, web interface settings, mobile applications, or scheduling. It is crucial to consult the camera’s manual for precise instructions tailored to your specific model.
Nonetheless, while considering turning off security camera lights for reasons such as privacy or reducing light pollution, it’s important to deliberate on potential security implications. Diminished visibility might compromise the camera’s ability to identify unauthorized individuals, which could lower your property’s security level.
Types of Security Camera Lights and Control Mechanisms
Security camera lights are critical for enhancing visibility and deterrence, especially during the night or in poorly lit conditions. These lights come in different types, each serving unique functions and suited for various scenarios.
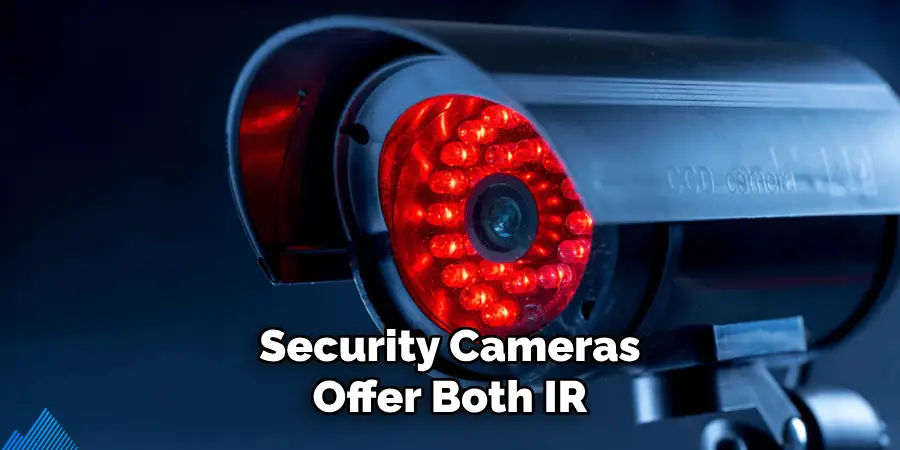
- Infrared (IR) Lights: Primarily used for night vision, IR lights emit a wavelength that is generally invisible to the human eye. This allows the camera to capture clear, black-and-white video footage in complete darkness without drawing attention. The functionality is particularly useful in surveillance areas where discreet monitoring is necessary, as it does not alert an intruder to the camera’s presence.
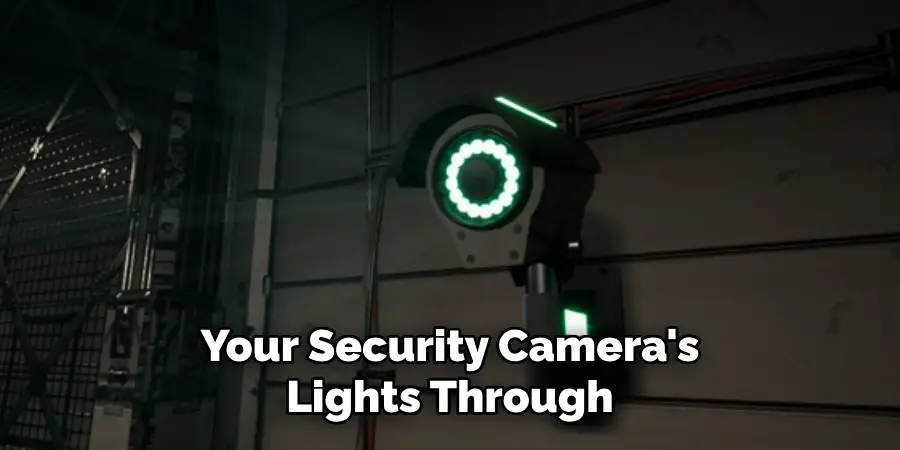
- White LED Lights: Unlike IR lights, white LED lights provide bright illumination, making them visible to the human eye. They’re used to enhance the color night vision capabilities of cameras, allowing them to capture video in low-light conditions with color detail. Additionally, the visible light can act as a deterrent, signaling to potential intruders that the area is under surveillance.
- Combination IR/LED Lights: Some security cameras offer both IR and LED lights, allowing users to switch between invisible night vision and visible illumination based on their needs. This hybrid approach allows for adaptable surveillance strategies, optimizing visibility and deterrence as required.
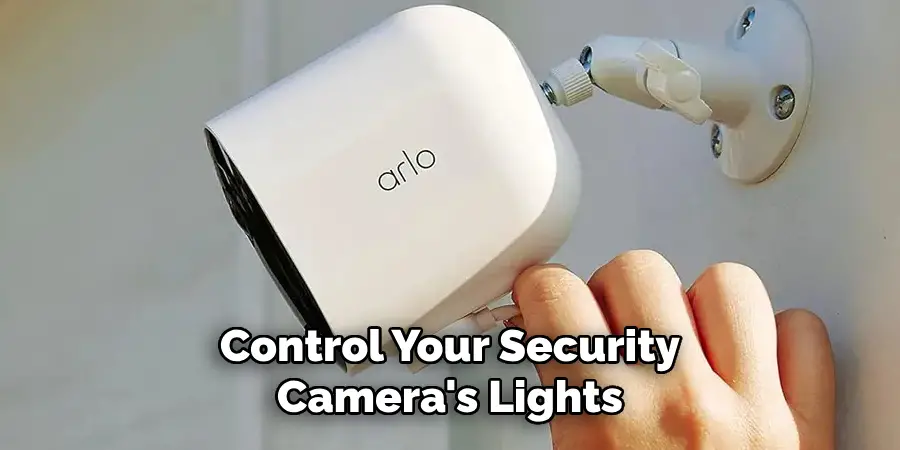
The control of these various light types can be managed through several mechanisms, enhancing flexibility and convenience for the user.
- Physical Switch on the Camera Body: Some models have a physical switch, allowing users to manually turn the lights on or off. This straightforward method is particularly convenient for quick adjustments but might not be suitable for cameras placed in hard-to-reach locations.
- Web Interface Settings of the Camera: Accessing the camera’s web interface through a browser provides a comprehensive platform for light management. Users can toggle between IR, LED, or Combination modes and adjust settings like brightness or sensitivity, all from a computer.
- Mobile App for Camera Control: Many modern security cameras are supported by mobile apps, granting on-the-go control over the lights. Through an app, users can swiftly alter lighting settings, switch modes, and even schedule specific times for lights to activate or deactivate, enhancing security and efficiency.
- Scheduling Options Within the Camera Settings: This feature allows users to automate light control based on specific times or conditions, like activating IR lights at sunset and switching to LED if motion is detected. Scheduling offers a hands-off approach to maintaining optimal lighting for surveillance without manual intervention.
Understanding the types of security camera lights and how to control them is essential for customizing your surveillance setup to meet specific needs and preferences. Whether through a physical switch, web interface, mobile app, or scheduling, managing your camera’s lighting enhances both visibility and security, ensuring peace of mind.
How to Turn Light Off on Security Camera: Turning off Lights via the Web Interface
Turning off your security camera’s lights through its web interface is a nuanced process that allows precise control over its lighting settings. This method typically requires access to the camera’s IP address and might differ slightly depending on the camera’s make and model. Here’s a general guide on how to accomplish this:
Access the Camera’s Web Interface:
- Begin by ensuring your device (computer or smartphone) is connected to the same network as your security camera.
- Find your camera’s IP address, often listed in the camera’s manual or found in your router’s device list. Enter this IP address into the web browser’s address bar and press enter. You might be prompted to enter login credentials, which should also be available in your camera’s manual or set during the initial setup.
Navigate to the Lighting Settings:
- Once logged in, look for a settings or configuration menu. This could be labeled under various names such as “Settings”, “Configuration”, “Camera Settings”, or something similar, depending on your camera’s interface.
- Within this menu, locate a section related to lighting or night vision. It could be labeled as “Night Vision”, “LED Control”, “Lighting Settings”, or “Infrared Settings”, among others. Click on this section to proceed.
Adjusting the Light Settings:
- Within the lighting or night vision settings, look for an option to enable or disable the lights. There might be separate controls for different types of lights (IR, LED), so ensure you’re adjusting the correct setting for your needs.
- Toggle the settings to disable or turn off the lights. There may also be options to adjust the intensity or scheduling of the lights if you prefer to dim them or set a specific operating schedule rather than turning them off completely.
Saving Changes and Verifying:
- After adjusting the settings as needed, look for an option to save or apply the changes. This might be a button labeled “Save”, “Apply”, or “OK”. Click it to confirm the adjustments.
- To verify the light has been turned off, physically check the camera after making the change. The light should no longer be visible, or you can monitor the live feed through the web interface or app to confirm the change in lighting settings.
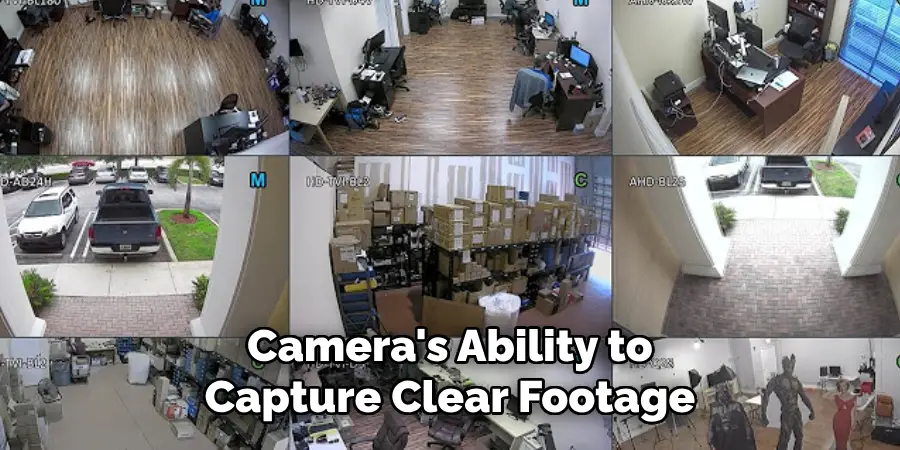
Remember, while disabling the lights may be desirable for certain scenarios, it’s important to consider how this might affect the camera’s ability to capture clear footage in low-light conditions. Always weigh the trade-offs between visibility and discreetness when managing your security camera’s lighting preferences.
How to Turn Light Off on Security Camera: Using Mobile Apps for Light Control
The advancement in security camera technology has introduced the convenience of controlling your camera’s light settings through mobile apps provided by the camera’s manufacturer. This method offers flexibility and ensures that you can manage your camera’s settings from anywhere, anytime. Here’s how to leverage this feature:
Downloading and Setting Up the App:
- Identify the App: First, determine the official mobile app compatible with your camera model. This information is typically listed on the manufacturer’s website or in the camera’s user manual.
- Download the App: Visit the App Store (for iOS devices) or Google Play Store (for Android devices), search for the identified app, and download it to your smartphone or tablet.
- Setup and Configuration: Open the app and follow the on-screen instructions to set it up. This usually involves creating an account, adding your camera by scanning the QR code or entering the camera’s model number, and connecting the camera to your Wi-Fi network.
Using the App to Disable the Light:
- Locating the Controls: Once your camera is added and set up in the app, locate the settings or controls section. Look for options labeled “Night Vision”, “LED Settings”, or “Lighting Control”. This might vary by app, so navigating through the settings menu might be necessary.
- Disabling the Light: Upon finding the relevant controls, there should be an option to disable or adjust the light settings. This might be a simple toggle switch to turn off the lights or a more complex setting allowing you to adjust the intensity or operational schedule.
- Confirming the Changes: After adjusting the settings as desired, ensure you save or apply the changes. You may need to refresh the live feed or physically check the camera to confirm that the light has indeed been turned off.
Considerations and Best Practices:
Using a mobile app to control your security camera’s lights adds a layer of convenience but also requires a stable internet connection for timely updates and adjustments. Always ensure that the app is updated to the latest version for the best performance and security features. Remember, turning off the lights could impact the camera’s night vision capabilities, so evaluate your security needs against the benefits of disabling the lights before deciding.
How to Turn Light Off on Security Camera: Scheduling Light Activation/Deactivation
Many modern security cameras offer a feature to schedule the activation and deactivation of their lights, providing an efficient way to manage lighting based on your specific needs and preferences. This functionality is particularly useful for optimizing visibility during critical hours without manual intervention every day.
Setting Up a Schedule:
- Access the Light Settings: Navigate to the light or night vision settings within the camera’s web interface or mobile app, as detailed in previous sections.
- Locate the Scheduling Option: Look for a scheduling option or menu within the lighting settings. This might be labeled as “Schedule”, “Light Schedule”, “Automatic Lighting”, or something along those lines.
- Defining Timeframes: Within the scheduling menu, you should be able to define specific times for when you want the lights to automatically turn on or off. This could involve setting a start and end time for light activation during nighttime hours or any other preferred timeframe. Most interfaces allow for different schedules on different days, offering flexibility for varied routines.
- Saving the Schedule: After setting your preferred timeframes, ensure you save or apply the changes. This option is usually marked as “Save”, “Apply”, or “Confirm”.
- Verifying Functionality: To ensure your schedule functions as intended, monitor the camera’s lights during the times you’ve set for activation and deactivation. This can be done by physical observation or through the live feed available on the web interface or mobile app.
Scheduling light activation and deactivation conserves energy and enhances security by ensuring optimal lighting when it’s most needed. Always review the operational schedule periodically and adjust as necessary to reflect any changes in your routine or security needs.
Security Implications of Disabling Lights
Disabling the lights on security cameras might seem suitable to increase privacy or reduce light pollution; however, it’s crucial to understand the potential security implications of such an action.
One of the most immediate effects is reduced visibility at night. Although cameras equipped with high-quality night vision can still capture footage, the lack of illumination may hinder the clarity of the video, potentially making it challenging to identify intruders or other crucial details.
Another consideration is the increased reliance on motion detection technology. While motion detection is valuable, it may not always be reliable, especially in environments with frequent non-threatening movements, such as animals or tree branches swaying. This could lead to either missed detections of actual threats or false alarms that can desensitize owners to alerts.
Furthermore, the presence of light is a significant deterrence for potential intruders. The visibility of a security camera, especially one that is actively illuminated, can act as a strong deterrent, signaling to would-be trespassers that the property is under surveillance.
Removing this element of deterrence could inadvertently invite more attempts at unauthorized entry or vandalism, as intruders might perceive less risk of being caught or identified.
Given these considerations, it is advisable for individuals and businesses to carefully weigh the benefits of increased privacy or reduced light pollution against the potential security risks. Depending on the specific needs and environment, the optimal setup may vary.
In some cases, adjusting the light settings rather than completely disabling them could offer a balanced compromise, maintaining visibility and deterrence while minimizing disturbances. Always consider the layout of the monitored area, local crime rates, and specific security needs when making decisions about your security camera’s light settings.
Troubleshooting Tips
If you encounter issues where the light on your security camera cannot be turned off using the conventional methods outlined above, here are some troubleshooting tips to help resolve potential problems:
1. Verifying Camera Operation
Ensure that your security camera is powered on and functioning correctly. Check the power source to confirm it’s securely connected and operational. If your camera operates on battery power, verify that the battery is charged or replaced if necessary.
Additionally, access the camera’s live feed through its web interface or mobile app to confirm that it is capturing and transmitting video as expected. This step helps to isolate the issue to the light functionality specifically, rather than a broader problem with the camera.
2. Checking for Firmware Updates
Manufacturers frequently release firmware updates to improve the functionality and security of their cameras, which can include fixes for issues related to light settings.
Access the camera’s administrative settings through its web interface or mobile app to check for any available firmware updates. Applying the latest firmware version can potentially resolve the issue if it’s related to a software glitch or a previously known problem that has been addressed in the update.
3. Consulting the Camera’s Manual
Refer to the security camera’s user manual for specific troubleshooting steps related to managing the light settings. Manuals often contain a troubleshooting section that addresses common issues, including problems with disabling or adjusting the light. This resource can provide model-specific instructions that might not be apparent through general troubleshooting methods.
4. Contacting the Manufacturer
If you’re still unable to turn off the light on your security camera after attempting the above steps, consider contacting the manufacturer for further assistance.
Technical support teams can offer guidance based on in-depth knowledge of their products and may be able to identify and resolve issues not easily addressed through general troubleshooting. They can also determine if the problem might warrant a repair or replacement under warranty conditions.
Remember, security cameras are sophisticated devices, and their optimal functioning is crucial for the safety and security of your property. Taking a methodical approach to troubleshooting can often resolve issues without needing professional intervention, but do not hesitate to seek support when necessary.
In instances where disabling the camera’s light does not align with security needs or does not address privacy concerns adequately, several alternative solutions can be considered. These alternatives aim to balance the need for privacy and light control while maintaining the security camera’s functionality and effectiveness.
5. Using Privacy Masks
One method is the use of privacy masks. These physical or digital overlays can be applied directly to the camera’s lens or through its software settings, respectively. Privacy masks block the camera’s view of specific areas within its field of vision.
This approach allows property owners to protect the privacy of certain areas (such as windows into private spaces) without compromising the overall surveillance capability. Digital privacy masks, in particular, offer flexibility and can easily be adjusted as privacy needs change without physically altering the camera setup.
6. Adjusting Light Sensitivity
Fine-tuning this feature can provide a middle-ground solution for cameras equipped with adjustable light sensitivity settings. By increasing the light sensitivity, cameras can utilize lower light levels to achieve clear night vision, potentially eliminating the need for continuous bright illumination.
This adjustment not only helps reduce light pollution but also minimizes the intrusion of light into private spaces while ensuring the camera remains effective in low-light conditions.
Installing Motion-Activated Lights
Another feasible option involves the integration of separate motion-activated lights within the camera’s surveillance area. This setup provides illumination only when movement is detected, ensuring that areas are well-lit during legitimate security concerns while remaining unlit and minimally invasive at other times.
Motion-activated lights can be a strong deterrent against unauthorized access or activities, as their sudden activation highlights the presence of activity. Furthermore, since these lights operate independently of the camera, they can be placed strategically to optimize both lighting and deterrence without affecting the camera’s privacy settings.
These alternative solutions offer a variety of approaches for those seeking to manage the balance between privacy, light control, and security effectively. Whether through the use of privacy masks, adjusting light sensitivity, or installing motion-activated lighting, property owners have several options at their disposal.
Each method has its unique benefits and can be catered to fit specific situations or preferences, ensuring that privacy and security needs are met without unnecessary compromise.
Frequently Asked Questions
Q1: Can the Privacy Masks Be Removed or Adjusted After They’ve Been Set?
A1: Yes, digital privacy masks are highly flexible and can be adjusted or removed at any time through the camera’s software settings. Physical masks would require manual adjustment or removal.
Q2: Are Firmware Updates Safe to Install, and Can They Cause Further Issues with The Camera?
A2: Firmware updates released by the manufacturer are generally safe and intended to improve the camera’s functionality, including security enhancements and bug fixes.
It is rare, but on occasion, updates may introduce new issues, which is why it’s important to ensure updates are downloaded directly from the manufacturer’s official website or app.
Q3: What Should I Do if My Camera Doesn’t Have an Adjustable Light Sensitivity Feature?
A3: If your camera lacks this feature, using external solutions like motion-activated lights can help manage light-related concerns. Additionally, exploring other camera models with the required feature could be an option for future upgrades.
Q4: Do Motion-Activated Lights Require Professional Installation?
A4: While some motion-activated lights might be easy enough for DIY installation, others, especially those that need to be integrated with an existing security system, might require professional setup to ensure optimal functionality and security.
Q5: How Effective Are Privacy Masks in Maintaining Privacy without Compromising Security?
A5: Privacy masks are very effective in blocking out specific areas from being recorded or monitored, thus ensuring privacy. Their effectiveness in maintaining security lies in their strategic placement, which allows the rest of the surveillance area to remain under watch without intrusions into private spaces.
Q6: If I Encounter Problems During Firmware Update Installation, What Should I Do?
A6: It’s best to contact the manufacturer’s technical support immediately if you encounter issues during a firmware update. Avoid attempting further actions that could potentially worsen the problem.
Q7: Can Adjusting the Light Sensitivity Affect the Camera’s Day-To-Day Battery Life or Power Consumption?
A7: Yes, increasing the camera’s light sensitivity can potentially reduce the need for continuous illumination, which in turn might lead to lower power consumption and longer battery life in wireless models. However, the actual impact varies depending on the camera model and settings.
Conclusion
Successfully managing how to turn light off on security camera involves understanding the specific model you own and its functionalities. The process begins with verifying the camera’s operation and includes checking for firmware updates, consulting the camera’s manual, and, if necessary, contacting the manufacturer for specialized assistance.
Each step is crucial in troubleshooting issues related to the camera’s light settings. Cameras are equipped with a variety of features designed to enhance security through intelligent lighting; thus, it’s essential to consider the balance between light control and the potential security implications.
Adjusting light sensitivity, employing privacy masks, or integrating motion-activated lighting can offer tailored solutions that respect privacy while ensuring security. Ultimately, consulting the user manual and manufacturer support can provide the most accurate guidance for your situation, ensuring your privacy and security needs are adequately met through informed decisions.