Are you looking for a way to secure your cabinets to the floor? If so, building a base is one of the best ways.

A great kitchen remodel, bar room addition, or just plain storage becomes a reality with cabinets. But before you purchase your dream set of cabinets, creating a strong base is important to ensure the cabinets stand up properly.
It’s not as hard as it seems –if you have the right supplies and follow these simple steps, you can easily build a sturdy base for your new cabinets!
So if you’ve been wanting that beautifully designed cupboard unit or just more space with extra shelves but don’t know where to start – read on for everything you need to know about how to build a base for cabinets to sit on.
What Will You Need?
To build a base for your cabinets, you will need the following supplies:
- Plywood sheets (at least ¾ inch thick)
- Wood screws
- Level
- Measuring tape/ruler
- 4 x 4 lumber posts or steel framing anchors
Once you have all the supplies, you can begin constructing your base.
8 Easy Steps on How to Build a Base for Cabinets to Sit on
Step 1: Measure Your Space
The first step in building a base for your cabinets is to measure the space where you’ll be installing them accurately. Ensure you take into account any existing appliances or fixtures that will need to integrate with the cabinets.
Use your measuring tape or ruler to determine your desired base’s length, width, and height. Remember, your measurements should match the dimensions of your cabinets to ensure a secure and level fit.
Step 2: Cut Your Wood

Once you’ve taken measurements, the next step involves cutting your wood to the correct dimensions. Using the measurements you’ve obtained, cut your plywood sheet for the base and your 4×4 lumber posts for the corners.
Always double-check your measurements before making each cut to avoid mistakes. Safety first – use protective equipment such as goggles and gloves while handling cutting tools.
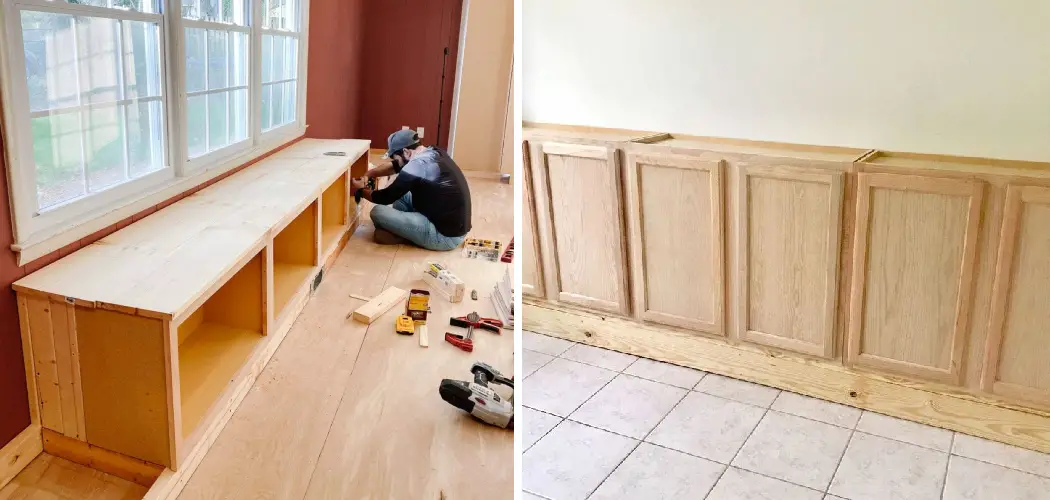
Step 3: Assemble the Base Frame
With your cut pieces ready, it’s time to assemble the base frame. Begin by positioning your 4×4 posts at each corner of your cabinet base. Then, lay your cut plywood sheet on top of the posts, ensuring the posts align perfectly with the corners of the plywood.
Screw the plywood into the posts using your wood screws to form a secure, sturdy base. Always ensure the base is perfectly level by using your level after assembly. Adjustments can be made by trimming or adding shims to the posts as needed.
Step 4: Secure the Base to the Floor
Now that the base frame is assembled and leveled, it must be secured to the floor. This is a crucial step as it ensures the stability and safety of your cabinets. Depending on the type of flooring you have, you can use either concrete screws for concrete floors or regular wood screws for wooden floors.
Carefully drill the screws through the plywood base into the floor, ensuring the base is securely fastened and does not move.
Step 5: Install the Cabinets on the Base
After securing the base to the floor, you’re ready to place your cabinets. Lift each cabinet onto the base, aligning them with the edges of the base frame. Make sure there is a uniform gap between the wall and the cabinets for a neat appearance.

Once properly positioned, screw the cabinets onto the base using wood screws. Remember to check the level of the cabinets after installation – any discrepancies can be adjusted with shims. Finally, open and close the cabinet doors and drawers to ensure they operate smoothly.
Step 6: Apply Finishing Touches
After your cabinets are installed securely on the base, it’s time to apply the finishing touches. This might involve installing cabinet doors, if not pre-installed, attaching the handles or knobs, and making any final adjustments to ensure the doors and drawers open and close smoothly.
You can also paint or stain the cabinets to match your existing decor. Lastly, clean up any sawdust or debris and enjoy your newly installed cabinets!
Step 7: Review and Inspect Your Work
Once you’ve finished installing and fine-tuning your cabinets, it’s time to step back and inspect your work. Ensure all cabinets are securely fastened, leveled, and operating smoothly. Carefully inspect the cabinets from different angles to ensure there are no gaps between them and the base or between individual cabinets.
Check that the doors and drawers are aligned correctly and that handles or knobs are securely affixed. This is also the right time to retighten loose screws and make minor adjustments. Congratulations, you’ve completed how to build a base for cabinets to sit on!
Step 8: Maintain Your Cabinets
Just building and installing isn’t enough; maintaining your cabinets is equally important to ensure longevity. Regular cleaning with a mild soap solution can help keep the surfaces free from dirt and grime. Avoid using harsh chemicals or abrasive cleaning tools that could damage the finish.

Check the screws and hinges periodically to ensure they’re tight and functioning properly. If you notice any cracks or other damage, repair them promptly to prevent further degradation. Proper maintenance will keep your cabinets looking beautiful and functioning perfectly for years.
By following these eight simple steps, you can easily build a sturdy base for your new cabinets.
5 Additional Tips and Tricks
- Make sure that the base of your cabinets is level and even: this helps ensure a secure fit and will reduce the chances of wobbling or unevenness when you attach your cabinets.
- If you’re using pre-drilled holes, make sure that they are the correct size and in the right locations relative to each other.
- When drilling through the base of your cabinets, use a countersink bit to create space for screws to fit flush against the surface of the wood.
- Use an adhesive such as construction or nail glue when attaching your cabinets to the underlying base. This will help keep the wood securely fastened together even under heavy weight.
- If desired, sand and seal your cabinet’s base for a more polished look before attaching it to its permanent location. This will also add an extra layer of protection against moisture or spills that could damage the wood over time.
With these tips in mind, you’ll be sure to have a successful and secure base for your cabinets.
5 Things You Should Avoid
- Take Your Time with the Process: Building a base for cabinets requires precision and patience. Hasty work can lead to uneven bases or insecure cabinet fittings, compromising the overall stability and functionality.
- Avoid Using Low-quality Materials: The strength and durability of your cabinets largely depend on the quality of materials used. Opt for high-quality wood and sturdy screws to ensure longevity.
- Pay Attention to the Importance of Measurements: A common mistake is not accurately measuring the space where your cabinets will sit. This can result in a base that needs to be bigger or smaller.
- Avoid Not Testing the Stability of the Base: Always test the base’s stability before mounting the cabinets to avoid mishaps later.
- Be Sure to Complete the Sealing Process: Even if it seems like an extra step, sealing the wood can protect it from moisture and potential damage.
Avoiding these mistakes will ensure a safe and successful project. With the right tips and tricks, you can build a strong base for your cabinets that will last for years.
What Do You Put on the Bottom of Cabinets?
The most common material used on the bottom of cabinets is plywood. Plywood provides a strong and stable base for cabinets while also helping to dampen sound and protect against moisture.
It’s important to use high-quality marine grade plywood if your cabinets are in an area prone to humidity or water exposure. Alternatives such as MDF board can also be used, but it tends to be less durable and more prone to warping than plywood.

Add additional layers of wood or veneers, such as melamine or laminate, for a more polished look. These materials provide an extra layer of protection and give the cabinets a more finished appearance. Whatever material you choose, ensure it’s securely attached to the bottom of your cabinets with construction glue or screws.
Whether you choose plywood, MDF board, melamine, or laminate, the right foundation will help make your cabinets more attractive and durable. You can create the perfect base for your cabinets with the right materials and patience.
Conclusion
How to build a base for cabinets to sit on can be difficult, but with a few simple steps, you’ll be on your way to success. When constructing your base, it’s important to measure correctly and use quality materials to have a sturdy foundation for the rest of your build.
Once you’ve planned out the size of your base, ensure that you account for the weight of what will be resting on top by adding extra support beams and brackets when necessary.
Your attention to detail throughout every step of the process will prove immensely beneficial in ensuring that your project is top-notch when finished. With these tips, it’s time to get out and let your creativity soar!
From sawing boards down to size for a custom setup or following pre-made plans, watch as that beautiful cabinet comes together, no matter which route you take. You’ll certainly be proud of the results!