Are you facing issues with your recessed lighting and not sure how to fix them? Worry not. We have got you covered. In this guide, we will walk you through the steps on how to fix recessed lighting .
With its sleek and modern aesthetic, recessed lighting has become a favored choice for homeowners looking to create a subtle yet effective lighting scheme in their living spaces. However, like all household fixtures, these lights can experience issues such as flickering, dimming, or even complete failure, often leaving residents in the dark about how to approach repairs. This guide aims to shed light on the common problems associated with recessed lighting and provides a step-by-step approach to diagnosing and fixing these issues.
Whether you’re facing a simple bulb replacement or dealing with more complex wiring problems, our instructions will help you illuminate the path to a well-lit, welcoming home environment.
What are the Causes of Recessed Lighting Issues?
Before diving into the repairs, it’s essential to understand the potential causes of your recessed lighting problems. These lights are typically powered through electricity and connected in a circuit, making them susceptible to issues such as faulty wiring, loose connections, or damaged components.
Additionally, bulbs may burn out or become loose in their sockets over time, resulting in flickering or dimming. In some cases, moisture buildup due to improper installation or ventilation issues may also interfere with the functionality of your recessed lights.
Another common culprit behind recessed lighting issues is the use of incompatible bulbs. Recessed lights are designed to work with specific bulb types, and using the wrong type may result in overheating or flickering.
What Will You Need?
Here is a list of materials and tools you will need to fix your recessed lighting:
- Replacement bulbs (if needed)
- A ladder or step stool
- Screwdriver (flathead or Phillips, depending on the fixture)
- Wire stripper or scissors
- Electrical tape
- Circuit tester
Once you have gathered these supplies, you can start diagnosing and repairing your recessed lighting issues.
10 Easy Steps on How to Fix Recessed Lighting
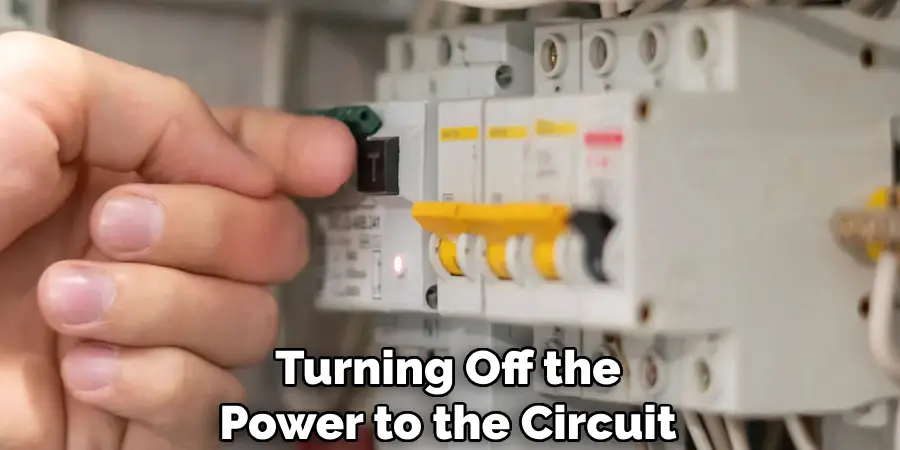
Step 1. Ensure Safety First:
Before you begin any work on your recessed lighting, it’s crucial to ensure your safety. Start by turning off the power to the circuit you will be working on. You can do this at your home’s main electrical panel by flipping the circuit breaker connected to your recessed lighting. Use a circuit tester to verify that the power is indeed off before proceeding to the next step. This precaution prevents the risk of electrical shock and ensures a safe working environment.
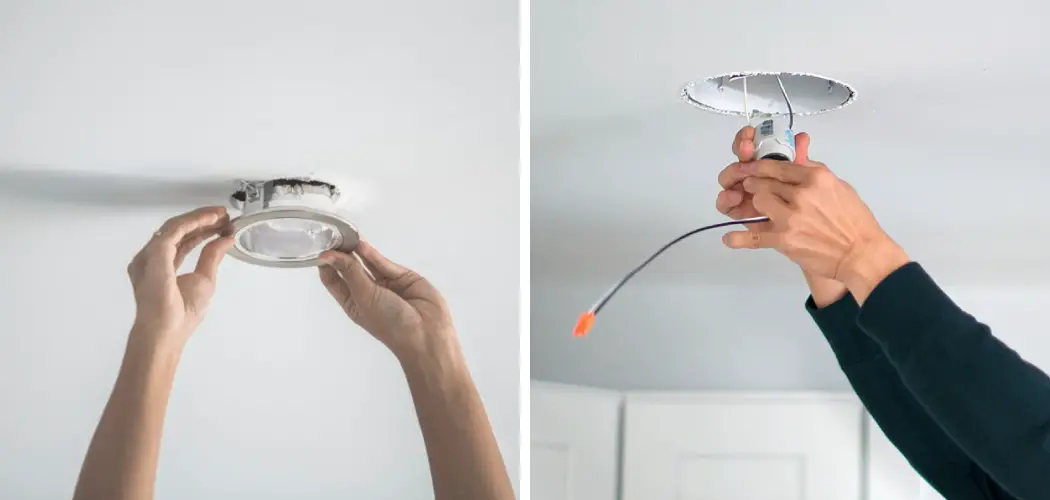
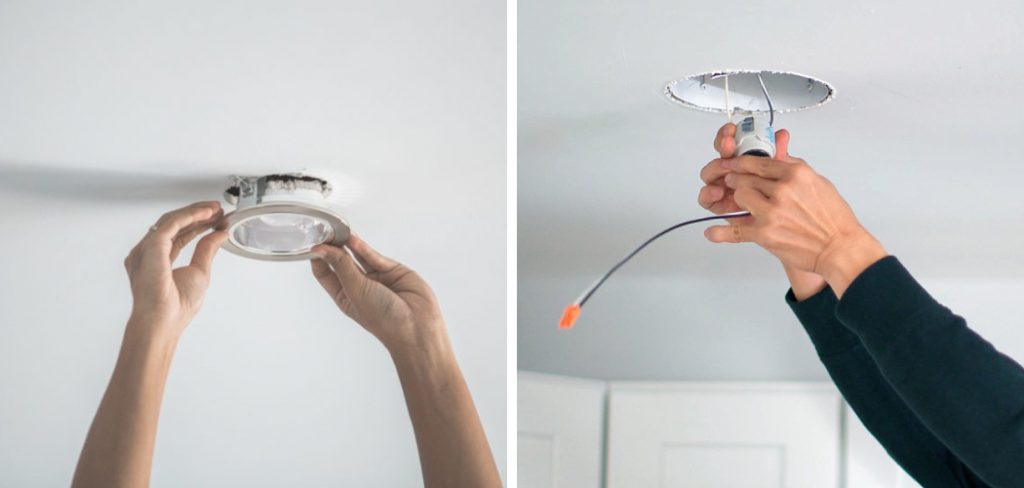
Step 2. Remove the Light Bulb and Trim:
With the power safely turned off, your next step is to remove the light bulb from the recessed lighting fixture. Depending on the design, you might need to unscrew the bulb or gently pull it out if it’s a push-fit model. After removing the bulb, you must deal with the trim – the decorative ring around the light. The trim can usually be detached by gently pulling it away from the ceiling, though some models may require unscrewing or a slight twist to release. Doing this will give you better access to the inner components of the recessed lighting fixture and allow for a more thorough examination of potential issues.
Step 3. Inspect the Socket and Wiring:
Closely inspect the socket and wiring within the recessed lighting fixture with the bulb and trim removed. Look for any signs of damage, such as burnt wires, loose connections, or corrosion. If you notice any damaged wires, they must be cut and stripped for a fresh connection. Ensure that all wire connections are tight and secure to prevent issues such as flickering or total loss of power. This step is crucial for identifying if the problem lies within the fixture’s electrical components.
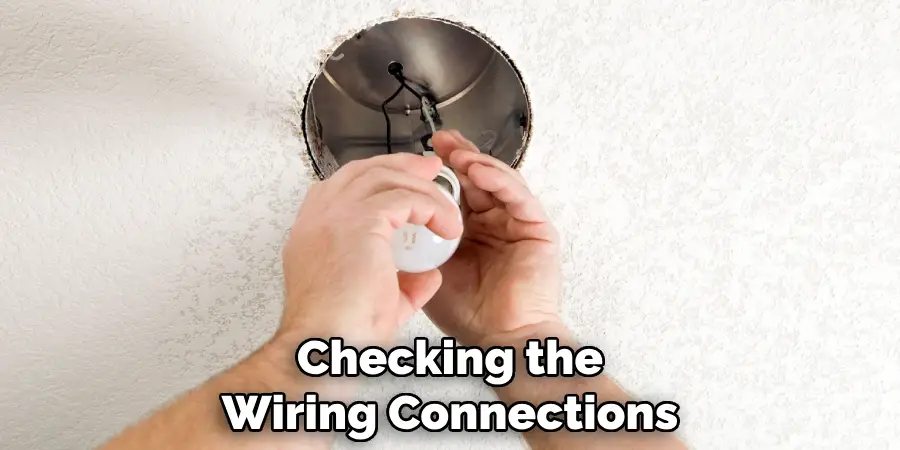
Step 4. Check the Wiring Connections:
After inspecting the socket and wiring for any visible damage, the next step involves checking the wiring connections to ensure they are correctly and securely made. This includes examining the wire nuts that connect the fixture’s wires to the house wiring. If any of the connections are loose, tighten them by hand before securing them with electrical tape. If the wires appear damaged or corroded, you may need to trim the ends and re-strip them before making a fresh connection. Ensuring strong and secure wiring connections can often resolve common issues like flickering or intermittent lighting.
Step 5. Replace the Bulb if Necessary:
Once you have inspected and ensured that the socket and wiring are in good condition, it may turn out that the bulb itself is the issue. If you’ve found that the bulb is burnt out, incompatible, or showing signs of wear, replace it with a new one that matches the specifications for your recessed lighting fixture. Always choose bulbs that are compatible with your fixture’s make and model to avoid problems such as overheating, flickering, or premature failure. When inserting the new bulb, ensure it’s securely and correctly positioned within the socket for optimal performance.
Step 6. Test the Fixture Before Reassembly:
Before reattaching the trim and inserting the bulb back into place, it’s a good idea to test the fixture to ensure the repairs have succeeded. Turn the power back on at your home’s main electrical panel and switch on the recessed lighting. If the light turns on without flickering or issues, you can proceed confidently. However, if problems persist, it may be necessary to revisit the previous steps for further inspection or consider consulting a professional electrician. Testing before reassembly helps to avoid the need for multiple disassembles and ensures that your efforts have effectively resolved the issue.
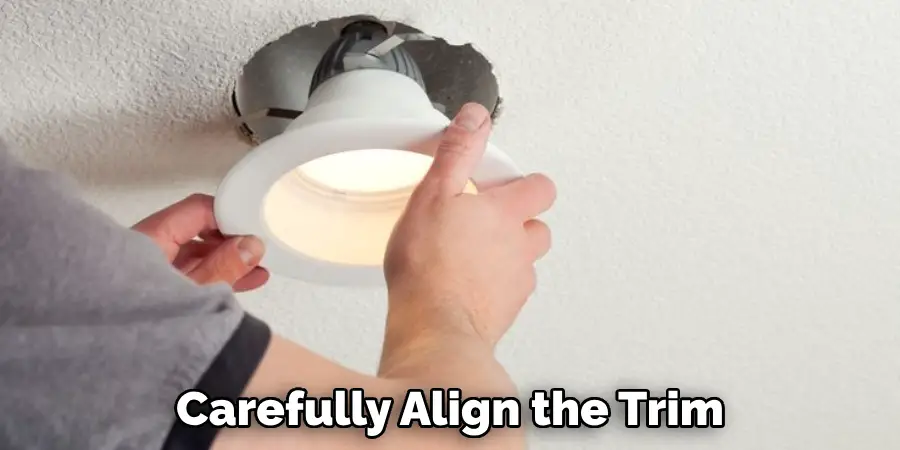
Step 7. Reattach the Trim:
After successfully testing the recessed lighting fixture and confirming it’s working correctly, the next step is reattaching the trim. Carefully align the trim with the opening of the fixture and gently press it back into place. For trim that requires screwing, ensure that it’s screwed in evenly to avoid bending or damaging the trim. For push-fit models, ensure the trim snaps back securely to the ceiling. This step not only restores the aesthetic appearance of your recessed lighting but also protects the internal components from dust and moisture.
Step 8. Insert the New or Existing Bulb:
With the trim securely in place, inserting the light bulb back into the fixture is next. If you’re using a new bulb, remove it from its packaging and gently align it with the socket. For both new and existing bulbs, ensure that they’re properly seated by screwing them in clockwise until snug. Avoid over-tightening, as this may damage the bulb or socket. Proper bulb insertion is critical for consistent lighting performance and to avoid any unnecessary strain on the electrical components of the fixture.
Step 9. Clean the Fixture:
Once the bulb is securely in place, take a moment to clean the recessed lighting fixture. Dust and debris can accumulate over time, not just on the outside but also inside the fixture itself, potentially affecting its performance. Use a soft, dry cloth to gently wipe the exterior trim and the interior surfaces accessible to you.
If your fixture is particularly dirty or has not been cleaned in a while, consider using a vacuum with a soft brush attachment to carefully remove dust from harder-to-reach areas. Keeping your fixture clean ensures optimal lighting and extends the life of your recessed lighting by preventing overheating caused by dust buildup.
Step 10. Final Testing and Adjustment:
Now that the bulb is installed, the trim reattached, and the fixture cleaned, conduct a final test of your recessed lighting to ensure everything is functioning as it should. Turn the power on and observe the light for any irregularities, such as flickering, dimming, or uneven light distribution.
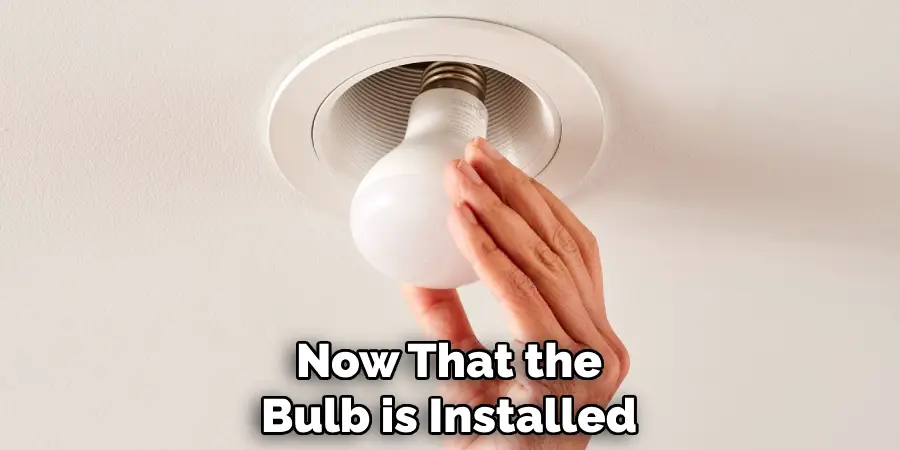
Double-check the bulb’s compatibility and ensure all connections are secure if you notice any issues. Adjustments might include re-seating the bulb or trimming and reconnecting wiring as necessary. This final check ensures that your efforts have fixed the immediate issue and that your recessed lighting will continue to perform reliably.
By following these steps, you can troubleshoot and resolve common issues with your recessed lighting fixture, saving you time and money on unnecessary replacements or professional assistance.
5 Additional Tips and Tricks
- Use the Right Tools: Having the right tools on hand can make the repair process smoother and more efficient. Ensure you have a voltage tester, wire strippers, and screwdrivers. A non-contact voltage tester is particularly useful for safely checking if there’s power in the wires.
- Safety First: Always prioritize safety by turning off the power at the circuit breaker before starting any repair work. This prevents the risk of electric shock. Additionally, wearing safety glasses can protect your eyes from dust or debris while working.
- Upgrade to LED: If you’re replacing bulbs, consider upgrading to LED options. LED bulbs are more energy-efficient, last longer, and produce less heat than traditional incandescent or halogen bulbs. They can also offer a range of color temperatures to suit different room ambiances.
- Dimmer Compatibility: If your recessed lighting is connected to a dimmer switch, ensure the new bulbs you install are dimmer-compatible. Not all LED bulbs work with all dimmer switches, so checking compatibility can prevent flickering and other dimming issues.
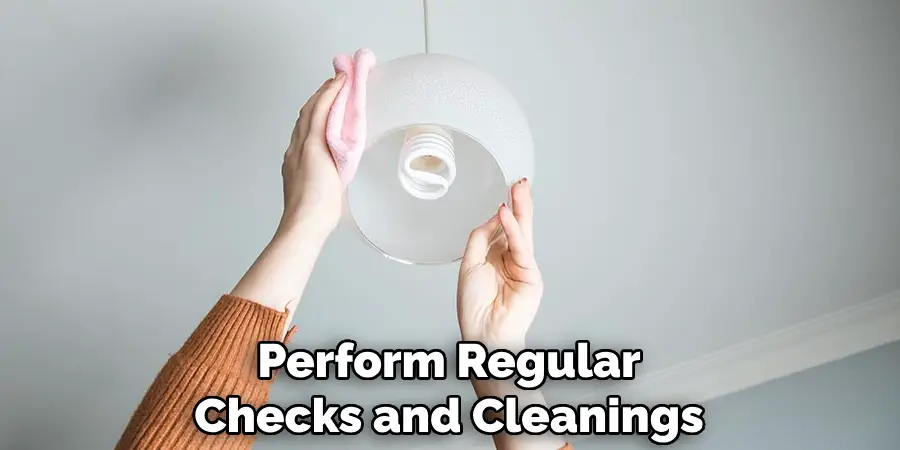
- Regular Maintenance: Perform regular checks and cleanings of your recessed lighting fixtures to prevent the build-up of dust and debris, which can lead to overheating and reduced efficiency. Simple, routine maintenance can significantly extend the life and performance of your lighting.
With these tips and tricks in mind, you can confidently troubleshoot and repair your recessed lighting fixtures, saving time and money while ensuring optimal performance for years to come.
5 Things You Should Avoid When Fixing Recessed Lighting
- Ignoring Safety Procedures: Only start repair work after first ensuring the power is turned off at the circuit breaker. Working on a live circuit can lead to serious electric shock or even fatal accidents.
- Using Incorrect or Incompatible Bulbs: Always choose the right type and size of bulb for your recessed lighting fixtures. Using bulbs that are too large, too powerful, or not designed for your specific fixture can cause overheating, damage the fixture, or produce inadequate lighting.
- Overlooking the Importance of Proper Tools: Avoid using improvised or incorrect tools for the job. Not having the right tools can damage the fixture or personal injury. Always use tools that are specifically designed for electrical work.
- Neglecting Manufacturer’s Instructions: Skipping over the manufacturer’s installation or repair instructions can lead to incorrect assembly, reduced lighting performance, or even fire risk. Always refer to the provided guidelines for specific requirements regarding your fixture.
- Forgetting to Test Before Reassembly: One common mistake is reassembling the entire fixture before testing if the problem has been resolved. This can result in disassembling and reassembling the fixture multiple times, increasing the risk of damage or error. Always conduct a preliminary test after making repairs but before final reassembly.
By avoiding these common mistakes, you can ensure a smooth and successful repair process for your recessed lighting fixtures.
What are the Types of Recessed Lighting?
Recessed lighting fixtures come in various types to suit different needs and preferences. These include:
- Fixed Downlights: Also known as fixed recessed lights, these fixtures are stationary and emit light straight down, making them ideal for general lighting purposes.
- Adjustable Downlights: Adjustable recessed lights allow for the direction of the light beam to be changed, making them suitable for highlighting specific areas or objects.
- Wall Washers: Wall washers produce a wider beam of light that illuminates a larger area. They are perfect for creating ambient lighting and adding depth and dimension to a room.
- Eyeball Lights: Similar to adjustable downlights, eyeball lights allow for the direction of the light to be adjusted, but they have a more distinct look with a movable “eyeball” design.
- Pinhole Lights: These recessed lights have a small opening that produces a narrow beam of light, ideal for highlighting artwork or architectural details.
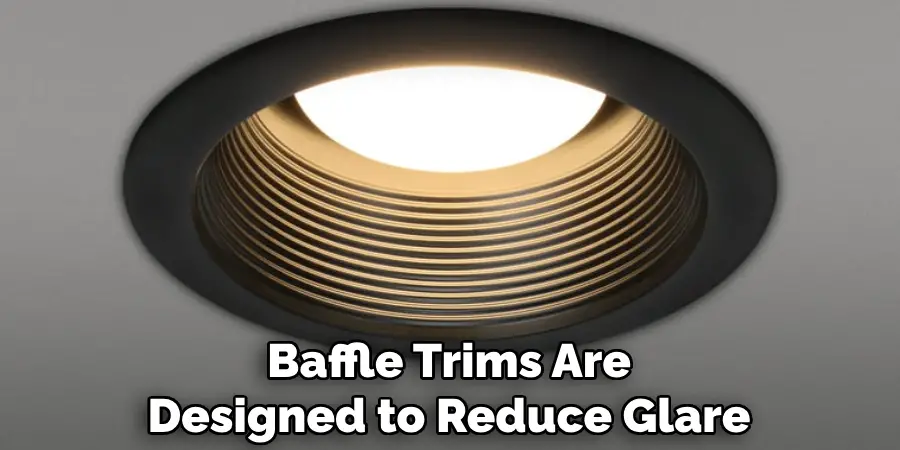
- Baffle Trims: Baffle trims are designed to reduce glare and provide softer, more diffuse lighting.
These are just a few examples of the types of recessed lighting available, each with its own unique characteristics and purposes. Before making any replacements or additions to your recessed lighting fixtures, consider the type that best suits your needs and desired aesthetic.
What is the Disadvantage of Recessed Lights?
While recessed lighting has many benefits, there are also some potential disadvantages to consider. These include:
- Installation Complexity: Installing recessed lighting can be more complex and time-consuming than other lighting fixtures.
- Heat Build-up: Recessed lights produce heat, which can accumulate in the ceiling and potentially cause damage or reduce the fixture’s lifespan.
- Limited Coverage: Depending on the type and positioning of recessed lights, they may have limited coverage and not provide adequate lighting for larger spaces.
- Difficult to Replace: If a recessed lighting fixture needs to be replaced, removing and replacing it without damaging the ceiling or surrounding area can be challenging.
By being aware of these potential disadvantages, you can decide whether recessed lighting is the right choice for your space. Proper maintenance, installation, and usage can help mitigate these issues and ensure optimal performance from your recessed lighting fixtures. Thus, it is important to consider all factors carefully before installing or repairing recessed lighting in your home or workplace.
How Does Recessed Lighting Stay in Place?
There are several methods used to keep recessed lighting fixtures in place. These include:
- Housing Clips: Housing clips are small metal clips that attach to the back of the fixture and secure it to the ceiling.
- Wing Springs: Wing springs are attached to the fixture’s housing and expand once inserted into a mounting hole, locking the fixture in place.
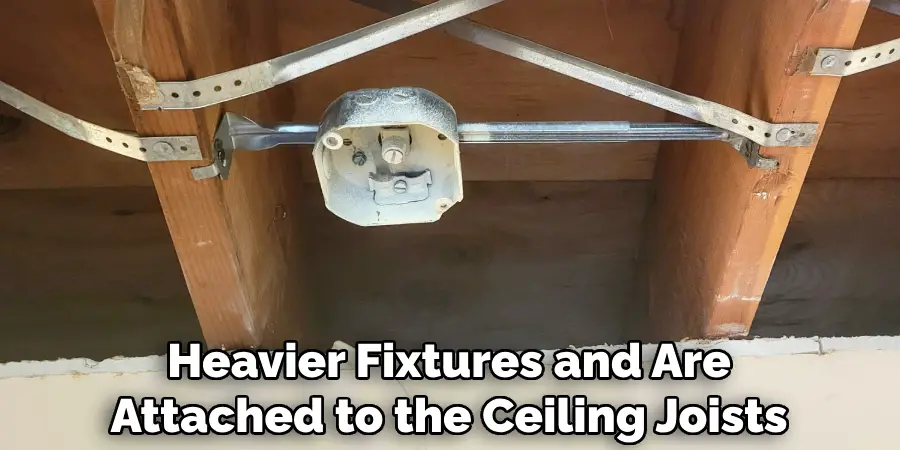
- Support Bars: Support bars are used for heavier fixtures and are attached to the ceiling joists, providing extra stability.
- Screw-in Brackets: These brackets attach to the sides of the fixture’s housing and screw into place, securing it to the ceiling.
The method used may vary depending on the type of recessed lighting fixture and the installation process specified by the manufacturer. It is essential to carefully follow the instructions provided for proper installation and ensure the fixture remains securely in place. Overall, recessed lighting fixtures are a great way to add both functionality and style to any space.
Conclusion
In conclusion, how to fix recessed lighting does not have to be a daunting task. By following practical steps and avoiding common mistakes, homeowners and professionals alike can efficiently troubleshoot and repair these fixtures. It’s crucial to prioritize safety by turning off the power before beginning any work, selecting the correct bulbs, utilizing the appropriate tools, adhering to the manufacturer’s instructions, and testing the fixture before its final assembly.
Additionally, understanding the different types of recessed lighting and their particular uses can aid in making informed decisions for both repairs and installations. While recessed lights offer a sleek and modern lighting solution, being mindful of their potential disadvantages ensures that you can enjoy their benefits without unforeseen problems.
With this comprehensive guide, maintaining and fixing recessed lighting becomes a more straightforward and less intimidating process.