Are you looking for a fun and creative way to spruce up an old wooden rocking chair in your home? Sanding can give it new life, and it’s a perfect DIY project for the weekend. Not only is sanding easy to do once you know what steps to take, but the result will have your rocking chair looking brand-new again – plus, it won’t cost you too much!
In this blog post, we’ll provide all the tips and tricks you need to complete this restoration project. Read on to learn how to sand a rocking chair can make a big difference in its appearance.
Supplies You Will Need to Sand a Rocking Chair
- Sandpaper or Electric Sander
- Safety Goggles and Dust Mask
- Paint Stripper (if necessary)
- Clean Cloth or Tack Cloth
- Tape or Plastic Sheets (optional)
- Wood Stain, Paint, or Varnish (optional)
Step-by-step Guidelines on How to Sand a Rocking Chair
Step 1: Prepare Your Work Area
Before you begin the sanding process, make sure to protect your work area. If possible, move the chair outside or into a well-ventilated space. If that’s not an option, cover the floor with plastic sheets or drop cloths and open windows for ventilation. Preparing the work area is essential to prevent dust and debris from spreading throughout your home.
Step 2: Strip off the Old Finish (if necessary)
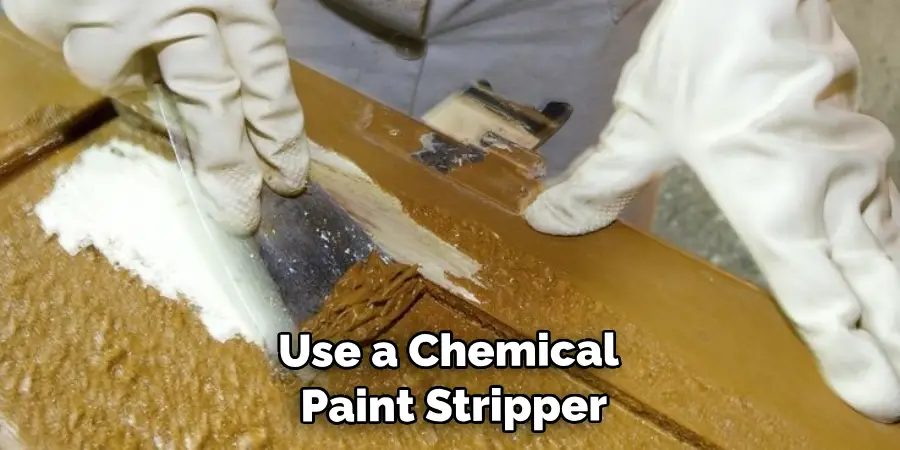
If your rocking chair has a thick layer of old paint or varnish, you may need to strip it off first before sanding. You can use a chemical paint stripper for this process, but make sure to follow the instructions carefully and wear protective gear. If the finish is not too thick or difficult to remove, you can skip this step.
Step 3: Start Sanding
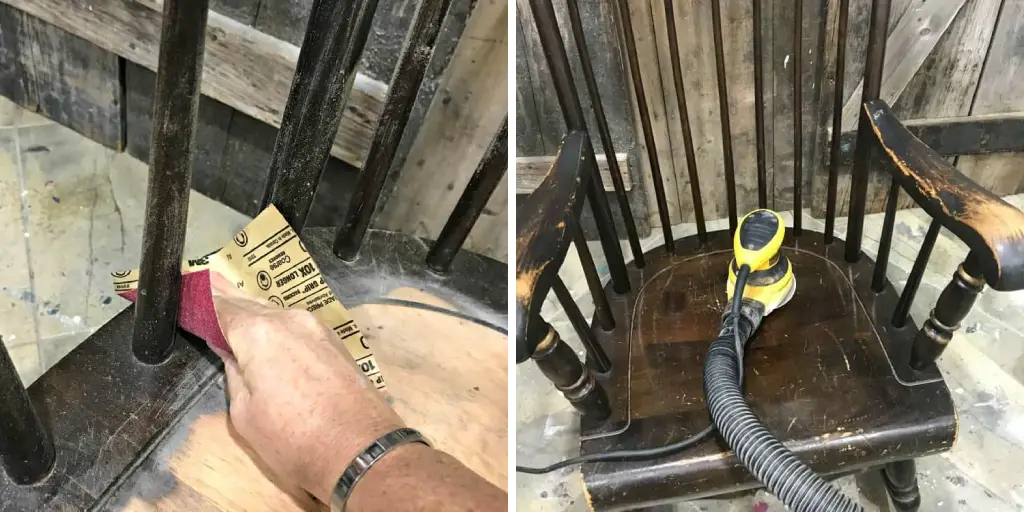
Begin by using low-grit sandpaper (around 80-100 grit) and gradually work your way up to a higher grit (around 220-240 grit). You can also use an electric sander for faster and more efficient sanding. Remember to follow the direction of the wood grain and apply even pressure while sanding. Make sure to sand all the surfaces of the rocking chair, including the legs, arms, and backrest.
Step 4: Check for Smoothness
After sanding, wipe away any dust with a clean cloth or tack cloth. Then, run your hand over the surface of the rocking chair to check for smoothness. If you feel any rough patches, go back and sand those areas again. It’s essential to achieve a smooth and even surface before moving on to the next step.
Step 5: Apply Finish (optional)
If you want to give your rocking chair a new look, now is the time to apply wood stain, paint, or varnish. Make sure to follow the manufacturer’s instructions and allow enough time for drying between coats. Be careful not to apply too much, as it can cause drips and runs. Applying a finish is entirely optional, but it can add a pop of color or protection to your rocking chair.
Following these steps will help you transform your old, worn-out rocking chair into a beautiful piece of furniture. Remember to take your time and be patient with the process. Sanding can be a bit messy, but the result is well worth it. Now you know how to sand a rocking chair and make it look brand new! Share this blog post with friends and family who may also want to learn this DIY skill. Happy sanding!
Additional Tips and Tricks to Sand a Rocking Chair
1. When sanding a rocking chair, it is important to start with coarse grit sandpaper and gradually move to finer grits. This will help achieve a smoother finish without damaging the wood.
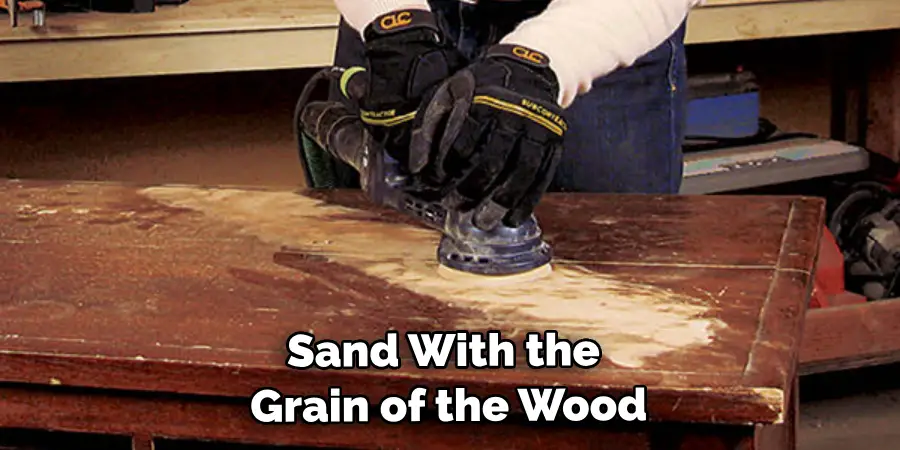
2. It is important to sand with the grain of the wood, rather than against it. This will prevent any scratches or rough patches on the surface.
3. For hard-to-reach areas, such as corners or curved parts of the chair, using a sanding sponge can be more effective than regular sandpaper.
4. Sanding in a circular motion can help to blend the sanding marks and create a more uniform finish.
5. After sanding, make sure to wipe down the chair with a clean cloth or tack cloth to remove any dust before applying a new coat of paint or stain.
6. When using an electric sander, be careful not to apply too much pressure as it can cause gouges in the wood. Let the weight of the sander do the work.
7. If your rocking chair has intricate designs or carvings, consider using a detail sander or sanding by hand to avoid damaging these details.
8. It is always a good idea to wear a dust mask and safety goggles when sanding to protect yourself from any flying particles.
9. Take breaks while sanding to avoid fatigue and to check your progress. This will also prevent you from over-sanding certain areas.
10. Lastly, remember to always work in a well-ventilated area when sanding to avoid inhaling any harmful fumes from paints or stains.
11. It is important to follow the manufacturer’s instructions when using any chemicals, such as paint strippers or wood cleaners, to prepare the surface before sanding.
Following these tips and tricks will ensure that you achieve a beautifully sanded rocking chair that is ready for a fresh coat of paint or stain. Happy sanding!
Things You Should Consider to Sand a Rocking Chair
1. The first thing you should consider to sand a rocking chair is the type of wood that your rocking chair is made from. The different types of wood will require different techniques, so it’s important to know what kind of wood you’re working with before starting.

2. Another important factor to consider is the condition of the rocking chair. If it’s an old or weathered piece, it may need more aggressive sanding compared to newer pieces. You should also check for any cracks or splits in the wood that may need to be repaired before sanding.
3. Before starting, make sure you have all the necessary tools and materials such as sandpaper of different grits (coarse, medium, fine), a paint scraper, a putty knife, wood filler, and safety gear like goggles and a dust mask.
4. Start by removing any existing finish or paint from the rocking chair using a paint scraper. If there are stubborn spots, you can use a chemical stripper to help loosen the finish.
5. Next, use coarse sandpaper to remove any rough edges, bumps, or dents on the surface of the wood. Always sand in the direction of the grain to avoid damaging the wood.
6. Once all the imperfections are removed, switch to medium-grit sandpaper and continue sanding in the direction of the grain. This will help smooth out the surface and prepare it for a finer sanding.
7. For a more polished look, you can use fine-grit sandpaper to achieve a smoother finish. Be sure to remove any dust particles between sanding each section by wiping it down with a damp cloth.
8. After the desired smoothness is achieved, you can fill in any cracks or holes with wood filler and let it dry completely before sanding again.
9. Once satisfied with the smoothness of the rocking chair, wipe it down with a tack cloth to remove any remaining dust particles before applying a new finish.
10. Finally, choose a finish that best suits the type of wood and style of your rocking chair. You can use paint, stain, or varnish depending on the look you want to achieve.
Following these considerations and steps will ensure that your rocking chair is properly sanded and ready for a new finish. Remember to take breaks and work in a well-ventilated area when sanding to avoid inhaling too much dust. With proper care, your rocking chair will look like new again! Happy sanding!
Frequently Asked Questions
How Often Should I Sand My Rocking Chair?
The frequency of sanding your rocking chair will depend on how often you use it and the material it is made of. If you have a wooden rocking chair that is regularly used, it is recommended to sand it every 1-2 years to maintain its condition.

However, if you have a metal or plastic rocking chair, it may not require sanding as frequently. It is important to regularly inspect your rocking chair and determine if it needs to be sanded based on its current condition.
How Do I Choose the Right Sandpaper Grit?
When selecting sandpaper grit for your rocking chair, consider the level of roughness or smoothness you want to achieve. Coarse grit (around 60-80) is suitable for removing paint or deep scratches, while medium grit (around 120-150) can be used for smoothing out rough surfaces. Fine grit (around 220-240) should be used for final sanding and achieving a smooth finish. You may also need to use different grits in combination depending on the condition of your rocking chair.
Should I Sand in a Specific Direction?
It is generally recommended to sand in the direction of the wood grain for wooden rocking chairs. This will help avoid creating scratches or visible marks on the surface. For metal or plastic rocking chairs, you can sand in any direction without worrying about damaging the material.
Can I Sand Painted Rocking Chairs?
Yes, you can sand-painted rocking chairs to remove or smooth out the paint. However, it is important to use caution and start with coarse grit to avoid damaging the wood underneath. You may also need to repaint or refinish the chair after sanding.
Conclusion
With the above outlined you can learn easily how to sand a rocking chair and keep it in good condition. Remember to always inspect your rocking chair before sanding and choose the appropriate grit for the job. Sanding regularly can help prolong the life of your rocking chair and keep it looking beautiful for years to come. If you are unsure about how to properly sand your specific type of rocking chair, consult a professional or do thorough research beforehand. Happy sanding!
You Can Check It Out to Mount a Monitor Without Screw Holes