
Maintaining the performance and longevity of your keyboard involves more than just cleaning the surface; it requires attention to the intricate components beneath the keycaps, particularly the keyboard switches. Over time, dust, debris, and even accidental spills can compromise the functionality of these switches, leading to issues like key chatter or unresponsiveness.
In this guide, we explore the art of cleaning keyboard switches, offering insights into the step-by-step process and the tools needed to ensure optimal performance. Whether you’re a dedicated gamer, a professional typist, or simply someone who relies heavily on their keyboard, understanding how to clean keyboard switches is a valuable skill to prolong the life of your input device and maintain a satisfying typing or gaming experience.
Importance of Cleaning Keyboard Switches
Regular cleaning of keyboard switches is not just about maintaining the aesthetic appeal of your keyboard; it’s a critical practice for preserving its functionality and responsiveness over time. Dust, food particles, and other forms of debris can accumulate beneath the keycaps, obstructing the switches’ mechanisms and leading to a host of issues including sticky or unresponsive keys.
For gamers, typists, or anyone who relies on precise keystrokes, this can significantly hinder performance and accuracy. Additionally, neglecting switch cleanliness can shorten the lifespan of your keyboard, resulting in a need for more frequent replacements. Through routine cleaning, you ensure that your keyboard remains in peak condition, providing a consistent and reliable user experience.
Understanding Keyboard Switches
Before embarking on the cleaning process, it’s vital to grasp what keyboard switches are and their role in your keyboard’s functionality. Keyboard switches are the mechanisms under the keycaps that register the keystrokes and send the input to your computer. They come in various types, including mechanical, membrane, and scissor switches, each offering a distinct touch, sound, and response rate.

Mechanical switches, for instance, are renowned for their durability and tactile feedback, making them a favorite among gamers and typists alike. Membrane switches, on the other hand, provide a softer keystroke and are often found in more compact, quieter keyboards. Understanding the type of switches your keyboard uses is crucial, as it influences the cleaning techniques and tools that will be most effective and safe to use, ensuring that you maintain the integrity and performance of your keyboard without risking damage.
Types of Keyboard Switches
Keyboard switches can significantly affect your typing or gaming experience, making it essential to choose the right type based on your preference and usage. The three most common types of keyboard switches are mechanical, membrane, and scissor switches.
- Mechanical Switches: Known for their durability and tactile feedback, mechanical switches are preferred by gamers and professional typists. These switches use individual mechanisms under each key to register keystrokes, offering precise control and a satisfying clicky sound. They are customizable and available in various forms, including linear, tactile, and clicky variants.
- Membrane Switches: Membrane keyboards utilize a pressure pad that outlines the keys beneath a soft membrane layer, providing a quieter and softer keystroke. These switches are typically found in workplaces or environments where noise reduction is preferred. While they are more affordable than mechanical switches, they may lack the tactile feedback that some users desire.
- Scissor Switches: Often seen in laptops and low-profile keyboards, scissor switches combine a membrane base with a scissor-like mechanism to stabilize the keycap. This design allows for a quieter, more stable typing experience with shorter key travel, making them ideal for fast typists and those seeking a sleek, compact keyboard.

Choosing the right type of keyboard switch depends on personal preferences and the primary use of the keyboard. Whether you prioritize typing feel, sound, durability, or the need for a quiet workspace, understanding the differences among these switch types can guide you in selecting the keyboard that best fits your needs.
Common Issues with Dirty Switches
When keyboard switches become contaminated with dust, debris, or liquids, several common issues can arise, affecting the overall typing or gaming experience. One of the most frequent problems is key chatter, where a single keystroke registers multiple inputs. This can disrupt typing flow and accuracy, leading to frustration during use.
Sticky or unresponsive keys are another significant concern, as accumulated grime can hinder the switches’ ability to return to their original position swiftly or even register a keystroke. Furthermore, dirty switches can lead to an inconsistent tactile feel across the keyboard, with some keys feeling different than others, which can be particularly distracting for users who rely on a uniform response for efficient typing or gaming.
In severe cases, the accumulation of debris and liquids can lead to permanent damage, necessitating expensive repairs or the complete replacement of the keyboard. Addressing these issues promptly through regular cleaning can preserve the functionality and extend the life of your keyboard.
10 Methods How to Clean Keyboard Switches
1. Unplug the Keyboard:
Before starting any cleaning process, unplug your keyboard or turn it off if it’s wireless. This ensures your safety and prevents any potential damage to the keyboard during the cleaning process.

After unplugging, place the keyboard on a flat surface with plenty of space for you to work comfortably. This will also prevent any accidental spills or drops during cleaning. To thoroughly clean the keyboard, you will need a few basic cleaning supplies.
2. Remove Keycaps:
To access the switches, carefully remove the keycaps using a keycap puller. Gently wiggle the puller under the keycap and lift it off. Take note of the keycap placement for reassembly. Although keycaps can be removed using fingers, it is recommended to use a keycap puller to avoid damaging the switches or keycap stem.
3. Use Compressed Air:
Begin by using compressed air to blow away loose dust and debris from the switches. Hold the keyboard upside down or at an angle to allow gravity to assist in the removal of particles. This step helps clear the surface before more detailed cleaning.
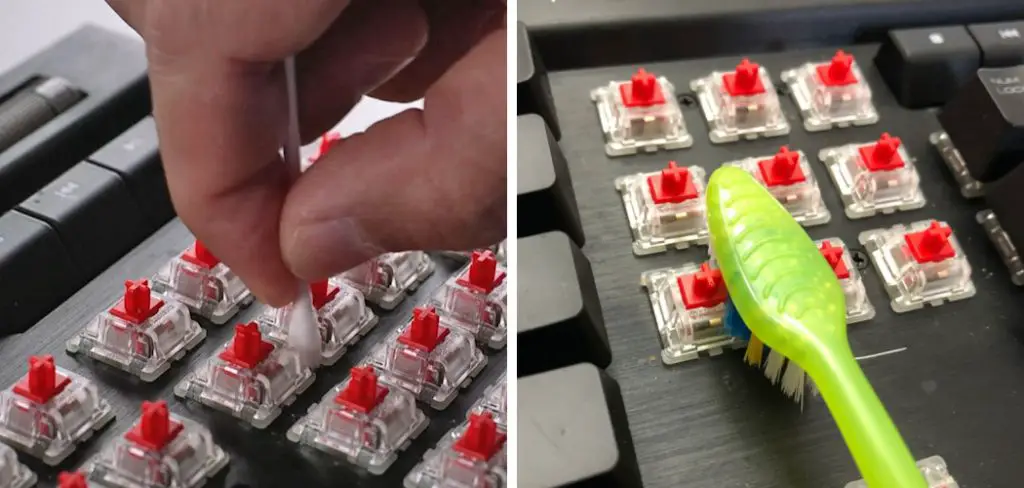
After using compressed air to remove loose dust and debris, you can use a small brush or cotton swab to clean between the keys. Be gentle while cleaning as harsh movements may damage the switches.
Next, use a mild cleaning solution along with a soft cloth or sponge to gently wipe down the surface of the keyboard. Make sure to wring out any excess water before wiping to prevent any liquid from entering the keyboard and damaging the switches.

For tougher stains or built-up grime, you can use a specialized electronic cleaner. Follow the instructions on the cleaner and use a soft cloth or cotton swab to gently apply and remove the solution.
4. Brushing with a Soft Bristle Brush:
Employ a soft-bristle brush, like a small paintbrush or a clean makeup brush, to sweep away remaining dust and particles. Gently brush over the switches and surrounding areas to dislodge any stubborn dirt. Continue to use the brush until all visible dirt is removed.
After brushing, use a damp cloth or cotton swab to clean any remaining grime. Be sure to wring out excess water before wiping down the switches, as moisture can damage electrical components. For sticky or greasy residue, add a small amount of mild dish soap to the water and wipe away gently.
It is recommended to use a soft-bristle brush when cleaning switches as it is gentle enough not to damage the delicate electrical components. However, if you don’t have a small paintbrush or clean makeup brush, you can also use a toothbrush with soft bristles.
5. Isopropyl Alcohol and Cotton Swabs:
Dampen a cotton swab with isopropyl alcohol (at least 90% concentration). Gently swab each key switch, ensuring the alcohol reaches the internal components. This helps dissolve sticky residues and disinfect the switches. Though it may seem counterintuitive, rubbing alcohol is actually a great cleaner because it evaporates quickly and doesn’t leave behind any residue.
Isopropyl alcohol (IPA) is a common household cleaning solution that can also be found in most first aid kits. It is also known as rubbing alcohol and is widely used for disinfecting surfaces and medical equipment due to its antibacterial and antiviral properties.
IPA is a highly effective cleaner for electronic devices, especially keyboards. The alcohol effectively removes grime, dirt, and oils from the keyboard switches without damaging them. However, it is important to use IPA with caution as it can damage some types of plastic and rubber materials.
6. Use a Keyboard Cleaning Gel:
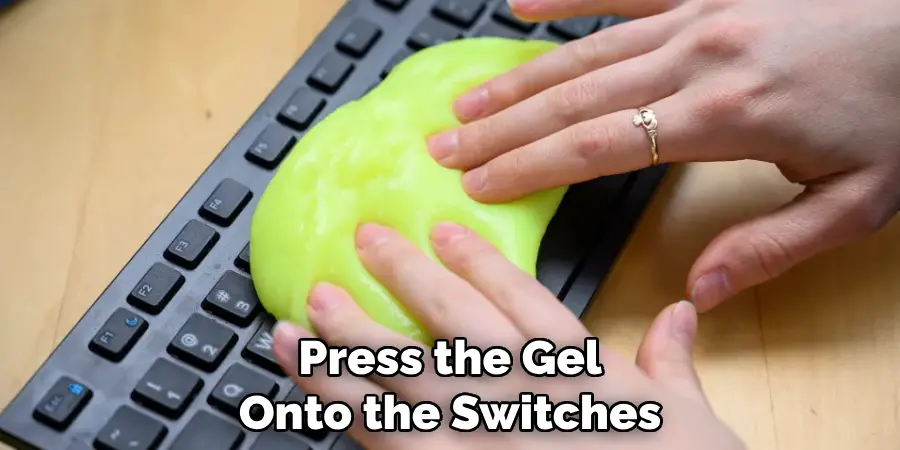
Keyboard cleaning gels, available commercially, are a convenient tool for reaching and removing debris from hard-to-reach areas. Press the gel onto the switches, allowing it to conform to the contours and capture dirt effectively. After a few seconds, gently lift the gel to remove any trapped debris. Repeat as necessary until all dirt and grime have been removed from your keyboard. However, keyboard cleaning gels are not the only option for keeping your keyboard clean. There are other techniques and tools that you can use to maintain a hygienic workspace.
One alternative to using a gel is compressed air. This method involves using a can of compressed air to blow away dirt particles from between the keys. It is an effective way to remove debris without touching the components of the keyboard. However, make sure to hold the can upright and at a safe distance from the keyboard to prevent any moisture or residue from damaging the device.
Another option for cleaning your keyboard is using cleaning wipes. These pre-moistened wipes are designed specifically for keyboards and are easy to use. Simply wipe down your keyboard with the cleaning wipe, making sure to clean between the keys and along the edges. These wipes are also great for disinfecting your keyboard, especially if you share it with other people.
7. DIY Cleaning Mixture:
Create a DIY cleaning solution by mixing isopropyl alcohol with distilled water. Dampen a microfiber cloth with this solution and gently wipe down the surface of the switches, keycaps, and the surrounding keyboard area. Make sure to not oversaturate the cloth and to let the keyboard dry completely before use.
Next, you can also create your own natural cleaning mixture using household ingredients. Mix equal parts white vinegar and water in a spray bottle and add a few drops of essential oils for added scent. This solution is perfect for disinfecting keyboards without harsh chemicals.
For tougher grime or stains, you can make a paste using baking soda and water. Apply the paste to the affected areas and let it sit for a few minutes before scrubbing with a toothbrush or cloth. This will help remove stubborn dirt and grime without damaging the keyboard.
8. Ultrasonic Cleaning:
For a more thorough cleaning, consider using an ultrasonic cleaner. Remove the keycaps, place them in a mesh bag, and immerse them in a mixture of water and a mild detergent. Run the ultrasonic cleaner for a few minutes to dislodge debris from keycaps and switches.

Ultrasonic cleaning is a highly effective method of cleaning that is commonly used in industrial and commercial settings. It utilizes high-frequency sound waves to create millions of tiny bubbles that collapse and agitate the water, providing a powerful scrubbing action. This process can remove even the toughest dirt and grime from small and intricate parts, making it perfect for cleaning keyboard components.
The ultrasonic cleaner is also a gentle method of cleaning, as it does not involve any harsh chemicals or abrasive scrubbing. This means that it is safe to use on delicate electronic components, such as keyboard switches and PCBs. The bubbles created during the ultrasonic cleaning process can easily reach into small crevices and openings, ensuring a thorough and deep clean.
Aside from keycaps and switches, an ultrasonic cleaner can also be used to clean other keyboard components such as stabilizers, springs, and housings. This makes it a versatile tool for keeping your entire keyboard in pristine condition.
9. Inspect for Residue:
After cleaning, inspect the switches for any remaining residue. If you notice persistent grime, repeat the cleaning process using isopropyl alcohol and cotton swabs until the switches are free of debris. You can also use compressed air to blow away any residual dust or particles.
Residue on switches can cause them to stick or malfunction, which can be a safety hazard and reduce the lifespan of your equipment. In some cases, residue may not be visible but can still affect the function of the switch. Regularly inspecting and cleaning your switches will prevent these issues from arising and ensure their proper functioning. Thouggh switches are sturdy and designed to withstand repeated use, they still require maintenance to ensure their longevity.
It is also important to inspect for residue on other parts of your equipment, such as the cord and plug. Over time, dirt and grime can accumulate on these areas, which can lead to electrical issues or potential fire hazards. Use a damp cloth or paper towel with a small amount of mild detergent to wipe down these areas and remove any residue. Make sure to dry them thoroughly before using the equipment again.
10. Allow Proper Drying Time:
After cleaning, allow the keyboard and keycaps to dry thoroughly before reassembly and use. This ensures that no moisture remains within the switches, preventing potential electrical issues.

Once the keyboard is completely dry, you can reattach the keycaps and start using it again. Depending on the level of cleaning done, the drying time may vary. It is recommended to wait at least 24 hours before reassembling and using your keyboard. Although it may be tempting to use the keyboard before it is fully dry, this can lead to damage and malfunctions.
In order to speed up the drying process, you can also use a hairdryer on low setting or place the keyboard in a well-ventilated area. However, do not apply heat directly onto the keyboard as it can cause damage to the delicate components.
Proper drying time is essential not only for the functionality of your keyboard, but also for its longevity. Moisture can cause corrosion and damage to the internal components, leading to a shorter lifespan. Therefore, it is important to be patient and allow enough time for your keyboard to dry completely before using it again.
Conclusion
In conclusion, mastering the art of cleaning keyboard switches is essential for maintaining the performance and longevity of your keyboard. By understanding the different types of switches and the components involved, users can effectively address common issues caused by dirt, dust, and debris accumulation.
Whether employing dry cleaning techniques like using compressed air or wet methods such as isopropyl alcohol and cotton swabs, attention to detail is paramount to ensure thorough cleaning without causing damage to the switches. Deep cleaning methods, including disassembly for a more comprehensive approach, can restore functionality to sticky or unresponsive switches.
Regular maintenance and post-cleaning checks contribute to a smooth typing experience and prolong the lifespan of your keyboard. By integrating these cleaning practices into your routine, you can ensure that your keyboard switches remain clean, responsive, and reliable, enhancing productivity and enjoyment during everyday use. Thanks for reading, and we hope this has given you some inspiration on how to clean keyboard switches!