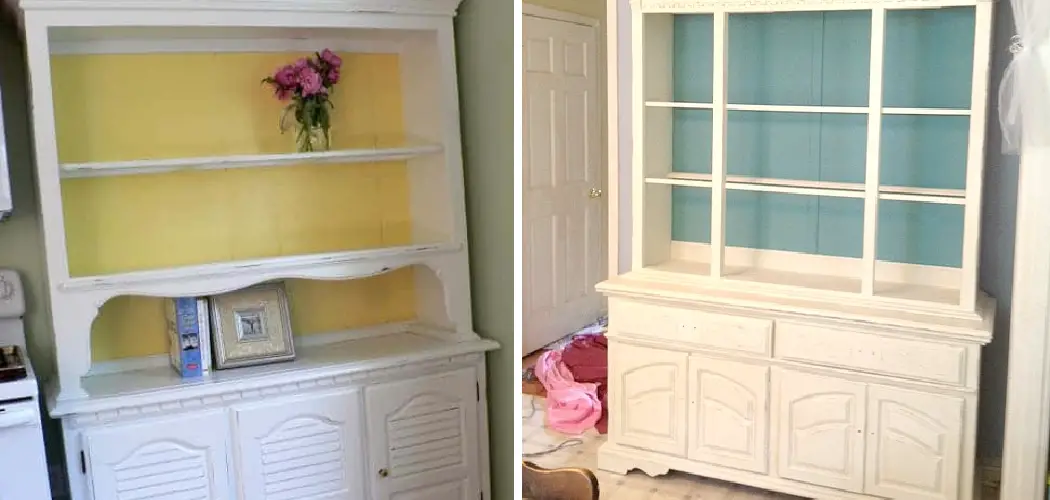
Are you looking to give an old hutch a new look? Painting a hutch is easy and can bring your furniture back to life. Here’s how to paint a hutch.
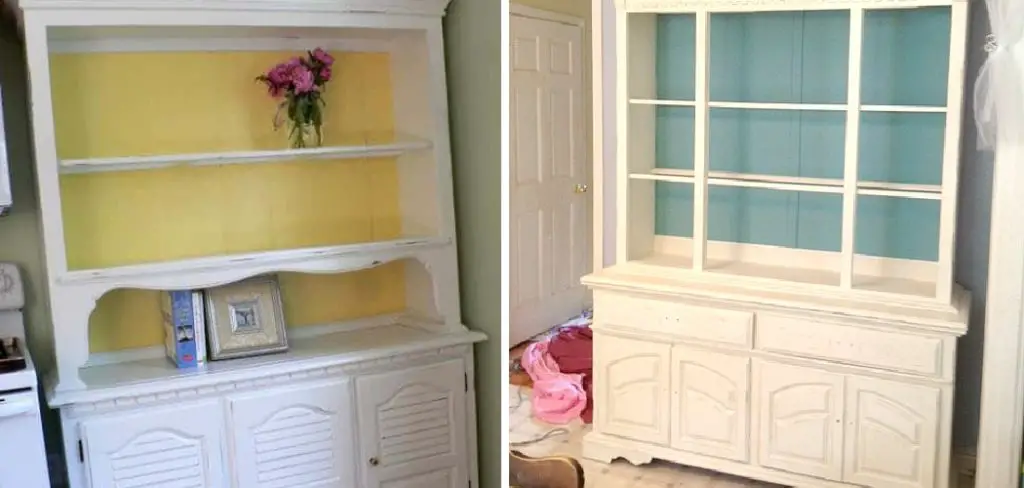
Painting a hutch is the perfect project for anyone looking to freshen up their home. Whether you want to create an entirely new look or just give your old hutch some love and care, it can be done with the right guidance and tools.
In this blog post, we’ll take you through all of the steps necessary to paint a hutch from start to finish so that you will have beautiful results in no time! From surface preparation and safety tips to advice on choosing quality materials, we’ve got everything covered so that experienced DIYers and rookies can accomplish this task without any headaches along the way.
What Will You Need?
Before you paint a hutch, you’ll need to gather the right materials and tools for the job. Here’s what you will need:
- Sandpaper or an electric sander
- Quality paintbrush
- Primer
- Latex paint in your choice of color
- Clear sealant or polyurethane
- Drop cloths or tarps for the floor
- Masking tape and plastic sheeting to cover areas you don’t want to paint
- Clean rags or paper towels
Once you have the necessary materials, it’s time to start.
10 Easy Steps on How to Paint a Hutch
Step 1. Prepare the Surface:
Before you start painting, it’s important to make sure that your hutch is free of dirt and dust. If possible, use an electric sander to get into all of the nooks and crannies. If you don’t have access to one, try lightly sanding small areas with medium-grit sandpaper. Be sure to remove any loose paint or debris from the surface of the hutch before moving on.
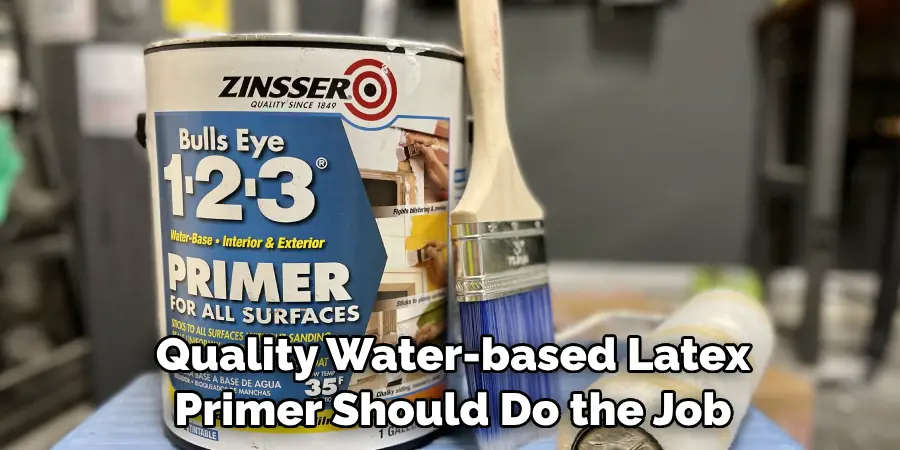
Step 2. Apply Primer:
Once your hutch is clean and dry, it’s time to apply primer. A quality water-based latex primer should do the job nicely; make sure to follow the instructions on the can for best results. Allow the primer to dry completely before moving on. As an alternative, you can use a spray primer for quick and easy application.
Step 3. Pick Your Paint:
Now that your hutch is prepped and ready, you can choose the color of paint you want to use. If you’re not sure about a color, consider going for something neutral like white or gray. You can always add a pop of color with accessories later!
Once you have chosen your paint, apply two coats with a quality brush in even strokes, allowing drying time between each coat. Don’t forget to cover any areas that you don’t want to be painted with masking tape and plastic sheeting.
Step 4. Use Sealant:
Once your paint has completely dried, it’s time to seal the hutch with a clear coat. This will help protect against wear and tear and make cleaning easier. Use a water-based polyurethane or any other type of sealant that the manufacturer recommends. Allow the sealant to dry fully before using your hutch again.
Step 5. Add Accessories:
Now that your hutch is freshly painted, you can add any accessories to complete the look. Consider adding some decorative knobs or pulls for a personalized touch. You could also hang artwork on the walls to show off your favorite pieces. The possibilities are endless!

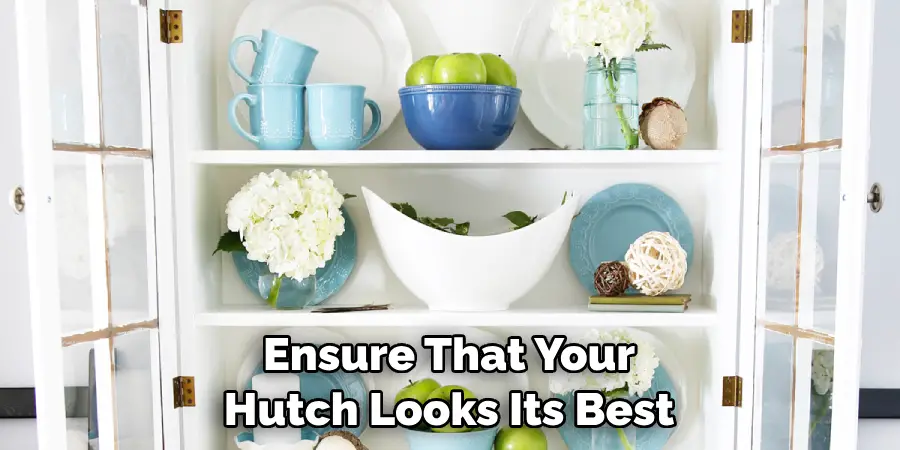
Step 6. Keep it Clean:
To make sure that your newly painted hutch looks its best, it’s important to keep it clean. Dust regularly and use wood cleaners as needed to keep up with daily wear and tear. If the hutch gets wet, be sure to dry it immediately to prevent warping or peeling.
Step 7. Dry Out:
Once you’re done cleaning, be sure to allow your hutch to dry completely before using it again. This will help avoid any issues with the paint or sealant. Be careful when handling a wet hutch to prevent any accidents.
Step 8. Check for Any Issues:
Now that your hutch is dry look to ensure everything looks good. If you notice any areas needing touch-ups or repairs, now’s the time to do it. Ensure that all of the edges are smooth and free of dirt or dust before you put them back into use.
Step 9. Enjoy!
Your hutch is finally ready to use and enjoy! Show it off proudly and bask in the compliments from friends and family who appreciate your hard work. Keep up with regular maintenance and cleaning, and your newly painted hutch will last for years to come.
Step 10. Take Care of Your Hutch:
To ensure that your hutch looks its best for years to come, take care of it by following the steps mentioned above. With proper maintenance, you can keep this project looking beautiful in no time at all. Remember to add sealant whenever necessary and keep any exposed surfaces free of dust to prevent damage.
By following these ten simple steps, you can turn an old hutch into a beautiful piece of furniture. With a little bit of patience and dedication, you’ll have the perfect piece to show off in your home.
5 Additional Tips and Tricks
1. Make sure to sand the hutch first to make sure your paint sticks! Light sanding will help remove any accumulated dust and dirt over time.
2. If you’re trying to cover up a previous paint job, use a primer and sealer before painting. This will help ensure that the new color will adhere evenly to the hutch.
3. Be sure to apply your paint in even coats with a brush or roller for best results. Don’t glob it on; light layers are key!
4. Use painter’s tape to get really clean lines around any details of the hutch, like drawers or other accents.
5. Allow enough dry time between coats; each coat needs at least 24 hours before applying another layer of paint – this could take several days, depending on how many coats you plan on doing!
With these tips, you’ll be able to easily paint a hutch and give it an entirely new look! Be sure to take your time and enjoy the process – happy painting!
5 Things You Should Avoid
- Don’t skip sanding the hutch – this is an important step that will ensure your paint job looks great!
- Avoid using too much paint or painting in thick layers – this could cause cracks and bubbles as it dries.
- Don’t leave gaps between coats of paint – they can lead to uneven color when finished.
- Don’t forget to use painter’s tape before painting; it will give you crisp, clean lines when done.
- Lastly, don’t rush the process; make sure each coat has enough time to dry properly before applying another!
Follow these simple tips, and you can paint a hutch and give it a new look easily! Remember that painting is an art, so have fun with it – enjoy the process!
6 Different Theme Ideas
1. Rustic: It’s all about the texture! Choose a distressed finish and use deep brown, black, and red colors for an authentic rustic look.
2. Modern: Incorporate bold colors like navy blue, white, and gray for a modern look. Try adding geometric shapes or patterns to really make the hutch stand out!
3. Eclectic: Choose an array of bright, happy colors along with eclectic patterns or designs to create an interesting and unique look.
4. Farmhouse: Think soft pastels or muted tones like sage green, cream, and light blues for a farmhouse-inspired hutch. Add a few rustic accents like jute rope or galvanized metal for extra texture!
5. Country Chic: Go for a classic country style with cream whites and shades of blue – you can’t go wrong! Accentuate it by adding some distressed details or a floral pattern for an extra touch of whimsy.
6. Tropical: Go for bright hues like pinks, greens, and oranges to create a fun and tropical vibe. Incorporate some palm leaves or floral patterns to really set the look!
Pick the theme that speaks to you, and have fun with it! With these five ideas, you can easily transform your hutch into something beautiful and unique. Enjoy the process – happy painting!

Conclusion
Painting a hutch can be an exciting, creative, and rewarding process. Not only does the end result look beautiful, but it is also a great way to save money by upcycling furniture you may already have or find cheaply.
Remember to properly prep your surface before you start painting, use quality materials, paint in thin coats, keep a wet edge so the paint doesn’t dry too quickly, and take time applying the finishes.
With these tips in mind, your newly painted hutch will be sure to turn heads and be the perfect addition to any room of your home. Now that you know how to tackle this task successfully, feel free to get out there and show off your creative flair!
Hopefully, the article on how to paint a hutch has provided you with the information and guidance necessary for a successful project. Happy painting! Good luck!
You Can Check It Out to Paint Plywood Cabinets