
Having the ability to use electricity outside can provide a great deal of added convenience, from powering holiday lights and outdoor speakers to running your power tools for those weekend DIY projects.
Running an extension cord outdoors is relatively simple, but it’s important to familiarize yourself with the guidelines set in place by safety standards so that you can keep yourself and your family safe.
In this blog post on how to stain shelves, we’ll discuss all the necessary steps and equipment for installing an outdoor-rated extension cord safely and effectively so that you can enjoy having a dependable source of outdoor power!
Necessary Materials
Given below is a list of the materials required for staining shelves:
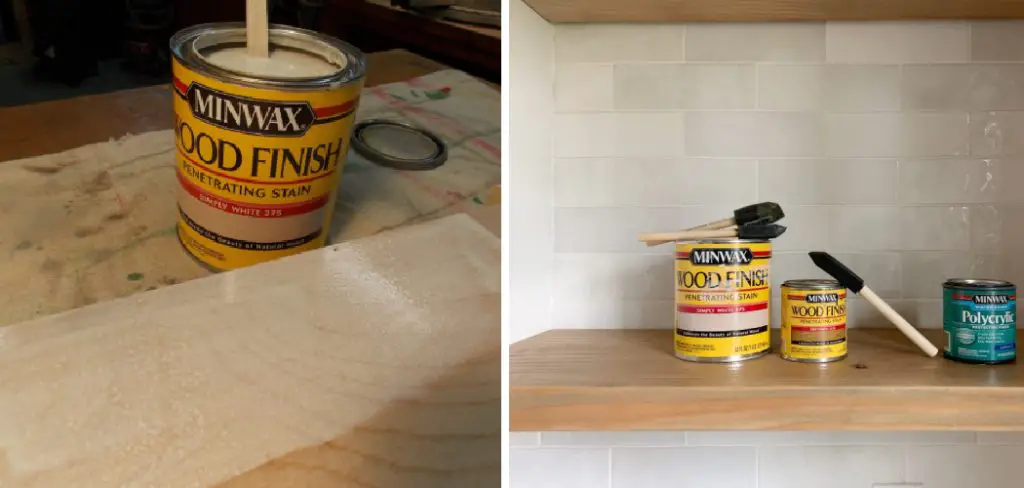
Stain or Paint
This is the most important material for staining shelves, as the color of the stain or paint will be what gives your shelf its unique look. Choose a stain or paint that is suitable for use on wood and in outdoor environments.
Primer
A primer will help ensure that the stain or paint adheres to the wood properly, giving you a more even finish.
Wood Sander
Using a wood sander will help make sure that the surface of your shelf is smooth before you apply the stain or paint.
Paint Brushes and Rags
You’ll need some brushes and rags to apply the primer, stain, and/or paint evenly across your shelf.
11 Step-by-step Guidelines on How to Stain Shelves
Step 1: Prepare the Shelf
Start by sanding down your shelf with a wood sander until it has a smooth surface. Wipe down any dust or debris with a damp cloth before beginning to apply the primer and/or stain. If you are staining the shelf, it is important to note that the wood should be sanded in the direction of the grain.
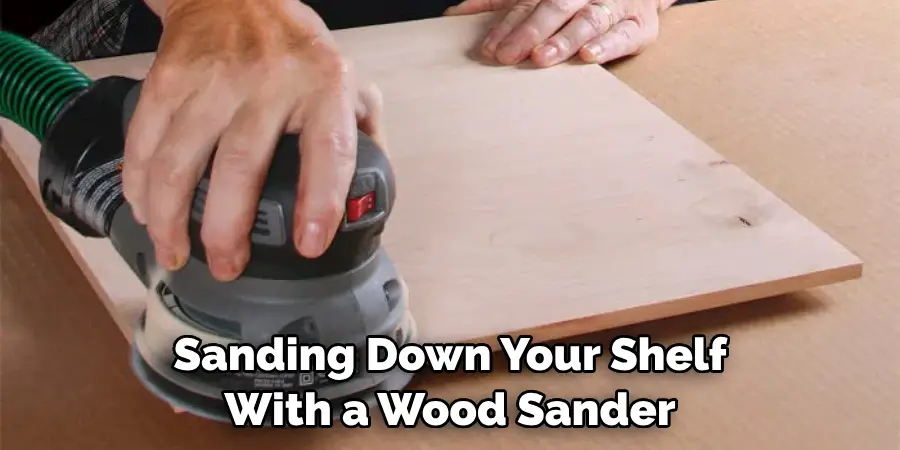
If you are painting the shelf, it is optional to sand the surface. This will help to ensure a smooth finish. It is important to make sure the shelf is dry and free of any debris before beginning this step.
Step 2: Apply the Primer
Using a brush, evenly apply a coat of primer to the shelf. Allow it time to dry according to the instructions on the product before moving on to the next step. It is important to apply the primer in thin layers, as this will help ensure that the final finish looks even and uniform.
This step is especially important if you are painting the shelf. This will help the paint adhere to the wood better and provide an even finish.
Step 3: Apply the Stain or Paint
Once your primer has dried, you can begin applying your chosen stain or paint. Use long strokes in the direction of the grain and wipe away any excess with a rag as you go. If staining, just one coat should be enough unless you want a darker shade of color. If using paint, two coats may be necessary for full coverage.
It is also important to note that if your paint is too thick, it can take a long time to dry and can lead to an uneven finish. But if you use thin layers, it will dry much faster and give you a better result.
Step 4: Allow Time to Dry
Allow sufficient time for your stain or paint to completely dry before moving on to the next step. This time will vary depending on the product you have chosen, so it’s important to read and follow the instructions on the label carefully. If you’re using paint, it is best to wait at least two days before moving on to the next step.
But if you’re staining, you can usually move on to the next step after only a few hours. It’s important to note that the drying time can vary depending on factors such as humidity and temperature.
Step 5: Apply a Clear Coat
Once your paint or stain has dried, it’s time to apply a clear coat of finish on top. This will help protect the color from fading and give you a beautiful, glossy sheen that is sure to last for years to come.
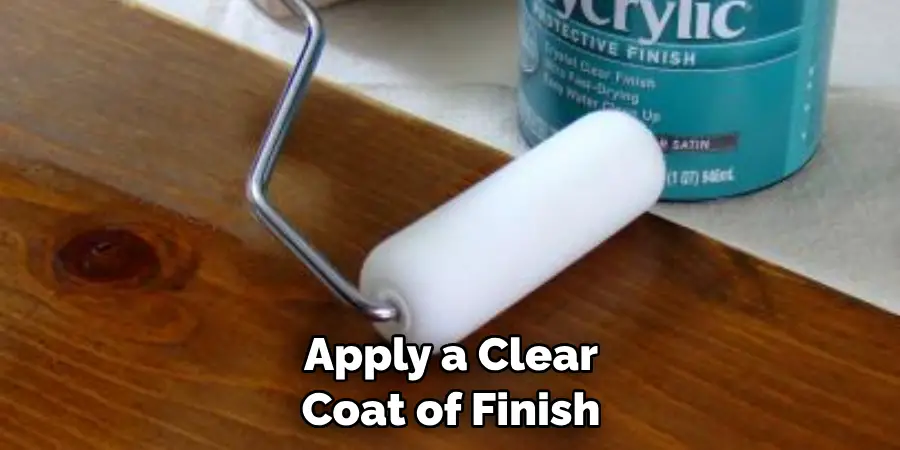
This step is optional but highly recommended if you want your shelf to look its best. If you choose to apply a clear coat of finish, use long strokes in the direction of the grain and allow it to dry thoroughly before moving on.
Step 6: Allow Time for the Finish to Dry
Allow your clear coat of finish sufficient time to dry before moving on. Again, follow the instructions on the label for the best results. Once it has completely dried, your shelf should be ready for use!
This is the last step in our tutorial on how to stain shelves. It’s important to note that if you are staining or painting a shelf for outdoor use, it is highly recommended to apply two coats of finish for added protection against the elements.
Step 7: Place the Shelf
Now that your shelf is finished, you can place it in its desired location. Make sure to do this carefully so as not to damage the paint or stain job. This completes our tutorial on how to stain shelves!
It’s important to note that these steps can also be applied to other woodworking projects such as decks, fences, and furniture. But it’s always best to double-check the instructions on the product before you begin any project.
Step 8: Enjoy Your Newly Finished Shelf
You’ve now successfully finished your shelf! Enjoy the beautiful finish you have achieved and take pride in a job well done. If you followed these steps, you should have a shelf that looks great and will last for years to come. Although staining and painting shelves may seem like a daunting task at first, this tutorial will help make the process much easier.
Step 9: Clean Up
Don’t forget to clean up your workspace after staining your shelf. Put away any tools or materials that you used and dispose of any leftover paint, stain, or primer according to the instructions on the product labels. This will help to ensure that you don’t accidentally create any hazardous waste.
Step 10: Keep Your Shelf Well Maintained

Keeping your shelf well maintained will help ensure its longevity and keep it looking beautiful for years to come. Make sure to wipe it down regularly with a damp cloth and apply additional coats of finish every few years if necessary. If you take good care of your shelf, it should last for a long time.
Step 11: Replace Any Damaged Parts
If over time parts of your shelf become damaged, make sure to replace them as soon as possible in order to maintain the integrity of the structure. This will help prevent further damage and keep your shelf looking beautiful for years to come. It’s important to note that if you are replacing any parts, it is best to use materials that match the original finish so as not to disrupt the overall look of the shelf.
Following these 11 steps on how to stain shelves should provide you with all the information you need. Just remember to use the right materials, take your time, and be patient for the best results! If you have any questions, make sure to consult an expert before proceeding.
Staining shelves is a great way to add a unique touch to any room in your home. With these step-by-step instructions, you now have everything you need to transform an ordinary shelf into something truly special. Best of luck with your project!
Frequently Asked Questions
Q: What Type of Primer Should I Use?
A: When staining shelves, you should use a quality wood primer that is suitable for outdoor use. Make sure to read the instructions on the label for the best results.

Q: How Many Coats of Stain or Paint Should I Use?
A: If staining, one coat should be sufficient unless you want a darker shade of color. For paint, two coats may be necessary for full coverage.
Q: How Often Should I Re-seal My Shelf?
A: Depending on how often you use and clean your shelf, it’s recommended that you re-apply a clear coat of finish every few years in order to protect the color from fading and keep it looking beautiful.
Q: What Should I Do if My Shelf Becomes Damaged?
A: If any parts of your shelf become damaged, make sure to replace them as soon as possible in order to maintain the integrity of the structure. This will help prevent further damage and keep your shelf looking beautiful for years to come.
Conclusion
Staining bookshelves is a great way to instantly enhance the look of any room. Knowing how to apply a stain properly can be the difference between a professional-looking finish and one that looks sloppy and amateur. The steps outlined here are simple on how to stain shelves, but they should not be overlooked or neglected.
They will ensure that your shelves look beautiful for years to come. Now, it’s up to you: gather the supplies, break out the protective gear, and get ready to create an amazing shelf that can make a statement in your home. With these tips at your disposal, you’re sure to achieve stunning results with each shelf project you tackle! So what are you waiting for? Let’s get to staining!
You Can Check It Out to Paint a Curio Cabinet