Are you looking for a straightforward way to take apart an office chair for cleaning, repair, or storage? It is important to know how to disassemble office chair. Breaking down furniture can be intimidating, but breaking down a bulky office chair doesn’t have to be!
With the right instructions and tools, taking apart a chair is quite simple. In this blog post, we’ll break it down step-by-step so that even the least mechanically inclined person can get the job done quickly and easily. So if you’re ready to disassemble your office chair and make it brand new again – let’s get started!
Tools You Will Need
- Screwdriver or Allen wrench (depending on the type of screws in your chair)
- Needle nose pliers
- Hammer
- Flashlight (optional, but helpful to see hard-to-reach areas)
6 Steps Guide on How to Disassemble Office Chair
Step 1: Remove the Arms and Base
Start by removing the arms of the chair, using your screwdriver or Allen wrench. Once you’ve taken off the arms, unscrew the plastic base from the chair’s frame. Carefully set aside these pieces for later reassembly.
Disassembling an office chair can seem intimidating, but it’s a surprisingly easy task with the right tools and a bit of knowledge. First start by removing the arms of the chair, which can be done with either a Phillips head screwdriver or an Allen wrench depending on how they were originally screwed into place.
You’ll want to unscrew the plastic base from the chair frame; this might require more strength than before, as those screws have likely been in place for quite some time!
Once you have taken off the arms and the base, set aside these pieces carefully for reassembly later. With just a few simple steps and a modicum of effort, you’ll have your office chair disassembled and ready for whatever maintenance it needs.
Step 2: Disconnect Chair from Gas Cylinder

Once you’ve removed the base, disconnect the gas cylinder from the bottom of the chair. This can usually be done by pressing a plastic lever or pulling up a metal ring attached to the cylinder.
When dissembling an office chair, the first step is to disconnect the gas cylinder from the bottom of the chair. The way to do this is to press a plastic lever or pull it up on a metal ring that is attached to the cylinder.
It is important to complete this step with caution, as improper disconnects could cause significant damage and force you to purchase an entirely new chair. To ensure smooth operation and a full lifespan, it’s always beneficial to take your time while taking apart office chairs.
Step 3: Remove Seat Padding and Upholstery
Using your needle nose pliers, remove any staples that may be holding the upholstery in place. Then, carefully peel away the seat cushion and upholstery from the chair frame.
Dismantling office chair padding and upholstery can be an intimidating job, but with the right tools and strategy, it’s entirely doable. Using needle nose pliers to remove any staples that may hold the seat cushion in place is your first step.
With a steady hand, carefully peel away the upholstery from the chair frame. The last remainder of the upholstery might require a bit more pull to come off—but once you’ve eased it off the cylinder, your chair will have been successfully disassembled.
Step 4: Remove Caster Wheels
You may need to use a hammer or other tool to gently tap out the caster wheels if they don’t come loose easily. Once you’ve removed all of them, set aside the casters.
Removing caster wheels from an office chair can be a tricky endeavor. At first, it may take some patience and effort to get the wheels loose, so using a hammer or other tools to gently tap them out might be necessary.

After all of the caster wheels have been removed and put aside, you can start disassembling the cylinder of the chair. Depending on the type of chair you’re working with, it might require different steps to complete this process correctly. Once all components are taken apart, disposing of a broken chair becomes easier.
Step 5: Take Apart the Frame and Mechanisms
To take apart the frame, you’ll need to unscrew all nuts securing it to the chair components. Then, use your screwdriver or Allen wrench to remove any screws that may be holding together different pieces of the frame. Be careful when doing this so as not to strip the screws or damage other components.
Taking apart a frame and its mechanisms is no small task, but with the right preparation and caution, it can be done easily. Before you start taking anything apart, make sure you have all the necessary tools – a screwdriver or an Allen wrench – as well as any corresponding replacement parts that may be needed if something gets damaged during the process. Then, unscrew all the nuts securing the frame to its chair components.
Use your screwdriver or Allen wrench to take out any screws that may be joining pieces of the frame together. Keep in mind that while stripping screws won’t prevent you from taking apart your furniture, it may render some of those screws unusable afterward.
Additionally, remain cautious throughout the take-apart process to ensure you don’t damage other components of your office chair’s cylinder or frame.
Step 6: Clean and Reassemble

Once all of the pieces are taken apart, use a damp cloth to wipe away any dirt and dust that may have built up on them over time. When you’re finished, simply reassemble your chair in reverse order!
Cleaning and reassembling your office chair is an important part of proper maintenance. To get started, you’ll need to completely disassemble it by removing the seat, back, and arms — if applicable — before getting rid of any dirt, dust, or other debris collected over time. Once everything is taken apart, use a damp cloth to give it a good wipe-down.
This includes starting with the base and working up to the big parts like the seat, armrests, and back until it’s back into one piece. With regular maintenance and cleaning it will look better longer and perform optimally for years to come!
And there you have it – the easy, 6-step guide to disassembling an office chair! With these steps, even a novice can tackle this project and have their chair looking good as new in no time. Good luck and happy disassembling!
Tips to Disassemble Office Chair
- Before you start, make sure that you have all the tools that you need. You will need a screwdriver, a hammer, and a pair of pliers.
- Start by removing the seat from the chair. Most office chairs have a lever underneath the seat that can be pulled to release the seat.
- Once the seat is removed, take a look at the base of the chair. There should be four screws that attach the base to the chair. Remove these screws with your screwdriver.
- The next step is to remove the arms from the chair. Two screws on each arm need to be removed.
- Once the arms are off, you can remove the back of the chair. There are usually four screws that attach the back to the chair frame.
- At this point, you should be able to see the mechanism that controls the height and tilt of the chair. Two screws attach this mechanism to the chair frame. Remove these screws and set them aside.
- The final step is to remove the gas cylinder from the chair. This is what allows you to adjust the height of the chair. There is a knob on top of the gas cylinder that needs to be turned to release it from the chair frame.
How to Safely Take Apart Your Office Chair for Cleaning and Maintenance?
Taking apart your office chair for cleaning and maintenance can be a daunting process, but with the right instructions and tools, it is relatively simple.
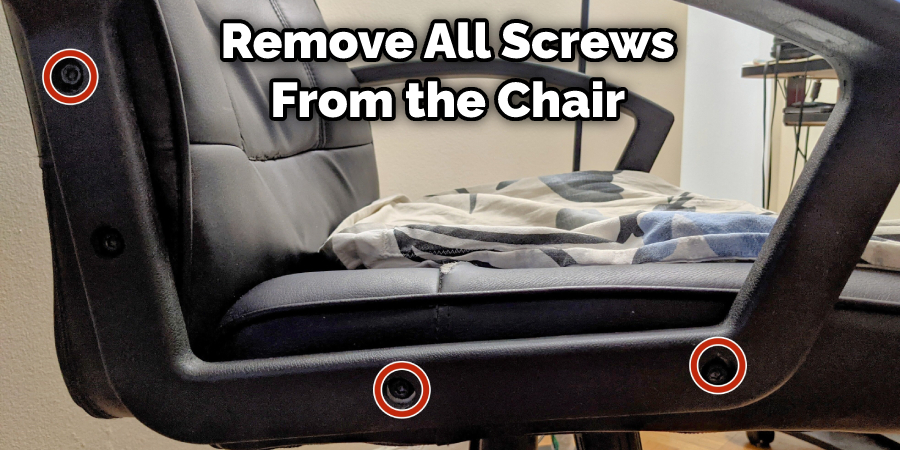
To begin, gather the necessary tools – typically a Phillips head screwdriver or Allen wrench – to remove all screws from the chair. After taking off any fabric covers and pads, begin to carefully dismantle the chair into its parts. Be sure to label each part with sticky notes so you know where everything goes when putting the chair back together.
Once all pieces are laid out in an orderly fashion, use a brush attachment on your vacuum cleaner to ensure deep cleaning. Using cloth towels soaked in a gentle bubbling soap solution, wipe down each piece of the chair before wiping them dry with separate cloth towels.
With care and attention, put everything back together as soon as possible so it will not get lost or misplaced – refer back to those labels you created earlier if need be.
Putting it all together should be easier since you were careful to note which parts went into what order during disassembly. Suddenly that pesky cleaning job doesn’t seem so daunting anymore – happy cleaning!
How the Right Tools Can Make Disassembling an Office Chair Easier?
Disassembling an office chair may seem like a daunting task, but having the right tools can make the process much simpler.
By having the appropriate screwdrivers and wrenches on hand, you’ll be able to loosen screws and nuts and disconnect parts of your chair with ease. Additionally, having these supplies nearby will help keep everything organized while you work on taking apart the chair.
While reassembling can also be intimidating, following instructions provided by the manufacturer or looking up guides online can provide helpful guidance that is needed when putting your chair back together. With the right tools and knowledge in mind, disassembling an office chair becomes much easier!
Conclusion
With these steps, you should be able to take apart your office chair with little issue. You should carefully determine how to disassemble office chair.
Be mindful of which bolts and screws go where, as some may only fit in one spot. If you have any trouble, don’t hesitate to ask a friend for help or bring the chair back to the store.