Introducing cabinet curtains is a charming and functional way to add character and warmth to your living space. Whether aiming to conceal cluttered shelves, create a cozy farmhouse vibe, or simply infuse a touch of elegance, hanging curtains on cabinets is a versatile interior design choice.
This article serves as your comprehensive guide on how to expertly hang cabinet curtains, from selecting suitable materials and styles to step-by-step how to hang cabinet curtains.
Whether you’re a seasoned decorator or a novice seeking to enhance your space, this guide will walk you through every aspect of the process. By mastering the art of hanging cabinet curtains, you’ll transform ordinary cabinets into stylish focal points that harmonize with your decor and reflect your unique taste.
The Trend of Using Cabinet Curtains for a Charming and Practical Look
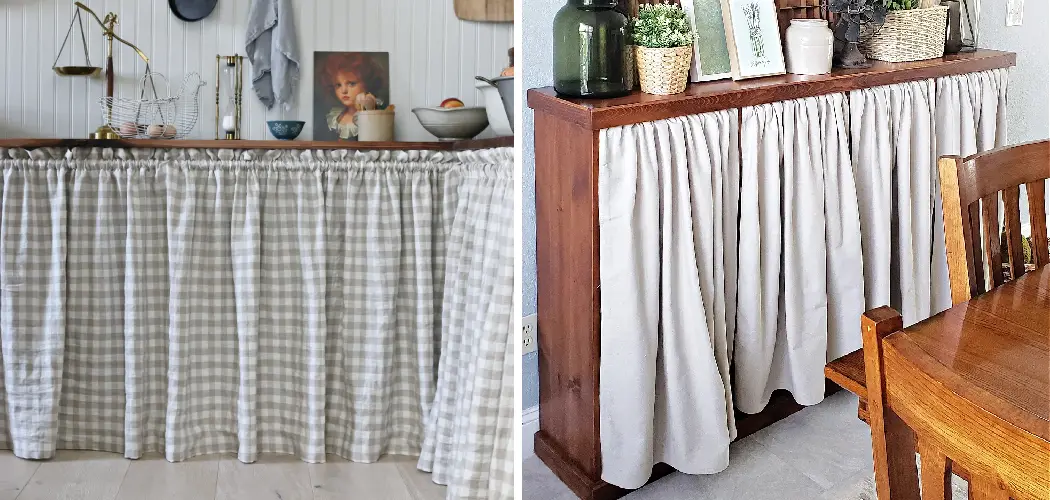
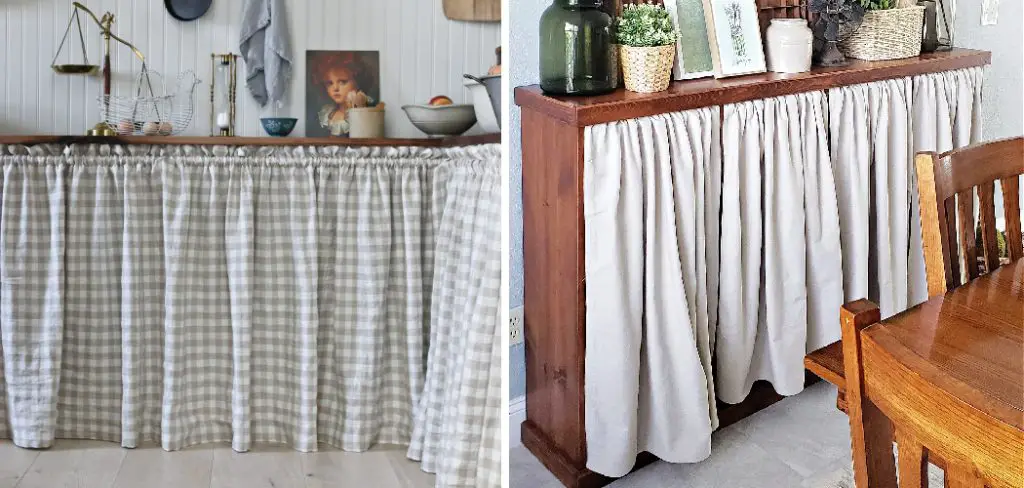
Cabinet curtains are a great way to freshen up the look of your kitchen or dining room without breaking the bank. Plus, they also have practical benefits! Not only do cabinet curtains add texture and color to a space, but they also provide an extra layer of protection from dust and grease over regular cabinetry doors.
And since most people hang curtains on open frames, they’re also easier to clean than covering up cabinet doors with painted-on wallpaper.
However, before you get started on this project, it’s important to make sure that you have the correct hardware. You want to be sure that your cabinet curtains are hung securely and safely. Although there are several different types, the most common types of hardware for hanging cabinet curtains include rods, clips, and pins.
Once you’ve determined the correct type of hardware to use, you’ll need to measure the space where your curtains will be installed. Measure both the width and height of the area to get an accurate measurement before purchasing materials.
Discussing the Advantages of Using Curtains Instead of Cabinet Doors
Cabinet curtains are an attractive and practical solution for updating a kitchen or bathroom space. Not only do they bring a unique and aesthetic appeal to the area, but they also provide several benefits over traditional cabinet doors.
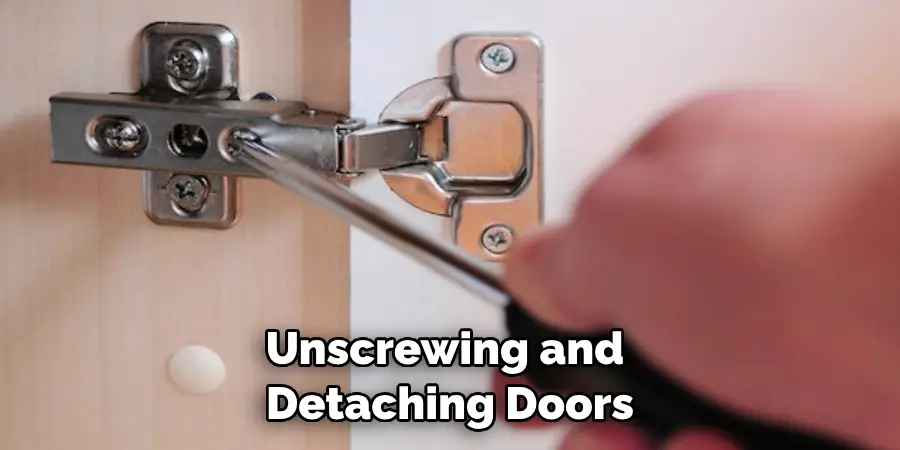
For starters, cabinet curtains can be removed easily when it comes time for cleaning or maintenance. This means that you don’t have to worry about unscrewing and detaching doors to get the job done. Just take down the curtains, clean them, then put them back up without any hassle!
Curtains come in a variety of styles as well, so it’s easy to find something that fits your overall design theme. Whether you want something with a classic or modern look, there’s sure to be a curtain option that meets your needs.
Another advantage of using cabinet curtains is that they are much quieter than traditional doors. This is ideal if you have small children or pets in the house, as it means no more loud banging and crashing when they get curious about what’s inside. And when closed, the curtains provide added privacy for all of your cupboard contents.
Finally, cabinet curtains are also more affordable than traditional doors, making them a great budget-friendly solution. Whether you’re looking to save a few bucks on your next remodel or just want an easier way to update the look of your kitchen cabinets, hanging curtains is definitely worth considering.
10 Steps How to Hang Cabinet Curtains
Step 1: Measure and Plan
The initial step in hanging cabinet curtains is to measure the dimensions of the cabinets you intend to dress. Accurate measurements are crucial for ensuring that the curtains fit seamlessly and enhance the cabinet’s aesthetic. Decide whether you want to cover the entire cabinet or specific sections.

If you’re aiming to conceal cluttered shelves or create a cozy nook, plan accordingly. Take into account the overall layout of the room and the color palette of your decor to choose curtain materials that complement the existing style.
Step 2: Choose Curtain Material
Selecting the right curtain material sets the tone for your cabinet curtain project. Your choice will depend on the ambiance you wish to create, the functionality you require, and your design preferences. Lightweight and airy materials like cotton or sheer fabrics add a touch of elegance and let light filter through, ideal for a breezy and inviting atmosphere.
For a rustic or farmhouse look, consider burlap or linen materials. Luxurious velvet curtains, on the other hand, can impart a sense of opulence to the space. Consider factors like durability, ease of maintenance, and how well the material complements the cabinet’s surroundings.
Step 3: Select Curtain Style
Cabinet curtains offer a versatile range of styles to suit various decor themes. Decide whether you want gathered curtains that exude a casual and relaxed vibe, pleated panels that bring a touch of sophistication, or classic cafe-style curtains that cover the lower portion of the cabinet.
Your choice of style will influence the level of privacy, light filtering, and overall aesthetic impact of the curtains. Ensure that the style you choose aligns seamlessly with the overarching design of the room.
Step 4: Gather Necessary Tools and Materials
Before embarking on the installation, ensure you have all the necessary tools and materials at your disposal. A measuring tape, curtain rod or tension rod, curtain rings or clips, a curtain rod bracket, a drill, screws, a level, and a screwdriver are among the essential items.
Having these tools on hand saves time and effort during the installation process and ensures that you can complete each step smoothly.
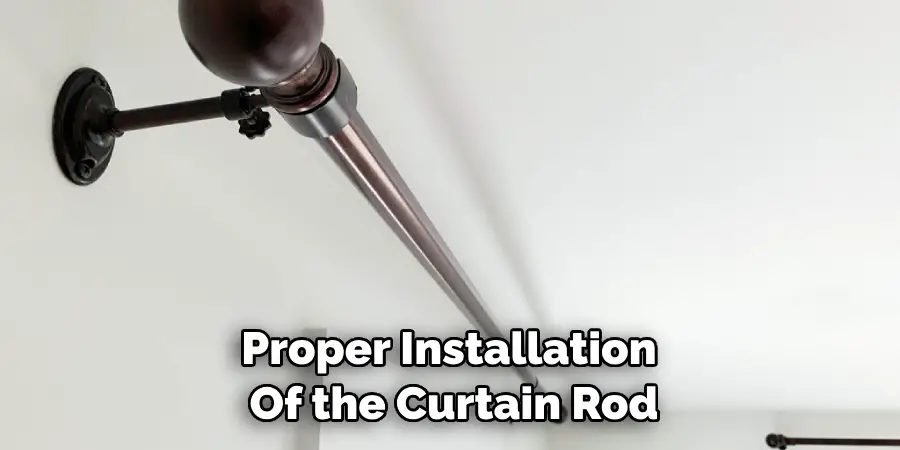
Step 5: Install Curtain Rod or Tension Rod
Proper installation of the curtain rod or tension rod is pivotal to the stability and appearance of the curtains. Begin by measuring the desired height above the cabinet for rod placement.
Using a level, mark the spot for installing the curtain rod brackets. Depending on the type of rod you’re using, either attach the brackets using a drill and screws or adjust the tension rod to fit snugly within the cabinet opening.
Step 6: Attach Curtain Rings or Clips
Prepare the curtain panels for attachment by adding curtain rings with hooks or clips to the top edge. The rings or clips will facilitate the seamless hanging of the curtains on the rod. Ensure that the rings or clips are evenly spaced and securely attached to prevent any mishaps during installation.
Step 7: Hang the Curtains
Slide the curtain rings or clips onto the curtain rod, ensuring that the curtains are evenly distributed. With the curtain panels now prepared and the rod in place, carefully position the rod with the attached curtains onto the brackets or tension rod.
As you hang the curtains, check for even draping and adjust as needed to achieve the desired look. Once you’ve hung the curtains, make sure it is secure and level before letting go. You can also tie a ribbon around the panels for added texture and decoration. Finally, step back and admire your new cabinet curtains!
Step 8: Arrange and Style
Once the curtains are hung, step back and assess their appearance. Take a moment to adjust any gathers, pleats, or folds to ensure that the curtains drape evenly and create a harmonious visual effect. This step allows you to fine-tune the aesthetics of the curtains and enhance their overall impact on the room.
If you’re concerned that the fabric is too lightweight or not heavy enough to hang properly, consider adding a few thin weights to the hem. These items can help keep your curtains in place and prevent them from blowing around with every open window. If hung correctly, cabinet curtains are an effective way to add style, color, and texture to any room.

Step 9: Secure the Bottom of the Curtains
To prevent the curtains from swaying or billowing due to drafts or movement, secure the bottom edges. Adhesive-backed hook-and-loop fasteners, curtain weights, or small drapery clips can all serve this purpose. This step not only maintains the clean and polished appearance of the cabinet curtains but also ensures they remain in place.
Step 10: Regular Maintenance
Cabinet curtains, like any decor element, may require occasional maintenance to keep them looking their best. Depending on the chosen material, follow care instructions such as gentle washing, ironing, or dry cleaning.
Additionally, it’s advisable to periodically inspect the curtain hardware to ensure that it remains securely attached, preventing any potential accidents or inconveniences.
Conclusion
In the end, knowing how to hang cabinet curtains correctly is an essential skill for any do-it-yourselfer or budding interior designer.
Whether you plan to spruce up your old kitchen cabinets with a set of curtains, or completely redo your family bathroom vanity with this simple update, learning the techniques outlined in this blog post can help ensure that your installation not only looks great but is also secure and safe for everyday use.
Don’t be intimidated by attempting this project; all it takes is a little preparation and finesse to hung the perfect cabinet curtains! So remember, measure twice and cut once when it comes to cabinet curtain installation and you’ll be good to go.