
To refill an office water dispenser safely, start by washing your hands and clearing the area around the cooler. Remove the empty bottle, clean the dispenser collar and probe, then prepare the new water jug by removing only the outer hygienic seal. Lift the full bottle with care, place it onto the dispenser, and check that the water flows properly without leaks.

An empty office water dispenser has a way of turning into someone else’s problem. People notice it, pause for a second, and walk away—usually because the bottle looks heavy, the process seems messy, or no one is quite sure what should and should not be removed from the new jug.
That hesitation is understandable. A full five-gallon bottle is awkward to lift, and the parts that touch the water need to stay clean. If the refill is rushed, the result may be spilled water, a clogged dispenser, or unnecessary strain on someone’s back.
This guide on how to refill the office water dispenser explains how to refill an office water dispenser in a clean, safe, and straightforward way. You’ll learn which type of dispenser you’re working with, what to prepare before starting, how to follow the 7-step refill process, and which common mistakes to avoid.
Understanding the Types of Office Water Dispensers
Before replacing a water bottle, take a quick look at the dispenser itself. Not every office water cooler works the same way, and the refill process depends on the model.
Top-Loading Water Dispensers
Top-loading dispensers are the traditional style most people picture when they think of an office water cooler. The bottle sits upside down on top of the unit, with the neck fitted into the dispenser collar.
These models rely on gravity to move water from the jug into the internal heating and cooling tanks. They are simple and common, but they do require someone to lift and invert a full five-gallon bottle. That is the part where good lifting technique matters most.
Bottom-Loading Water Dispensers
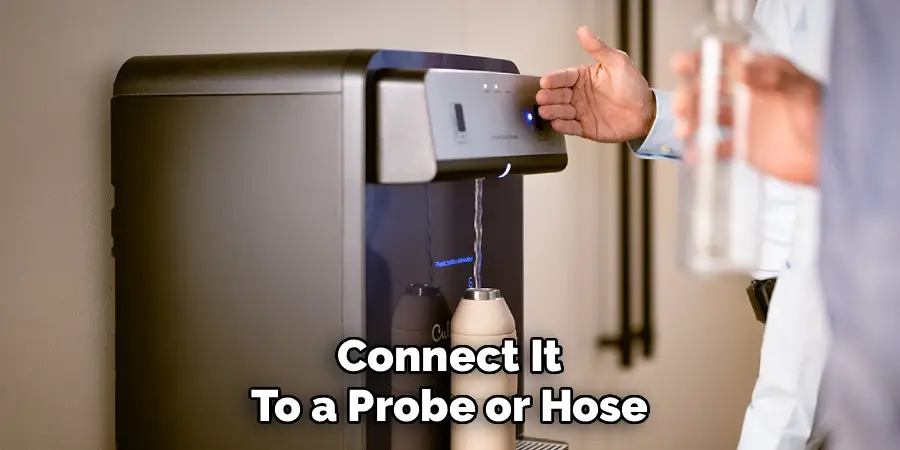
Bottom-loading dispensers keep the water bottle inside a lower cabinet. Instead of lifting the jug onto the top of the machine, you place the bottle upright in the base and connect it to a probe or hose.
A built-in pump draws the water upward. This design removes most of the heavy lifting, which can make it a better fit for offices where employees may not be comfortable handling large bottles overhead.
Point-of-Use Water Dispensers
Point-of-use dispensers do not use replaceable water jugs at all. They connect directly to the building’s water line and filter municipal water before dispensing it.
If your office has this type of system, there is no bottle to refill. Maintenance usually involves filter changes, cleaning, and service checks rather than manual jug replacement.
Safety and Hygiene Precautions Before You Start
Refilling a water dispenser is a small office task, but it still involves drinking water and a heavy object. A little care at the beginning can prevent the two most common problems: contamination and injury.
Wash your hands thoroughly before touching the dispenser or the new bottle. The bottle neck, cap area, dispenser collar, and probe are all close to the water path, so it is best to treat them as clean-contact surfaces.
Lifting also deserves attention. A full five-gallon water bottle weighs roughly 42 pounds, and its smooth plastic sides can be hard to grip. Bend your knees, keep the bottle close to your body, and avoid twisting while lifting or setting it into place.
If the bottle feels too heavy or unstable, do not force it. Ask a coworker for help or use a dispenser style that does not require overhead lifting.
Tools and Materials You’ll Need
You do not need much equipment to refill an office water dispenser properly. Still, having the right items nearby makes the job cleaner and less stressful.
Gather these before you begin:
- A full, sealed replacement water jug
- Food-safe antibacterial wipes or a clean cloth with a mild, food-safe sanitizing solution
- A dry microfiber towel for spills
- Optional grippy work gloves for better control
- A clean cup for testing the water flow
The key is to avoid scrambling halfway through the refill. Once the empty bottle is off and the new one is ready, you want the process to move smoothly.
7 Simple Step-by-Step Guidelines on How to Refill the Office Water Dispenser
The following steps focus on a standard top-loading office water dispenser, since that is the model most likely to require manual bottle replacement. If your office uses a bottom-loading unit, the hygiene steps still apply, but the lifting and placement process will be different.
Step 1: Prepare Your Workspace and Wash Your Hands
Start by washing your hands with soap and warm water for at least twenty seconds. This may feel like a small detail, but it is one of the easiest ways to reduce the chance of introducing bacteria near the water path.
If there is no sink nearby, use an alcohol-based hand sanitizer and let your hands dry completely before touching the bottle or dispenser. Wet sanitizer residue on your hands can also make the bottle harder to grip, so give it a moment.
Next, clear the area around the dispenser. Move chairs, waste bins, bags, loose cups, or anything else that could get in your way. You need enough space to lift, turn, and lower the bottle without stepping around obstacles.
Place the full replacement jug as close to the cooler as possible. The shorter the carrying distance, the less strain on your back and arms.
Step 2: Remove the Empty Water Jug Safely
Stand directly in front of the water cooler with your feet about shoulder-width apart. This gives you a stable base before you start moving the bottle.
Grip the empty jug with both hands. Even when it is nearly empty, it may still contain a little water, and the plastic can be slippery from condensation or handling. Pull the bottle straight upward in a controlled motion so it clears the central probe without rocking the machine.

Once the jug is free, lower it carefully to the floor. If there is a little water left inside, tilt the bottle slightly over the dispenser opening so the last drops fall into the reservoir rather than onto the floor.
Then move the empty bottle out of the immediate work area. Leaving it at your feet creates a tripping hazard, especially while you are handling the full replacement jug.
Step 3: Clean and Sanitize the Dispenser Collar
With the old bottle removed, you can see the dispenser collar and central probe. This is a good moment to clean them, because these parts are usually hidden once the bottle is installed.
Use a food-safe antibacterial wipe or a clean cloth with a suitable sanitizing solution to wipe the plastic rim. Pay attention to areas where dust, dried water, or mineral residue may have collected.
Clean the central probe carefully as well. This part punctures the cap and comes into direct contact with the water path, so it should not be skipped.
Use a fresh wipe if the first one picked up visible debris. After cleaning, allow the surface to air dry for about a minute, or according to the sanitizer instructions. Rushing this step may leave unnecessary moisture or residue around the collar.
Step 4: Prepare the New Water Jug for Installation
Now turn to the full replacement bottle. Look for the tamper-evident outer seal or sticker covering the cap area.
Remove that outer seal completely and throw it away. Do not leave loose plastic nearby, since it can stick to the bottle, fall into the dispenser area, or simply become another piece of breakroom clutter.
Be careful not to remove the actual cap unless your dispenser or bottle design specifically requires it. Many modern water cooler bottles are made to be punctured through the center of the cap by the dispenser probe. If you remove the entire cap and then try to flip the bottle upside down, the water may pour out immediately and make a large mess.
Before lifting the bottle, wipe the exposed cap area with a sanitizing wipe. Bottles are often stored on floors, in supply rooms, or near delivery areas, so it is reasonable to assume the outside may have picked up dust during handling.
Step 5: Lift the New Water Jug with Proper Ergonomics
This is the part where people tend to rush, and it is also where strain can happen. A full five-gallon bottle is heavy enough to deserve your full attention.
Stand close to the jug rather than reaching for it from a distance. Plant your feet firmly, bend your knees, and keep your back as straight as you comfortably can.
Grip the neck of the bottle with one hand and support the bottom with the other. If the bottle has a molded handle, use it, but do not rely on one hand alone to control the weight.
Lift with your legs, not your lower back. Bring the bottle close to your torso as you stand. Keeping it close reduces the leverage pulling on your back and makes the bottle easier to control.

Avoid twisting while you lift. If you need to turn toward the dispenser, move your feet instead of rotating your spine under the weight.
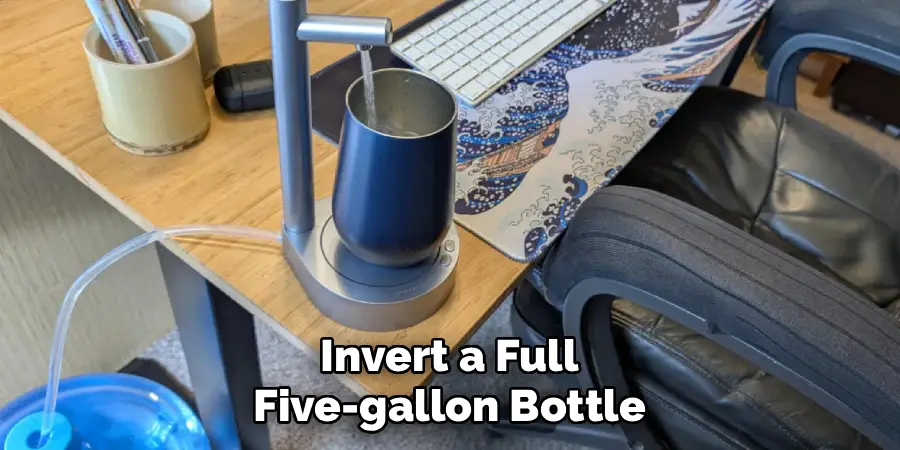
Step 6: Place the New Jug onto the Dispenser Probe
Once you are upright and steady, tilt the bottle so the capped end points downward. Move slowly. It is normal to feel a bit awkward here, especially if you do not replace these bottles often.
Position the inverted bottle over the dispenser collar. Align the center of the cap with the internal puncture probe. A few drops of water may escape during this stage, but the cap should prevent a full spill if it has not been removed.
Lower the bottle straight down onto the probe. You may feel or hear a small pop as the probe punctures the cap. Let the jug settle into the collar and check that it sits level.
At this stage, you should see air bubbles rising through the bottle as water moves into the dispenser’s internal reservoir. That bubbling is usually a good sign. It means water is flowing down and air is moving back up into the bottle.
If the bottle leans to one side, pause and adjust it carefully. A tilted jug may not seal well and could lead to slow leaking around the collar.
Step 7: Test the Dispenser and Check for Leaks
After the bubbling slows or stops, test the dispenser. Place a clean cup under the cold-water spout and dispense a small amount of water. If your unit also has a hot-water function, test that side as well, using normal caution around heated water.
This quick check helps confirm that water is moving through the internal lines properly. It may also clear small air pockets left from the refill.
Next, inspect the collar area and the floor around the machine. Look for water pooling, dripping, or slowly spreading from the base. A small spill from the installation is easy to wipe up, but ongoing leaking needs attention.
Sometimes a bottle may have a small crack that interferes with the vacuum seal. If that happens, the dispenser can overflow even when the bottle appears to be installed correctly. Dry the floor right away and keep an eye on the unit for the next few minutes. Following these steps on how to refill the office water dispenser will ensure a smooth and mess-free process.
Common Mistakes to Avoid When Refilling an Office Water Dispenser
Most refill problems come from a few predictable mistakes. The good news is that they are easy to prevent once you know what to watch for.
Removing the Entire Plastic Cap
This is probably the messiest error. If the bottle is designed to be punctured by the dispenser probe, removing the full cap before flipping the jug can release several gallons of water at once.
Remove only the outer hygienic seal unless the bottle instructions say otherwise.
Forgetting the Hygienic Sticker or Seal
The opposite mistake can also cause trouble. If a small seal or sticker remains on the cap, it may come loose during installation.
In some cases, that loose piece could interfere with the dispenser’s internal parts or water flow. Always check the cap before lifting the bottle.
Skipping the Collar Cleaning
The collar is easy to ignore because it is covered most of the time. Still, dust and residue can collect there between bottle changes.
If this area is never cleaned, the dispenser may develop unpleasant odors, visible buildup, or hygiene concerns over time. A quick wipe during each refill is a simple habit that helps keep the water station more sanitary.
Lifting Too Fast or From the Wrong Position
Trying to muscle the bottle into place from an awkward angle increases the risk of spills and strain. Slow down, stand close, and use your legs.
If this sounds like more weight than you can safely manage, ask for help. There is no benefit in turning a routine office chore into a back injury.
Maintenance Tips for Office Water Dispensers
Replacing the bottle is only one part of keeping a water dispenser in good condition. Regular cleaning helps the machine work properly and keeps the water tasting fresh.
Schedule a deeper clean every three to six months, depending on how heavily the dispenser is used. This usually involves draining the system and flushing the internal tanks with a food-safe descaling or sanitizing solution. Some offices use a diluted vinegar mixture where appropriate, but you should always follow the dispenser manufacturer’s guidance.
Clean the external drip tray at least weekly with hot, soapy water. Coffee splashes, dust, and standing water can leave sticky residue or odors if the tray is ignored.
If your model uses internal air filters, replace them according to the manufacturer’s schedule. Not every dispenser has them, so check the manual or ask your service provider if you are unsure.
Health and Safety Benefits of Proper Refilling
A clean, stocked water dispenser supports the daily rhythm of an office in a practical way. People are more likely to drink water when it is easy to access, cold, and ready when they need it.
Better hydration may support focus, comfort, and energy during the workday. It will not solve every workplace productivity issue, of course, but a reliable water station removes one small source of friction.
The hygiene side matters too. When employees wash their hands, clean the collar, and avoid touching the bottle neck or probe, they reduce the chances of transferring germs to shared equipment. In a busy office, that kind of routine care adds up.

Conclusion: Make Water Dispenser Refills Safer and Easier
Refilling an office water dispenser does not need to be intimidating, but it should be done with care. Wash your hands, clear the space, clean the collar, prepare the new bottle correctly, and lift with proper body mechanics. Those small steps help protect both the water quality and the person doing the refill.
Keep this guide near the breakroom or supply area so employees can follow the same process each time. The next time the bottle runs dry, the refill should feel less like a guessing game and more like a simple shared office routine. Thanks for reading this guide on how to refill the office water dispenser.