A swivel chair is a fantastic piece of furniture, offering comfort and flexibility in offices and homes alike.
However, there comes a time when you might need to disassemble it. Perhaps you’re moving, need to replace a broken part, or want to reupholster the seat.
Removing the swivel base can seem like a puzzle, but it’s a straightforward task with the right approach. Following the correct steps not only makes the process easier but also prevents damage to the chair’s components.
This guide on how to remove swivel chair base will walk you through everything you need to know to safely and effectively remove your swivel chair base.
What Will You Need?
Before you begin, gathering the right tools will make the job much smoother. You won’t need a professional workshop, just a few common items.
- Rubber Mallet: Essential for applying force without damaging the chair.
- Pipe Wrench or Locking Pliers: To grip the gas cylinder firmly.
- Penetrating Oil (like WD-40): Helps loosen stubborn, rusted, or tight parts.
- Screwdriver Set (Phillips and Flathead): For removing any screws holding plastic covers or the seat.
- Safety Glasses: To protect your eyes from flying debris or lubricant spray.
- Gloves: To protect your hands and improve your grip.
- A Soft Cloth or Rag: For cleaning up excess oil.
10 Easy Steps on How to Remove Swivel Chair Base
Follow these detailed steps to detach the base from your swivel chair without any trouble.
Step 1: Prepare Your Workspace
First, find a clear, open area to work in. A garage floor, patio, or a room with plenty of space is ideal. Lay down a drop cloth or an old blanket to protect your floor from scratches and any potential drips from the penetrating oil. This also gives you a dedicated space to place the parts as you remove them, so nothing gets lost.
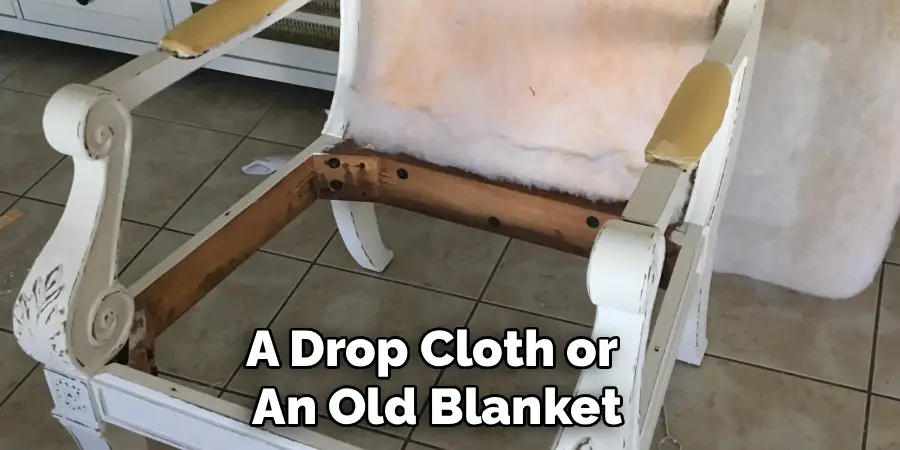
Make sure the area is well-lit so you can see all the small components, clips, and screws you’ll be working with. Having your tools organized and within reach will also save you time and frustration.
Step 2: Invert the Chair
Carefully turn the chair upside down. The easiest way to do this is to place the top of the backrest and the armrests on the floor, so the base is pointing up towards the ceiling. This position gives you direct, stable access to the connection point between the seat mechanism and the gas cylinder, which is your main target.
If your chair is heavy, ask someone to help you lift and position it to avoid strain or injury. Ensure it is stable and won’t wobble or tip over while you are working on it.
Step 3: Remove the Retaining Clip
Look closely at the bottom of the gas cylinder, right where it enters the center of the five-star base. You should find a small C-clip or retaining clip. This clip is a safety feature that prevents the cylinder from falling through the base.

Using a flathead screwdriver or needle-nose pliers, gently pry this clip off. It might be small, so be careful not to lose it, especially if you plan to reassemble the chair later. Place it in a safe spot, like a small container or magnetic dish.
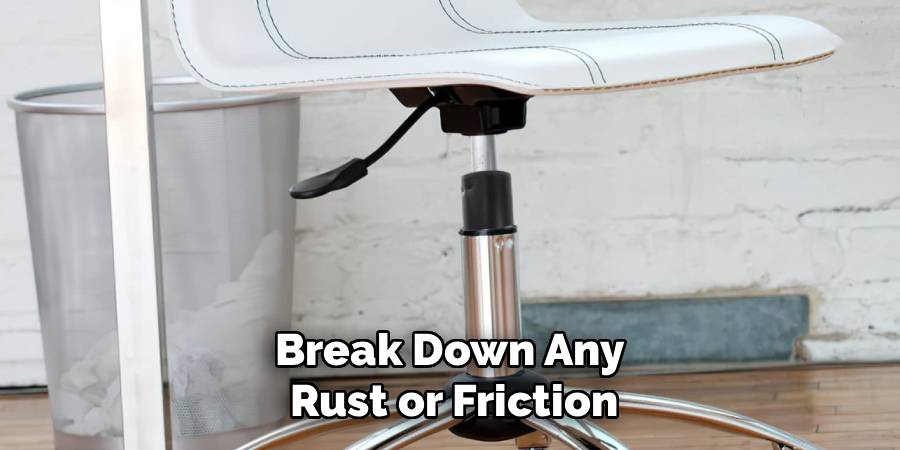
Step 4: Apply Penetrating Oil
The connection between the gas cylinder and the chair’s base can become very tight over time due to pressure and corrosion. To make separation easier, spray a generous amount of penetrating oil (like WD-40) around the joint where the cylinder meets the base.
Let the oil sit for at least 15-20 minutes. This allows it to seep into the tight space and break down any rust or friction that is holding the parts together. For very stubborn chairs, you might need to let it soak for an hour or even reapply the oil.
Step 5: Tap the Base with a Rubber Mallet
With the chair still upside down, it’s time to use some gentle force. Take your rubber mallet and begin tapping firmly around the center of the base, right where the cylinder is inserted. Work your way around in a circle, hitting each leg of the base near the center hub.
The goal is to use vibrations to loosen the tapered, pressure-fit connection. Avoid hitting the plastic casters or the cylinder itself. Be patient; this step can take several minutes of consistent tapping. You should start to see a gap forming between the base and the cylinder.
Step 6: Separate the Base from the Cylinder
Continue tapping until the base comes loose and slides off the gas cylinder. If it’s particularly stubborn, you may need to apply more force with the mallet or add another dose of penetrating oil and wait a bit longer.

Once it breaks free, lift the base off the cylinder and set it aside. You have now completed the first major separation. Now, your focus shifts to removing the gas cylinder from the seat mechanism.
Step 7: Apply Oil to the Top Connection
Turn your attention to the other end of the gas cylinder, where it connects to the tilt and height adjustment mechanism under the seat. Just like you did with the base, spray penetrating oil around this joint.
This area is also a pressure-fit connection and is often even tighter than the base connection. Give the oil plenty of time to work its way into the joint—at least 20 minutes is recommended for the best results.
Step 8: Secure the Gas Cylinder
This is where a pipe wrench or a pair of locking pliers becomes crucial. Firmly clamp the wrench or pliers onto the gas cylinder, getting as strong a grip as you can. It’s best to grip the main body of the cylinder.
Some cylinders have a telescoping outer cover; make sure you are gripping the structural part, not just a decorative sleeve. This secure grip will allow you to twist and pull the mechanism without the cylinder spinning in your hand.
Step 9: Twist and Pull the Mechanism
While holding the chair seat steady with one hand (or having a helper hold it), use your other hand to forcefully twist the pipe wrench back and forth. The twisting motion is key to breaking the friction seal. As you twist, pull the cylinder away from the seat mechanism.
This step requires significant effort. The combination of twisting, pulling, and the penetrating oil will eventually cause the mechanism to pop free from the cylinder.
Step 10: Final Separation and Cleanup
Once the gas cylinder is detached from the seat mechanism, the process is complete. You now have three separate components: the seat with its mechanism, the gas cylinder, and the five-star base with its casters.
Before storing or working on the parts, take a soft cloth and wipe away any excess penetrating oil from all components. This will prevent messes and keep the parts in good condition. You have successfully removed the swivel chair base.
5 Things You Should Avoid
- Using a Metal Hammer: Never use a steel or metal hammer directly on the chair’s base or mechanism. It will dent, crack, or break the components. Always use a rubber mallet to absorb impact and apply force safely.
- Skipping the Penetrating Oil: The parts are pressure-fitted and often seized. Trying to separate them with brute force alone can lead to damage. Patience and penetrating oil are your best friends in this process.
- Hitting the Gas Cylinder Directly: The gas cylinder is a pressurized component. Striking it directly with a hammer or other tool could damage it, causing it to fail or leak. Always focus your efforts on the base or the mechanism it’s attached to.
- Forgetting to Remove the Retaining Clip: The small C-clip at the bottom of the base is designed to hold everything together. If you forget to remove it, no amount of hammering will separate the base from the cylinder.
- Working on an Unstable Surface: Trying to do this on a soft carpet or wobbly table is a recipe for frustration and potential injury. Always work on a hard, flat surface where the chair can be held steady.
Frequently Asked Questions
Why Won’t My Chair Base Come Off After Hammering It?
This is a common issue. It’s likely because the pressure fit is extremely tight or has corroded. Try applying more penetrating oil and letting it sit for a longer period (an hour or more). Also, ensure you have removed the small retaining clip at the bottom of the gas cylinder before you start tapping.
Can I Reuse the Gas Cylinder After Removing It?
Yes, in most cases, the gas cylinder is perfectly reusable as long as it wasn’t damaged during removal. As long as it still holds pressure and functions correctly, you can re-install it on a new base or seat mechanism. Avoid gripping it with tools that could dent or puncture its surface.
Is It Safe to Handle a Gas Lift Cylinder?
Yes, it is generally safe. The cylinder is a self-contained unit under pressure, but it is not explosive. As long as you don’t try to puncture, cut, or heat it, there is very little risk. The removal process described here is safe and standard practice for chair repair and disassembly.
Conclusion
How to remove swivel chair base might seem daunting, but it’s a manageable project for anyone with the right tools and a little patience.
By preparing your workspace, using penetrating oil, and applying force correctly with a rubber mallet, you can successfully disassemble your chair without causing damage. Avoiding common pitfalls like using a metal hammer or skipping the oil will ensure a smooth process.
Whether you are replacing a part, reupholstering, or preparing for a move, following these steps will help you get the job done right.