
Mesh office chairs are a popular choice for their comfort, breathability, and modern aesthetic. They provide excellent ergonomic support, which is essential for anyone spending long hours at a desk.
However, like any piece of furniture, they can suffer from wear and tear. A sagging seat, a tear in the mesh, or a wobbly base can turn your comfortable chair into a source of frustration. Before you consider buying a new one, remember that many common issues can be fixed at home.
This guide on how to fix mesh chair will walk you through everything you need to know to restore your chair to its former glory.
What Will You Need?
Tools:
- Screwdriver set (Phillips and flathead)
- Allen key set (hex wrenches)
- Pliers or a wrench
- Utility knife or scissors
- Staple gun (for some mesh replacement methods)
- Heat gun or hairdryer
- Rubber mallet
Materials:
- Replacement mesh fabric (if needed)
- Heavy-duty thread and a curved upholstery needle
- Fabric glue or a clear epoxy
- Replacement screws or bolts (if originals are stripped or lost)
- Replacement parts (e.g., new caster wheels, gas lift cylinder)
- Zip ties or heavy-duty string
10 Easy Steps on How to Fix Mesh Chair
Step 1: Inspect and Identify the Problem
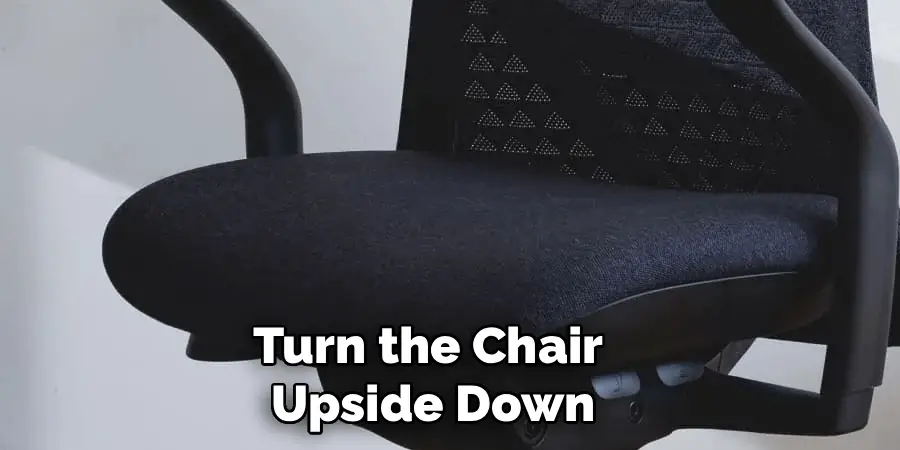
Before you start disassembling anything, take a few minutes to thoroughly inspect your chair. Sit in it and move around to feel for any wobbliness or instability. Check the mesh for sagging, rips, or holes. Turn the chair upside down to examine the base, wheels, and gas lift mechanism.
Pinpoint exactly what needs fixing. Is it a loose armrest? A tear in the seat back? A sagging seat? A clear diagnosis will guide your repair strategy and ensure you have the correct tools and materials on hand. Make a note of all the issues you find so you can address them systematically.
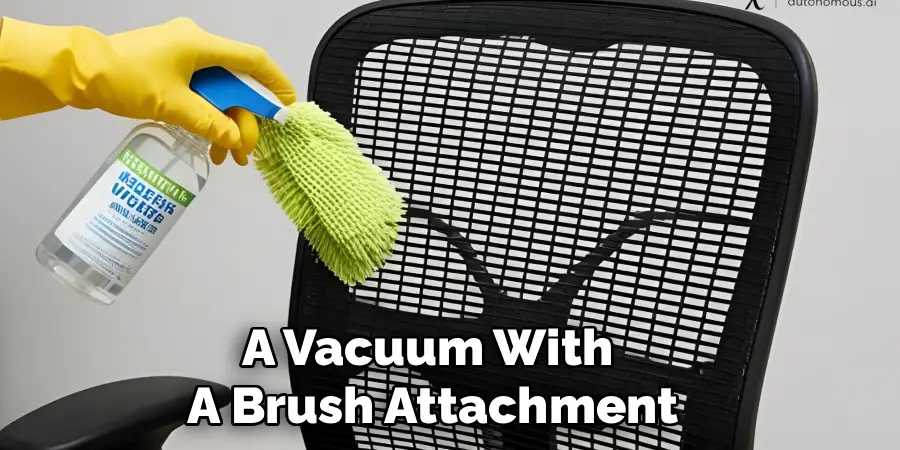
Step 2: Clean the Chair
Working on a clean chair is easier and more hygienic. Use a vacuum with a brush attachment to remove dust, crumbs, and debris from the mesh and crevices. For stains or grime, mix a small amount of mild soap with warm water. Dampen a microfiber cloth with the solution and gently wipe down the mesh and frame.
Avoid soaking the mesh, as excessive moisture can be difficult to remove. Let the chair air dry completely before you proceed with any repairs, especially if you plan to use adhesives. A clean surface ensures that any glue or patches will adhere properly.
Step 3: Tighten All Screws and Bolts
One of the simplest and most effective fixes is to tighten all accessible hardware. Over time, the vibrations from daily use can cause screws and bolts to loosen, leading to a wobbly and unstable chair. Systematically go over every screw you can find—on the armrests, the seat base, the backrest support, and the mechanism underneath.
Use the appropriate screwdriver or Allen key for each one. Turn them clockwise until they are snug, but be careful not to overtighten, as this can strip the threads or crack the plastic components. This step alone can often solve problems with instability.
Step 4: Repair Small Rips and Tears
For minor rips or punctures in the mesh, you don’t need to replace the entire panel. You can perform a discreet repair using a curved upholstery needle and heavy-duty thread that matches the color of your mesh. Carefully stitch the torn edges together using a tight, clean stitch pattern like a blanket stitch or a simple whipstitch.

Your goal is to close the gap and prevent it from getting larger. For a tiny hole, you can apply a small dab of clear, flexible fabric glue or epoxy to the frayed ends to seal them and stop further unraveling.
Step 5: Address Sagging Mesh
Sagging is a common issue that compromises the chair’s ergonomic support. A popular DIY method to restore tension involves using a heat gun or a powerful hairdryer. Hold the heat source about six inches away from the sagging mesh and move it continuously in a sweeping motion, as if you were drying hair.
The heat causes the synthetic fibers of the mesh to shrink slightly, tightening the fabric. Work in small sections and apply heat evenly to avoid melting or damaging the material. You should see the mesh visibly tighten. Let it cool completely before testing the tension.
Step 6: Prepare for Mesh Replacement
If the mesh is severely torn, stained, or too saggy to be fixed with heat, replacement is the best option. Start by removing the damaged mesh panel. This usually involves flipping the chair over and unscrewing the seat or backrest frame.
The mesh is often held in place by a spline (a rubber cord) pressed into a groove or by being stapled directly to the frame. Carefully pry out the old spline with a flathead screwdriver or use pliers to remove the staples. Once the fasteners are gone, you can pull out the old mesh panel completely.
Step 7: Cut and Position the New Mesh
Lay your new replacement mesh fabric on a flat surface. Place the old mesh panel on top of it to use as a template. Carefully cut the new fabric, leaving about two inches of excess material around all sides. This extra fabric gives you something to hold onto and ensures you have enough material to create a taut fit.
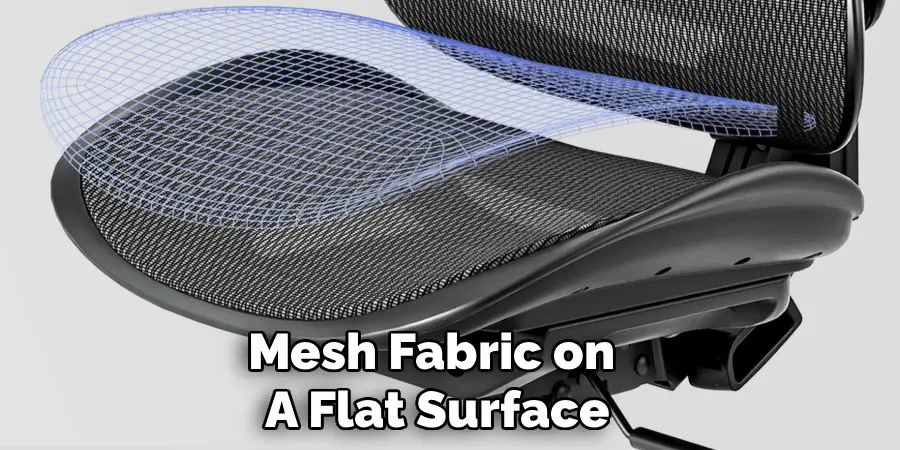
Once cut, drape the new mesh over the empty chair frame. Center it and make sure the weave of the fabric is straight and aligned with the frame for a professional-looking result.
Step 8: Secure the New Mesh
This is the most critical step for achieving a tight, supportive surface. Start securing the mesh on one side of the frame. If your chair uses a spline, press the mesh into the groove and then force the spline in on top of it using a rubber mallet or a specialized tool.
Work your way around the frame, pulling the mesh taut as you go. You can use clamps to hold it in place. If your chair uses staples, pull the mesh tight and use a staple gun to secure it to the underside of the frame, placing staples every inch.
Step 9: Trim Excess Mesh and Reassemble
After the new mesh is securely fastened, trim away the excess fabric. Use a sharp utility knife to carefully cut along the edge of the spline groove or just below the staple line. A clean cut will ensure the reassembled chair looks neat and professional.
Once the trimming is complete, you can reattach the seat or backrest to the chair’s main body. Align the screw holes, insert the screws, and tighten them securely. Double-check that all components are correctly reinstalled.
Step 10: Replace Other Faulty Components
While you have your tools out, address any other issues you identified in Step 1. If your wheels are broken or sticking, they can usually be pulled out of the base and replaced with new ones.
If your chair’s gas lift cylinder is failing, it can be removed from the base and the seat mechanism (sometimes requiring a rubber mallet), and a new one can be inserted. Replacing these components is often straightforward and can dramatically improve the chair’s functionality and your overall comfort.
5 Things You Should Avoid
- Overtightening Screws: While loose screws are bad, overtightening them can strip the threads or crack plastic parts, causing more damage. Tighten until snug, but don’t use excessive force.
- Using Harsh Chemicals: Avoid cleaning your mesh with bleach or abrasive cleaners. These can degrade the fabric’s fibers, making them brittle and prone to tearing. Stick to mild soap and water.
- Applying Too Much Heat: When trying to tighten sagging mesh, keep the heat gun moving and at a safe distance. Concentrating heat in one spot can melt or burn the synthetic material.
- Ignoring Small Tears: A tiny rip can quickly become a large, unfixable tear. Address small damages as soon as you notice them to prevent them from worsening.
- Choosing the Wrong Replacement Mesh: If you need to replace the mesh, make sure to buy high-quality, durable upholstery-grade material designed for seating. Cheap fabric won’t provide adequate support and will fail quickly.
Frequently Asked Questions
How Much Does It Cost to Fix a Mesh Chair?
The cost varies greatly depending on the repair. Tightening screws costs nothing but your time. Repairing a small tear might only cost a few dollars for a needle and thread. Replacing a gas lift or the entire mesh panel will be more expensive, potentially ranging from $20 to $100, but this is still significantly cheaper than buying a new high-quality chair.
Can I Replace the Mesh on Any Office Chair?
Most mesh chairs are designed to be repairable, but some high-end or uniquely designed models may have fused frames that make mesh replacement difficult or impossible for a DIY project. Always inspect how the mesh is attached to the frame before you purchase new material. If it’s held by a spline or staples, it’s usually replaceable.
Is It Worth Fixing an Old Mesh Chair?
Absolutely. If the chair’s main frame and structure are still in good condition, repairing common issues like sagging mesh, broken wheels, or a faulty gas lift is a very practical and sustainable choice. It saves you money, reduces waste, and allows you to keep a chair that you already find comfortable.
Conclusion
How to fix mesh chair is an achievable project that can save you money and keep a perfectly good piece of furniture out of the landfill.
Whether you’re dealing with a simple wobble, a frustrating tear, or a sagging seat, the solutions are often within your reach. By following these steps, you can tackle the most common problems and restore your chair’s comfort and functionality.
So, before you shop for a replacement, grab your tools and give your trusty chair the attention it deserves.