
There comes a point with almost every computer when things start going wrong — sluggish performance, persistent software errors, or a system cluttered with files and programs you no longer need. Sometimes the cleanest solution is also the most effective one: starting fresh. Knowing how to restore lenovo desktop to factory settings gives you the power to wipe the slate clean and bring your machine back to the condition it was in when it first left the box.
This process isn’t just for tech-savvy users. Whether you’re preparing your desktop for resale, troubleshooting a stubborn issue, or simply want a faster, cleaner machine, a factory reset is a practical and often underused solution. This guide walks you through the entire process step by step, in plain language, so you can get it done with confidence.
Why Restoring A Lenovo Desktop To Factory Settings Matters
Over time, every computer accumulates software clutter, registry errors, and fragmented files that slow performance and create instability. A factory reset addresses all of these issues at once by removing everything and reinstalling a clean version of the operating system. It’s one of the most effective fixes for a wide range of problems that other solutions simply can’t fully resolve.
Beyond troubleshooting, a factory reset is essential when you’re selling or donating your desktop. It protects your personal data by wiping your accounts, files, and browsing history from the machine. It also ensures the next user gets a clean, fully functional system. For Lenovo desktops specifically, the built-in recovery tools make this process more straightforward than many users expect, reducing the need for external software or technical support.
Step-By-Step Guide To How To Restore Lenovo Desktop To Factory Settings
Step 1: Back Up Your Important Files First
Before you do anything else, back up every file you want to keep. A factory reset permanently deletes all personal files, installed applications, and custom settings — and there is no undo option once the process begins. Connect an external hard drive, use a USB flash drive, or upload your most important documents, photos, and media to a cloud storage service like OneDrive or Google Drive.
Think carefully about what you might be forgetting — browser bookmarks, saved passwords, game data, and work documents all count. Give yourself enough time to do this backup properly rather than rushing through it. Once you’re satisfied that everything important is safely stored somewhere outside of your desktop, you can move forward knowing you won’t lose anything that matters to you.
Step 2: Make Sure Your Desktop Is Plugged In
This step sounds simple, but it’s genuinely important. A factory reset can take anywhere from 30 minutes to over an hour, depending on your system configuration and the reset method you choose. If the power cuts out partway through the process, it can leave your operating system in a broken, partially reset state that may be very difficult to repair without reinstalling Windows from scratch.
Before you begin, make sure your Lenovo desktop is connected directly to a power outlet rather than running through a power strip with other devices. You won’t be using the desktop for anything else during the reset, so this is a good time to close all open programs and save any work you might have left open. A stable power connection from start to finish protects the entire process.
Step 3: Open The Windows Settings Menu
With your files backed up and your desktop plugged in, it’s time to start the reset process. Click the Start button in the bottom-left corner of your screen and then click the gear icon to open the Settings menu. From there, select “Update & Security,” which is where Windows keeps the recovery and reset tools. This path is the same for Windows 10, and slightly different for Windows 11 — but both versions give you straightforward access to the reset option.
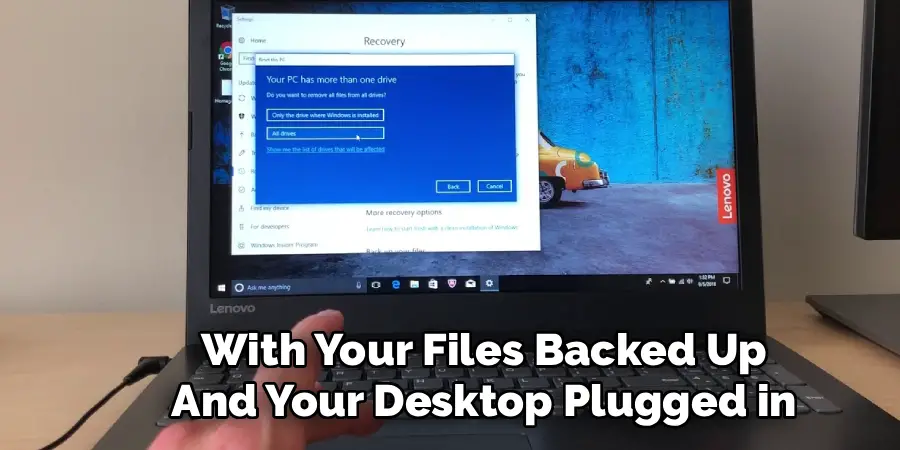
If you’re using Windows 11, go to Settings and then navigate to “System,” followed by “Recovery.” Either way, the options available to you are similar. Take a moment to read through the descriptions on screen before clicking anything. The language Windows uses here is clear and direct, and understanding each option before proceeding ensures you select the right type of reset for your situation.
Step 4: Select The Reset This PC Option
Inside the Recovery section, you’ll find the option labeled “Reset this PC.” Click the “Get started” button beneath it. Windows will then present you with two primary choices: “Keep my files,” which removes apps and settings but leaves your personal files intact, and “Remove everything,” which performs a full wipe of all files, apps, and settings.
For most situations — especially when preparing the desktop for a new owner or resolving deep software problems — “Remove everything” is the right choice. If you’re simply trying to fix performance issues and don’t want to lose your files, “Keep my files” may be sufficient. Choose the option that fits your specific goal, and the process will guide you through a few more confirmation screens before anything is permanently changed.
Step 5: Choose How To Reinstall Windows
After selecting your reset type, Windows will ask how you’d like to reinstall the operating system. The two options are “Cloud download,” which downloads a fresh copy of Windows directly from Microsoft’s servers, and “Local reinstall,” which uses the recovery files already stored on your desktop. Cloud download tends to produce a cleaner result but requires a reliable internet connection and can use several gigabytes of data.
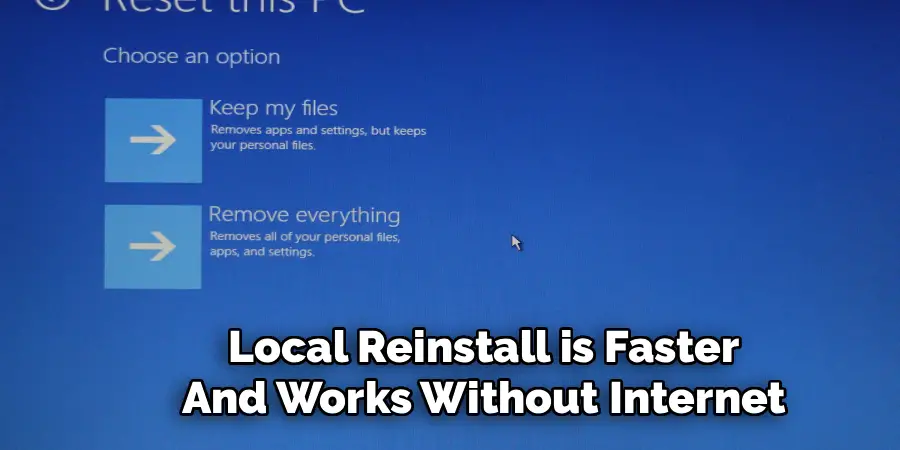
Local reinstall is faster and works without internet access, making it a good choice if your connection is slow or unreliable. For most Lenovo desktop users going through how to restore lenovo desktop to factory settings for the first time, local reinstall is the more practical option — it’s reliable, quick, and doesn’t require anything beyond what’s already on the machine. Both options lead to the same outcome, so choose based on your circumstances.
Step 6: Confirm Your Settings And Start The Reset
Before the reset begins, Windows will display a summary screen showing exactly what it’s about to do based on the choices you’ve made. Read through this carefully. It will confirm whether files will be deleted, whether drives will be cleaned, and which reinstall method you’ve selected. This is your last chance to change any setting before the process starts.
If everything looks correct, click “Reset” to begin. Your desktop will restart automatically and enter the recovery environment. You’ll see a progress screen with a percentage indicator — this is normal and expected. Do not turn off your computer during this phase, even if the progress bar seems to stall. The reset process handles many internal operations that don’t always update the screen in real time, and interrupting it can cause serious problems.
Frequently Asked Questions
Will A Factory Reset Remove Viruses Or Malware From My Desktop?
In most cases, yes. A factory reset wipes the operating system and reinstalls it cleanly, which removes the vast majority of viruses, malware, and spyware. However, certain advanced threats can survive a reset if they’ve embedded themselves in the firmware or a separate partition. For most everyday infections, though, a complete factory reset is one of the most effective ways to fully clean an infected machine.
How Long Does A Factory Reset Take On A Lenovo Desktop?
The time varies based on your system specs and the reset method you choose. On average, expect the process to take between 30 minutes and 90 minutes from start to finish. Cloud download resets take longer because they need to download Windows from Microsoft’s servers first. Local reinstall is typically faster. Either way, plan to leave the desktop undisturbed for at least an hour to be safe.
Can I Cancel A Factory Reset Once It Has Started?
You should not attempt to cancel a factory reset once it has started. Interrupting the process — whether by turning off the machine or forcing a shutdown — can leave the operating system in a corrupted state that is difficult or impossible to recover from without outside help. If the reset is taking longer than expected, leave it running. It will complete on its own given enough time and a stable power connection.
Do I Need A Windows License Key After Resetting My Lenovo Desktop?
No, you typically do not. Lenovo desktops that came with Windows pre-installed have the license key embedded in the firmware. When Windows reinstalls after a factory reset, it automatically detects and activates using that stored key. As long as you’re reinstalling the same version of Windows that originally came with the machine, activation happens automatically without any input from you.
What Happens To Lenovo-Specific Software After A Factory Reset?
Some Lenovo software, such as the Lenovo Vantage app, may reinstall automatically as part of the recovery process, especially if you used local reinstall. If it doesn’t appear after the reset, you can download it directly from Lenovo’s official website at no cost. Vantage is useful for managing drivers, checking for hardware updates, and monitoring system health, so it’s worth reinstalling if it doesn’t come back on its own.
Conclusion
A factory reset is one of the most powerful tools available to any Lenovo desktop user, and it’s far more accessible than most people assume. You’ve covered the full process — from backing up your files and choosing the right reset option to completing the Windows setup afterward and getting your system updated. Each step builds on the last, and following them in order gives you the best chance of a smooth, successful outcome.
Now that you understand how to restore lenovo desktop to factory settings from start to finish, you’re equipped to handle one of the most common and effective PC troubleshooting solutions on your own. Take the time to back up your data carefully, follow each step without rushing, and you’ll have a clean, fast, and fully functional desktop ready to use in less time than you might expect.
