
Moving to a new home is an exciting chapter, but the process of getting there can be challenging.
Among the many items you need to pack, furniture often presents the biggest puzzle. Chairs, with their unique shapes, legs, and delicate finishes, are particularly prone to damage during a move. A single scratch, a broken leg, or a torn seat can be a frustrating and costly outcome. Taking the time to wrap your chairs correctly is a small investment that pays huge dividends, ensuring they arrive at your new home in the same condition they left.
This guide on how to wrap chairs for moving will walk you through everything you need to know to protect your seating and make your relocation smoother.

What Are the Benefits of Wrapping Your Chairs?
- Protection From Scratches and Dents: By wrapping your chairs, you can prevent them from getting scratched or dented during the move. This is especially important for delicate materials like wood or metal.
- Prevention of Broken Legs or Torn Seats: A well-wrapped chair can also protect against more serious damage, such as broken legs or torn seats. This can save you the hassle and expense of repairing or replacing your chairs later on.
- Easy to Transport: Wrapped chairs are typically easier to carry and transport, as they are less likely to slip out of your hands or get tangled up with other items. This makes the moving process smoother and safer for both you and your movers.
What Will You Need?
- Moving Blankets or Furniture Pads: These are your first line of defense against scratches, dings, and impact.
- Bubble Wrap: Ideal for protecting delicate parts like carved legs, armrests, and chair backs.
- Plastic Stretch Wrap: Use this to secure moving blankets and bubble wrap in place. It keeps everything tight and protected from dust and moisture.
- Packing Tape: A good-quality packing tape is crucial for securing bubble wrap and sealing any loose ends.
- Scissors or a Box Cutter: For easily cutting tape, stretch wrap, and bubble wrap.
- Furniture Sliders: Optional but highly recommended for moving heavy chairs across the floor without scratching it.
- Cleaning Supplies: A soft cloth and a gentle cleaner to wipe down your chairs before packing.
10 Easy Steps on How to Wrap Chairs for Moving
Step 1: Clean and Fully Prepare Each Chair
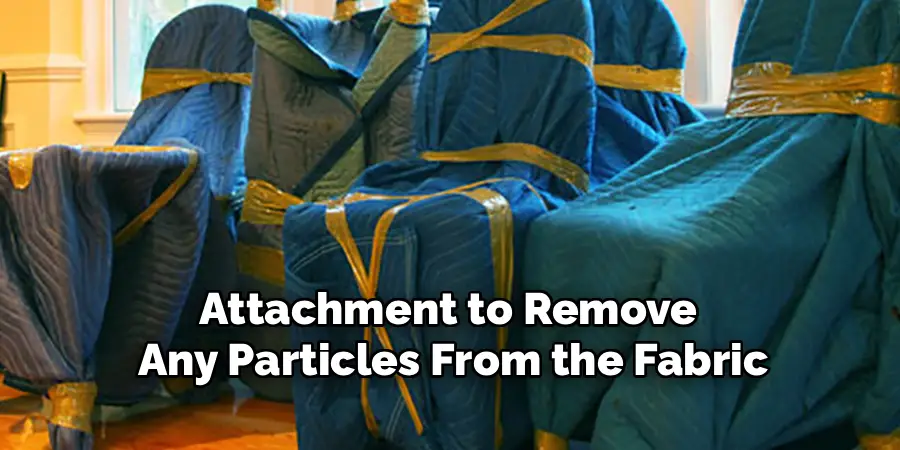
Before any wrapping material touches your furniture, it’s crucial to give each chair a thorough cleaning. Dust, crumbs, and other small debris left on the surface can become abrasive agents during transit. The constant vibrations of a moving truck can cause this grit to rub against the finish, creating fine scratches and dulling the surface.
Use a soft, damp cloth to wipe down wood or metal frames. For upholstered chairs, use a vacuum with a brush attachment to remove any particles from the fabric. Make sure the chairs are completely dry before you move on to the next step, as trapping moisture can lead to mold, mildew, or water stains, especially on long-distance moves. This small preparatory step preserves the integrity and beauty of your furniture.
Step 2: Disassemble What You Can
Take a moment to inspect your chairs for any removable parts. Many dining chairs have legs that can be unscrewed, office chairs often have removable bases and armrests, and some armchairs have detachable cushions. Disassembling chairs makes them less bulky and awkward to handle, which simplifies the wrapping process and makes them easier to stack and load onto the truck.
It also reduces the risk of protruding parts getting snagged or broken. Keep all hardware, like screws and bolts, in a small, labeled plastic bag. Securely tape this bag to the underside of the main chair seat so you can easily find it during reassembly at your new home. This avoids the frustration of lost parts.
Step 3: Individually Wrap the Legs
Chair legs are one of the most vulnerable parts during a move. They are slender, stick out, and often bear the brunt of impacts and scrapes. To protect them, wrap each leg individually and meticulously with bubble wrap. Start at the top of the leg and work your way down, overlapping the layers for complete coverage. For simple, sturdy legs, two or three layers will be sufficient. If your chairs have ornate, carved, or particularly delicate legs, be more generous with the padding. Once a leg is fully wrapped, secure the bubble wrap with a small piece of packing tape. This prevents the padding from shifting and ensures the legs are shielded from every angle.
Step 4: Pad Armrests, Backs, and Delicate Details
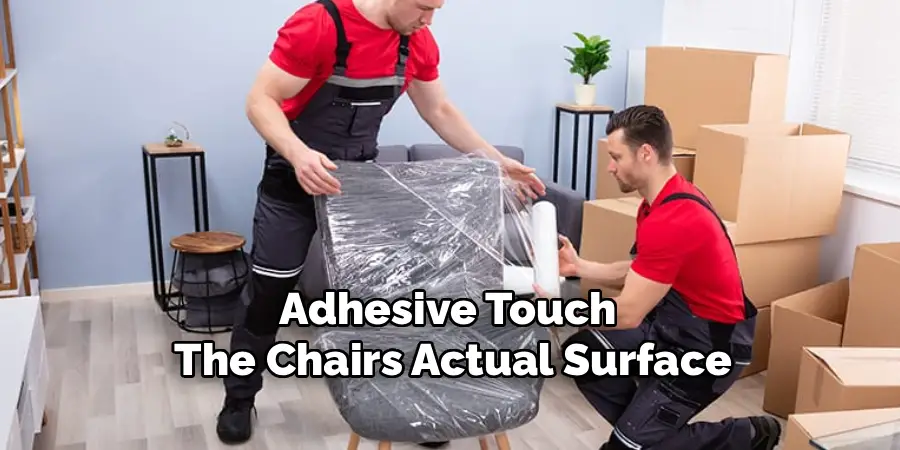
After securing the legs, turn your attention to other high-contact and fragile areas. Armrests, the crest rail (top of the back), and any decorative carvings are prone to getting bumped, dinged, or scuffed. Wrap these sections carefully with bubble wrap, ensuring all corners and exposed edges are well-padded. Mold the bubble wrap around the unique shapes of your chair. Use packing tape to hold the padding in place, but be careful not to let the tape’s adhesive touch the chair’s actual surface. Applying tape directly to wood, paint, or fabric can cause damage when removed, stripping the finish or pulling fibers. Always apply tape over the protective layer of bubble wrap.
Step 5: Drape with a Moving Blanket
Now it’s time for the primary layer of defense. Drape a thick moving blanket or furniture pad over the entire chair. These blankets are specifically designed to absorb shock and prevent scratches. For a standard dining chair, a single blanket should provide enough coverage.
For larger pieces like recliners or oversized armchairs, you may need to use two blankets, overlapping them to ensure no part of the chair is left exposed. Make sure the blanket conforms to the shape of the chair, leaving no loose, baggy areas. A snug fit is key to effective protection.
Step 6: Secure Everything with Stretch Wrap
Plastic stretch wrap is the key to holding your entire protective bundle together. It acts like industrial-strength plastic wrap, creating a tight and secure cocoon around the chair. Start at the top of the blanket-draped chair and begin wrapping, pulling the stretch wrap taut as you go.
Overlap the layers by about 50% as you work your way down to the bottom. This tension is what keeps the moving blanket firmly in place, preventing it from slipping off during handling. The stretch wrap also adds an invaluable layer of protection against dust, dirt, and moisture.
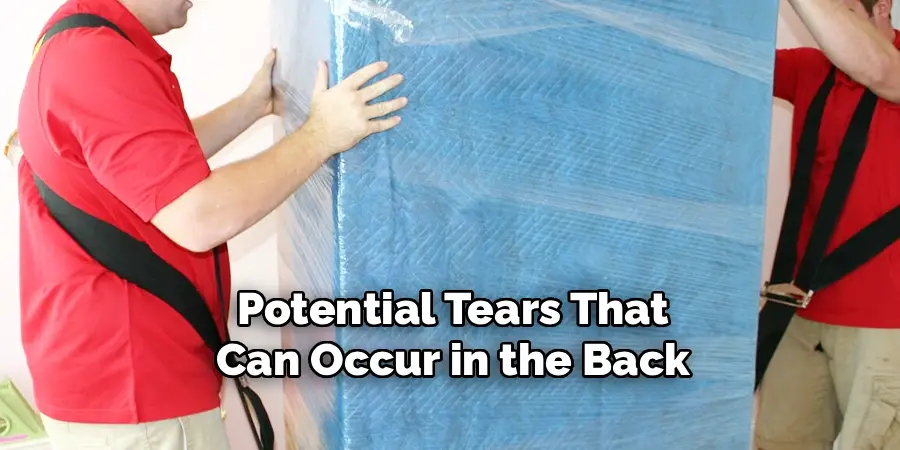
Step 7: Protect Upholstery from Grime and Rips
If you are moving upholstered chairs, particularly those with light-colored or delicate fabric, the combination of a moving blanket and stretch wrap is essential. Before you apply the stretch wrap, double-check that the moving blanket completely covers all fabric surfaces. The blanket will prevent the plastic from directly touching the upholstery, which could potentially cause condensation, while the stretch wrap provides a formidable barrier against dirt, spills, and potential tears that can occur in the back of a moving truck. This two-step process keeps your seating fresh and clean.
Step 8: Create a Supportive “Diaper” Wrap
For chairs that have open space between the seat and the legs, you can add extra stability by creating a “diaper” with the stretch wrap. After you’ve wrapped the main body of the chair, run the stretch wrap from the front of the seat, down and under the legs, and up to the back of the seat. Repeat this from side to side. This technique weaves a supportive web that helps secure the individually wrapped legs, preventing them from wiggling or shifting, and adds structural integrity to the entire wrapped package.
Step 9: Label for Easy Unpacking
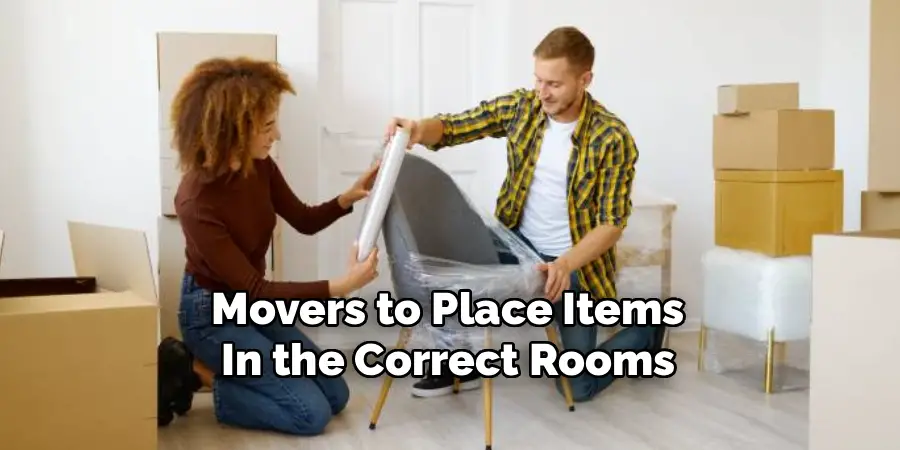
Once a chair is fully wrapped, it can be difficult to tell what it is or where it belongs. To save yourself a headache on unpacking day, label each piece. Use a permanent marker to write directly on the stretch wrap or on a piece of packing tape applied to the outside. Simple labels like “Dining Chair,” “Living Room Armchair,” or “Desk Chair” are effective. This simple organizational step allows movers to place items in the correct rooms and helps you prioritize what to unwrap first.
Step 10: Perform a Final Quality Check
Your last step is a final inspection. Run your hands over the entire surface of the wrapped chair. Feel for any sharp corners or edges that might have poked through the padding. Check for any areas that feel thin or insufficiently protected and add more bubble wrap or another layer of stretch wrap if needed. Ensure all tape is firmly stuck down and that there are no loose flaps of blanket or wrap that could get snagged. A properly wrapped chair should feel solid, compact, and fully shielded, ready for its journey.
5 Things You Should Avoid
Proper wrapping is just as much about what you don’t do as what you do. Avoid these common mistakes to prevent damage.
- Applying Tape Directly to Surfaces: Packing tape adhesive can strip paint, wood finish, and even fabric fibers. Always apply tape over bubble wrap or moving blankets, never directly on the chair.
- Skipping the Cleaning Step: Packing a dirty chair can lead to permanent scratches. Grit and dirt trapped under the wrapping will act like sandpaper during the vibrations of the move.
- Using Insufficient Padding: A single, thin layer of bubble wrap won’t protect against a significant impact. Be generous with your padding, especially on corners and delicate parts.
- Leaving Gaps in the Wrapping: Any exposed area is a potential spot for damage. Ensure your moving blankets and stretch wrap provide complete coverage from top to bottom.
- Stacking Improperly: Never stack heavy boxes or other items on top of wrapped chairs in the moving truck. Their shape is not designed to support weight, and doing so can lead to broken frames or legs.

Conclusion
Moving can be a source of stress, but damage to your treasured furniture doesn’t have to be part of it.
By investing a little time and using the right materials, you can wrap your chairs like a professional. Following these steps ensures that every chair—from your functional office seat to your heirloom dining set—arrives safely at your new destination.
Hopefully, the article on how to wrap chairs for moving has given you some useful tips and tricks. Happy moving!